
© 2024 Pashant Khandelwal

© 2024 Pashant Khandelwal
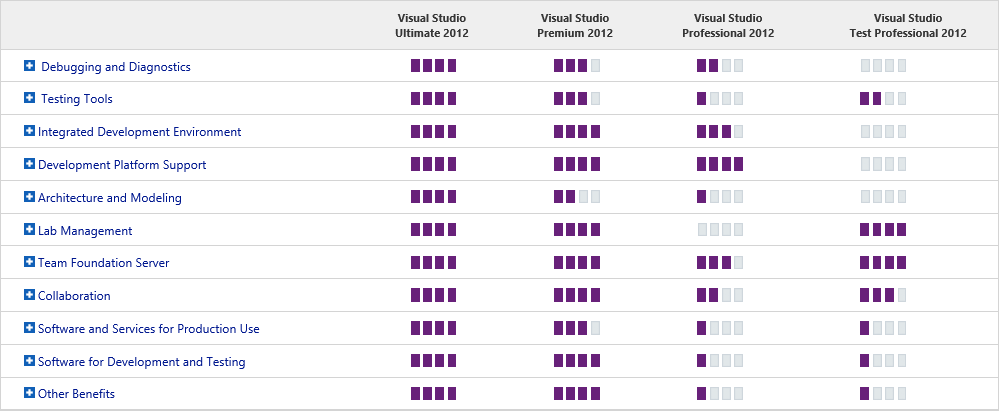
Visual Studio 2012 is now available and here is a chart that compares the features of different versions of Visual Studio 2012.
I took a look at Stack Overflow Stack-Exchange Data Explorer that is built in MVC and is open-source application to query the Stack Exchange data dump that is being provided by Stack Exchange team in every month or few. I do have a dump, but I was more curious to know about the application that they built to query the database. And I must admit that I learned tons of things. I came to know the power of Micro-ORM (Dapper) over Entity-Framework (EF) and one more pretty thing that attracted me was the routing mechanism used in the application. I strongly recommend that you check out this tool/application and take a deep dive in the code, lot of things to learn.
Before we start writing the code, we’ll take a quick look at a NuGet package AttributeRouting. You can find the source code at GitHub in case if you are interested. The documentation is simple and explains almost every bit of the package. It’s incredibly easy.
The NuGet package I am using is for MVC, if you want to do the same with your Web API application then use this package.
To see how easy it is to implement routing in your MVC application. Start Visual Studio and create a new MVC4 (Internet) application and fire up the below NuGet command.

This command just don’t install one single package but also some other dependent packages. Here is the output when I fire the above NuGet command:
PM> Install-Package AttributeRouting
Attempting to resolve dependency 'AttributeRouting.Core (≥ 2.5.1.0)'.
Attempting to resolve dependency 'AttributeRouting.Core.Web (≥ 2.5.1.0)'.
Attempting to resolve dependency 'WebActivator (≥ 1.0.0.0)'.
Successfully installed 'AttributeRouting.Core 2.5.1.0'.
Successfully installed 'AttributeRouting.Core.Web 2.5.1.0'.
Successfully installed 'WebActivator 1.0.0.0'.
Successfully installed 'AttributeRouting 2.5.1.0'.
Successfully added 'AttributeRouting.Core 2.5.1.0' to MVCAttrRouteTest.
Successfully added 'AttributeRouting.Core.Web 2.5.1.0' to MVCAttrRouteTest.
Successfully added 'WebActivator 1.0.0.0' to MVCAttrRouteTest.
Successfully added 'AttributeRouting 2.5.1.0' to MVCAttrRouteTest.
Now before you make any changes to the web application, hit CTRL+F5. Hover or click on the links which are on the top which are About and Contact. The URL rendered in the address bar is something like this (as what specified in your application Global.asax file).
For About View:
/Home/About
For Contact View:
/Home/Contact
The Home that we see here is the name of the controller being used. I don’t want the name of the controller to be visible to my site visitors or maybe I just want a different name there. Usually, I would have switch to my application Global.asax file and register a new route there. But now I can now control my routes within controller itself. This is pretty cool for and a time saver, as I do not have to avoid working with Global.asax. This is the simplest implementation of AttributeRouting. Below are the 2 Home controller methods About and Contact:
[GET("About")]
public ActionResult About()
{
    ViewBag.Message = "Your app description page.";
    return View();
}

[GET("Contact")]
public ActionResult Contact()
{
    ViewBag.Message = "Your contact page.";
    return View();
}
There are no changes in the method, only the routing attribute has been added. The URLs for About and Contact are now free from the controller name Home. Now we look at a second condition where I want to have a totally different URL for About view or to be specific I would say I want to have outbound URLs and this will require RouteName property with the routing attribute. This is called Named Routes. I am going to change the URL to /App/AboutMe.
[GET("App/AboutMe", RouteName = "About")]
public ActionResult About()
{
    ViewBag.Message = "Your app description page.";
    return View();
}
Working with parameters without routing can lead to very ugly URLs or some un-wanted params in the URLs. Again to have a clean URL we can handle the parameters passed to the controller action. I have added a new view named Welcome (no scaffolding) in the Home controller and added a ViewBag property GreetMessage. When this view is called, it will display a greeting message in a heading. The GreetMessage will hold the name of the person, which is our parameter. Below is our controller action:
[GET("App/Greet/{name}")]
public ActionResult Welcome(string Name)
{
    ViewBag.GreetMessage = "Welcome " + Name;
    return View();
}
The URL that is rendered on the browser is:
http://domain.com/App/Greet/Prashant
/App/Greet/ is the URL we want to show and Prashant is the parameter is being passed to the Welcome view.
This is it for this tutorial but this is not it. The AttributeRouting package has to offer a lot of things and has a very powerful and easy way of routing. There are very advance topics that are documented at GitHub.
Related Links:
If you are freelancing or working from home, then you must have some productivity tools which can really make your work from home a lot better. Why one has to invest in a service that can be available with no cost at all? Though some services are good enough to pay for, but I suggest one should not get them unless you really need one.
I have been blogging and in a job for now almost 4 years and as a programmer I am a really big fan of open-source projects which have made my/our life easy without spending a single dime. While working from home and having a decent broadband connection I utilize the power of net and networking, but it can’t be possible if you are not using the right set of tools.
Skype: After the software giant acquired Skype, the best VOIP tool saw lot of updates. Apart from just having your Skype contacts you can now also connect to your Facebook contacts. You can chat and make a video call, conference call (paid for video, if you have more contacts in conference, not applicable to Facebook contacts). You have other alternatives like Google Hangouts, but Skype has better voice quality over Google Hangout (my experience). Skype also allows you to record the conversation using free third-party tools like CallBurner which will allow you to record voice calls you have with your colleagues and clients so you can have a reference with you later on in case you forget something. Skype also have a desktop sharing feature that is worth checking out.
Tweet Deck / Metro Twit: If you want to keep a keen eye on your Twitter account and followers then use these desktop applications without even opening the browser. I personally used both of these applications and both of them are good. I like Tweet Deck over Metro Twit as it also has notifications for Facebook, but Metro Twit has its own awesomeness. I recommend you to take a look at both of these tools and then decide which one to stick with.
Join.me: Sharing prototypes and communicating with clients is a problem that mostly every freelancer suffers. It’s not a big problem but still we cannot share everything on e-mail, and the deliverables should reach client only when it is the right time and not before. How would you feel if you created a prototype of a website and share the design files with the client on e-mail? May be he will never get back to you and use your design prototype in his project with slight modification. Though there is an NDA signing and other legal docs, but why take chances? Join.me is a perfect solution through which you can easily share your screen with your clients and show them the prototype from your place. This perfect little application will download a client application nd generates a unique ID, which you can share with the clients or with your team members. Join.me Works on HTTPS and is a secured and reliable way to share your screen.
Gmail Notifier Plus: Keeping in touch with your clients and colleagues is the key to success for a freelancer. An e-mail plays this part very well and no other tool or mechanism can take this place. But why Gmail Notifier Plus? Well, I own a domain and shared hosting and e-mail service. The default e-mail server is ridiculous which is why I shifted to Google Apps and now I have a peace of mind that my e-mails will never went down. I use MS Office Outlook as my primary e-mail client, but while I am on the move or I am out I use web to access my e-mails. Gmail Notifier Plus is not an e-mail client but it notifies you if any new e-mail arrives in your inbox. Just in case if you are not into your e-mail client or in case you don’t have one, this small utility make sure that you just don’t miss an important e-mail. As a Google App user you will really like this tool as it notifies you on your desktop for a new e-mail and has a very decent integration with Windows 7 as it adds e-mail alerts in the taskbar.
There should be a very good reason if you are not using any of the cloud services out there. I am using these services since their launch and I have gigs of files stored on the cloud which are synced on my machine and as well as on my co-worker’s machine.
SkyDrive: With recent big update SkyDrive is in lime light and is also offering paid service for biz users. We have data but not so much that we have to buy additional space. I have been using SkyDrive since its launch and I have 2 accounts with 25GB each. The new users will get 7GB of space but for old users Microsoft gave some time to claim your old whooping 25GB of space. It not just about putting your stuff to cloud, but it is about how much you are making out using the service. It’s free, but is it beneficial? Yes, it is. With SkyDrive desktop application I can now share my files by just dropping it into a folder which is linked to my SkydDrive. It automatically starts syncing the files when I change anything in the linked folder or vice-versa. I can also access my storage using web interface. If you are new to SkyDrive then you want to know how to setup SkyDrive desktop app for online storage. I choose SkyDrive as the best option to share files among co-workers and clients.
Google Drive: Similar to SkyDrive, I am not using it right now but Google Drive also comes up with a desktop utility which sync files between user desktop and cloud. At the moment Google Drive is offering free users a 5GB of space.
Microsoft Office WebApps / Google Docs: Sharing files with clients and co-workers on e-mails can be tedious and sometimes irritating when the changes are just too small. Using WebApps and Google Docs allows you to share files among clients and co-workers and also to make changes which will reflect in a jiffy. Office WebApps have a very efficient integration with Microsoft Office Products and you should use Office WebApps if you own Office Suite. Just in case if you are wondering, Office WebApps also have integration with SkyDrive.
Apart from these you can try using Amazon Cloud Drive and DropBox.
Paint.NET: An undergraduate college project turns out to be a replacement for Microsoft Paint. Some people says that this is a replacement of Photoshop. I would rather say that Paint.NET has awesome features and also have amazing plugins and filter effects but not a complete replacement of Photoshop. For basic and for some advance photo editing Paint.NET is just perfect. Who can’t afford the license of Photoshop should use this tool.
KeePass: It’s free, open-source and built with .NET. If you have a problem remembering your user name and password then this tool is meant for you. It allows you to save the credentials and URLs of the website and other confidential information in the encrypted database. You can also take the backup of the database and place it on a remote server. You can login to any of the site using your credentials with a press of a button. The feature I like most in this utility is that it auto-fills the user name and password and auto-login to the website and that too with the press of a (hot) key.
You must store your credentials in your head and nowhere else.
Notepad++: A perfect notepad replacement. Includes syntax highlighting and more features than your traditional notepad editor.
RDCMan: A free light-weight tool from Microsoft to establish remote desktop connection. I work on 2 Windows machines and 1 Linux machine. I can now easily manage multiple remote connections with ease. A must have if your home/office network have more than 1 computer.
FileZilla: A free, open-source FTP client. Start using it now and replace it if you running any other FTP client.
Evernote: While working you keep on writing notes, but you forgot to save it or you forgot where you saved it. This tool will help you in to keep track of your notes you made and also serve as a to-do manager.
AutoHotkey: Automate keystrokes, mouse clicks with a little bit of scripts and lot more to do. I highly recommend you to use this because it will save you a hell of time. Awesome, free and open-source.
Web is an ultimate resource of information and you can use the best of it. Here are few of them which I feel should be in your bookmark list.
LogMeIn: If you know Join.me then you also know about LogMeIn. LogMeIn is a free/paid service through which you can take remote control of your computer. I use a free service to take remote of my home machine while I am at work and it is all fun if the sysadmin has blocked social networking sites. If we look from a different perspective, you can access any PC remotely (of course, you must have a logmein client installed on that machine) and in a co-working environment where your co-worker is on a remote location, this service is a life-saver as you can have a full access to the remote machine.
TeamLab: A highly intutive application for small business. As working in a team you should use this to track the progress of your on-going projects. This is free and open-source software which you can also download and host it on your network or on a sub-domain. If you don’t want to get into much trouble, then sign up for the free service on Teamlab site.
del.icio.us: A famous bookmarking site to save and share your bookmarks with others. As a freelancer you should be doing a lot of RnD and you must have lots of links. Save it and share it with others so you never have to lose an important bookmark if your system crashes.
PayPal: Do I have to say something about this service which dominates the mode of online payment. I believe everyone has one.
Markup.io: Discuss site design more specifically without sharing your screen. Mark it up on the page and share it with others.
There can be more of them and it all depends on the user and the way they are working. My list ends here, but if I found something useful, I’ll share it here. Feel free to leave comments and share any other tool/utils/service you are using.
Microsoft made it available a free e-book for developers to understand UX Guidelines for Metro styled apps for Windows 8 and that too for both PC and tablets. This is an awesome resource which will let you know the basics and fundamentals while designing applications for PC annd tablets. As we all know that Windows 8 is the new OS with new UI design (metro) and it is necessary for every developer to know the basics before he starts developing the application for PC or for tablets. The e-book has it all from planning a metro app to making a stylish metro app.
Download your copy today.
Yesterday, while working on a project I came across a weird problem while working with Colorbox jquery plugin and ASP.NET. The problem is not only with Colorbox but also with another famous plugin called Fancybox. If you plan to use the plugine just to show dialog boxes, then this plugin works perfectly fine. Integrating the plugin with ASP.NET works fine but prevents post back if you have server controls on the colorbox dialog box (which is actually an invisible div on the page). ASP.NET developers can consider this as a bug but actually it’s not a bug, but a scenario missed in the plugin.
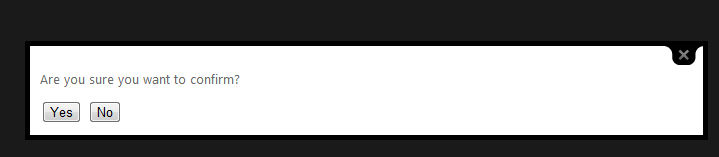
I have a button click for button labelled Yes which redirects me to the about page. Now when you try to click the button there will be no post back event. This is because Colorbox renders the div outside the form tag which hinders the post back event.
Now to overcome this problem, you need to jump inside the Colorbox plugin code. The main function that add the content to the DOM or on the page is called appendHTML.
function appendHTML() {
    if (!$box && document.body) {
        init = false;

        $window = $(window);
        $box = $tag(div).attr({ id: colorbox, 'class': isIE ? prefix + (isIE6 ? 'IE6' : 'IE') : '' }).hide();
        $overlay = $tag(div, "Overlay", isIE6 ? 'position:absolute' : '').hide();
        $wrap = $tag(div, "Wrapper");
        $content = $tag(div, "Content").append(
            $loaded = $tag(div, "LoadedContent", 'width:0; height:0; overflow:hidden'),
            $loadingOverlay = $tag(div, "LoadingOverlay").add($tag(div, "LoadingGraphic")),
            $title = $tag(div, "Title"),
            $current = $tag(div, "Current"),
            $next = $tag(div, "Next"),
            $prev = $tag(div, "Previous"),
            $slideshow = $tag(div, "Slideshow").bind(event_open, slideshow),
            $close = $tag(div, "Close")
        );

        $wrap.append( // The -1x3 Grid that makes up ColorBox
            $tag(div).append(
                $tag(div, "TopLeft"),
                $topBorder = $tag(div, "TopCenter"),
                $tag(div, "TopRight")
            ),
            $tag(div, false, 'clear:left').append(
                $leftBorder = $tag(div, "MiddleLeft"),
                $content,
                $rightBorder = $tag(div, "MiddleRight")
            ),
            $tag(div, false, 'clear:left').append(
                $tag(div, "BottomLeft"),
                $bottomBorder = $tag(div, "BottomCenter"),
                $tag(div, "BottomRight")
            )
        ).find('div div').css({ 'float': 'left' });

        $loadingBay = $tag(div, false, 'position:absolute; width:9999px; visibility:hidden; display:none');

        $groupControls = $next.add($prev).add($current).add($slideshow);

        $(document.body).append($overlay, $box.append($wrap, $loadingBay));
    }
}
In the above method (which is an extract from the plugin), notice that the plugin is focusing on document.body whereas in order to get it working with the post back events we need to change the above highlighted lines with the one below:
if (!$box && document.forms[0]) {
And
$(document.forms[0]).append($overlay, $box.append($wrap, $loadingBay));
After the changes have been made, it’s time to check again. Try clicking the button and check again. This time you will be redirected to the about page. Although, this seems to be simple problem, but there will be few fellow programmers who will scratch their head if they stuck in this sort of a problem. Hope this helps someone out there.