
© 2025 Pashant Khandelwal

© 2025 Pashant Khandelwal
I am now using Windows 7 since its beta release and so far my experience is awesome. But as a developer the hard drive space is always been a problem for me, no matter how many external drives or other stoarge devices you have connected to your machine but the disk space on the host machine is always a primary problem. Windows 7 is more stable OS in Windows family so far (I found it more stable than Win XP) and the reason it is being more stable because everytime you install a program on your Win 7 machine, it automatically creates a snapshot of the host drive. This is because if anything goes wrong with the program or it just crashes causing problems, Windows 7 can recover automatically from that state with the snapshot created before the installation.
But these snapshots hogs up a lot of hard drive sapce and there is no way that you can copy them and place it in a different drive or just change the location of the snapshots been taken by the OS. Therefore to maintain the balance, the OS automatically deletes the last/oldest snapshot from the hard drive resulting some free space for the user and for other processes of the system. If you no longer require the snapshots (only if you think that your machine is running perfectly fine) execute the below command to delete all the snapshots created so far:
c:\>vssadmin delete shadows /for=c: /all
In the above command /for parameter should have the letter of your Windows OS drive. In my case it is C: (as in majority of the cases it will be C:)
Just in case if you don’t want to delete all the snapshots then instead of using the /all parameter use the /oldest parameter. This will dleete the oldest snapshot from the drive:
c:\>vssadmin delete shadows /for=c: /oldest
This will free up some GIGs of space if you are using it for the first time and if you are using it quite frequently then also you end up with MBs of free space.
![]()
To locate a place on maps (Bing or Google), the best thing is to get the latitude and longitude of the location, this ensures that the place we are pinning on the map is accurate. But the big question is to where to get the latitude and longitude of the location. There might be a web service for getting the latitude and longitude of a location, but wouldn’t it be nice if you just have to query a local database?
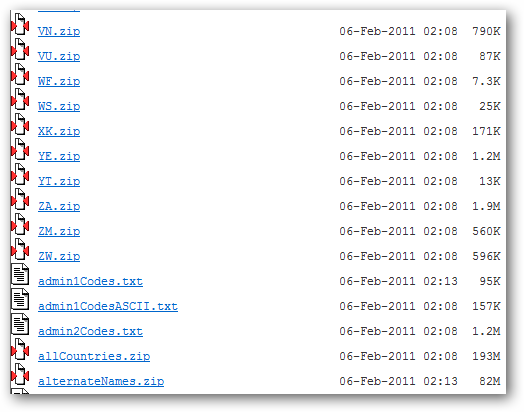
Apart from providing free web services and API Geonames.org also provides their data dumps which gets updated regularly. the best things about the data dumps are that they are distributed country-wise, city-wise etc. If you wish to download the data country wise, then you can download the file(s) which are named according to the countries IATA codes. The one I am using for this example is the allCountries files from the dumps. Download this dump only if you want to have ALL the Geoname data.
The dump can be imported in the database using the Data import-Export wizard present in the SQL Server or you can write a custom tool to import the whole dump. The dump is in a TAB delimited format. Just in case if you are not aware, the file you downloaded is in UTF-8 encoding and therefore you need it to convert it to UTF-16 encoding before you actually import it into the database. There is a command line tool which will help you to convert the database dump to UTF-16 which I got from the Geoname forums.
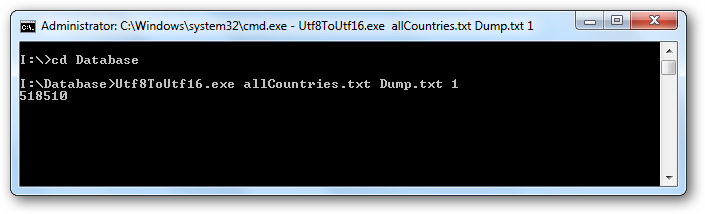
This tool will convert the format of the dump file from UTF-8 to UTF-16. After the successfull conversion of the file, now comes the time to import the data in the database.
Create a database table:
CREATE TABLE GeoNames(
geonameid int NOT NULL,
name nvarchar(200) NULL,
asciiname nvarchar(200) NULL,
alternatenames nvarchar(max) NULL,
latitude float NULL,
longitude float NULL,
feature_class char(2) NULL,
feature_code nvarchar(10) NULL,
country_code char(3) NULL,
cc2 char(60) NULL,
admin1_code nvarchar(20) NULL,
admin2_code nvarchar(80) NULL,
admin3_code nvarchar(20) NULL,
admin4_code nvarchar(20) NULL,
population bigint NULL,
elevation int NULL,
gtopo30 int NULL,
timezone char(31) NULL,
modification_date date NULL
)
To import millions of records you can write a custom tool or you can use the SQL Server Data Import/Export Data wizard. I have wrote a custom tool to import, but you can use the T-SQL’s BULK INSERT (because it is simple and easy) to import the dump.
BULK
INSERT GeoNames
FROM 'I:\Database\Dump.txt'
WITH(
DATAFILETYPE = 'widechar',
FIELDTERMINATOR = '\t',
ROWTERMINATOR = '\n'
)
The parameters in the above SQL statement is self-explanatory and therefore I am not going to brief them. But before you can start locating places with ASP.NET make sure you have indexed the table, if not then you will receive a SQL Server timed-out error.
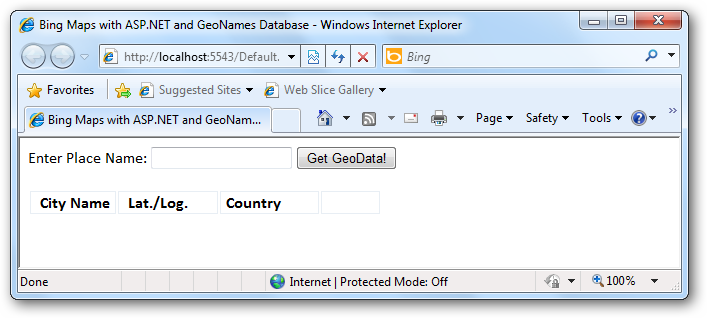
Our database is now ready and now we can start locating the places on the Bing maps. We have two pages in the project, one which we will be using to get the locations and their details on the basis of city name enter by the user and the other which will show the map with a push pin.
Default.aspx page:
<%@ Page Language="C#" AutoEventWireup="true" CodeBehind="Default.aspx.cs" Inherits="BingMap._Default" EnableViewState="true" %>

<!DOCTYPE html PUBLIC "-//W3C//DTD XHTML 1.0 Transitional//EN" "http://www.w3.org/TR/xhtml1/DTD/xhtml1-transitional.dtd">
<html>
<head>
    <title>Bing Maps with ASP.NET and GeoNames Database</title>
    <link href="Style/style.css" rel="stylesheet" type="text/css" />
</head>
<body>
    <form id="form1" runat="server" enableviewstate="true">
    Enter Place Name:  <asp:TextBox ID="txtPlaceName" runat="server" />
    <asp:Button ID="btnPlaceName" runat="server" Text="Get GeoData!" OnClick="btnPlaceName_Click" />
     <br />
    <br />
        <table id="GeoData" style="width: 55%;" enableviewstate="true">
            <tr>
                <td class="tdheader">
                      City Name
                </td>
                <td class="tdheader">
                      Lat./Log.
                </td>
                <td class="tdheader">
                     Country
                </td>
                <td>
                </td>
            </tr>
            <%for (int i = 0; i < RecCount; i++)
              {%>
            <tr>
                <td>

                    <%=CityName[i]%>
                </td>
                <td>

                    <%=Lat[i]%>
                    /
                    <%=Log[i]%>
                </td>
                <td class="country">

                    <%=Country[i]%>
                </td>
                <td>
                    <a href="BingMap.aspx?lat=<%=Lat[i]%>&log=<%=Log[i]%>&place=<%=CityName[i]%>" target="_blank">Show on Map</a>
                </td>
            </tr>
            <%}%>
        </table>
    <br />
   <asp:Label ID="RecFound" Text="" runat="server" />
    </form>
</body>
</html><br>
Code Behind: Default.aspx.cs:
using System;
using System.Collections.Generic;
using System.Linq;
using System.Web;
using System.Web.UI;
using System.Web.UI.WebControls;
using BingMap.DBModel;


namespace BingMap
{
    public partial class _Default : System.Web.UI.Page
    {
        WorldEntities world = new WorldEntities();
        public List<string> CityName = new List<string>();
        public List<string> Country = new List<string>();
        public List<string> Lat = new List<string>();
        public List<string> Log = new List<string>();
        public int RecCount = 0;

        private void GetLocation(string CName)
        {
            try
            {
                var WorldLoc = from l in world.Geonames
                               where l.name == CName
                               select l;

                foreach (var item in WorldLoc)
                {
                    CityName.Add(item.name);
                    Country.Add(item.country_code);
                    Lat.Add(Convert.ToSingle(item.latitude));
                    Log.Add(Convert.ToSingle(item.longitude));
                    RecCount = RecCount + 1;
                }

                if (RecCount == 0)
                {
                    RecFound.Text = "No Record(s) Found!";
                }

                else
                {
                    RecFound.Text = Convert.ToString(RecCount) + " Record(s) Found!";
                }
            }
            catch (Exception x)
            {
                Response.Write(x.ToString());
            }
        }

        protected void Page_Load(object sender, EventArgs e)
        {

        }

        protected void btnPlaceName_Click(object sender, EventArgs e)
        {
            if (Page.IsPostBack)
            {
                GetLocation(txtPlaceName.Text);
            }
        }
    }
}
here could be many places with the same name in different geographical locations. For example, if you query the database with San Francisco, you’ll find out it is not the only place on the planet in U.S. The same is with the city in India called Hyderabad, one is in India and the other is in Pakistan. But the geographical location is different and thus we can place a push pin on the maps.
I have used a different web page for the map. From the page Default.aspx page I will pass the information (latitude, longitude and place name) in query string to pin the location on the map.
BingMap.aspx:
<%@ Page Language="C#" AutoEventWireup="true" CodeBehind="BingMap.aspx.cs" Inherits="BingMap.BingMap" %>

<!DOCTYPE html PUBLIC "-//W3C//DTD XHTML 1.0 Transitional//EN" "http://www.w3.org/TR/xhtml1/DTD/xhtml1-transitional.dtd">

<html xmlns="http://www.w3.org/1999/xhtml">
<head runat="server">
    <title>Bing Map</title>
    <script type="text/javascript" src="http://dev.virtualearth.net/mapcontrol/mapcontrol.ashx?v=6.3"></script>

    <script type="text/javascript">
        function LoadMap() {
            map = new VEMap('BingMap');
            var Latitude = '<%= LocLat %>';
            var Longitude = '<%= LocLog%>';
            var PlaceName = '<%=Place %>';
            if (Latitude.length == 0 || Longitude.length == 0) {
                var latlong = new VELatLong(28.63576, 77.22445);

                map.SetDashboardSize(VEDashboardSize.Large);
                map.LoadMap(latlong, 9, VEMapStyle.Road);

                //Add pushpin
                var pin = new VEShape(VEShapeType.Pushpin, latlong);
                pin.SetCustomIcon(null);
                pin.SetTitle("New Delhi");
                pin.SetDescription("Capital City Of India");
                map.AddShape(pin);
                map.ShowDashboard();
            }
            else {
                var latlong = new VELatLong(Latitude, Longitude);

                map.SetDashboardSize(VEDashboardSize.Large);
                map.LoadMap(latlong, 9, VEMapStyle.Road);

                //Add pushpin
                var pin = new VEShape(VEShapeType.Pushpin, latlong);
                pin.SetCustomIcon(null);
                pin.SetTitle(PlaceName);
                pin.SetDescription("<br/>" + "<strong>Latitude:</strong>" + '<%=LocLat%>' + "<br/>" + "<strong>Longitude:</strong>" + '<%=LocLog%>');
                map.AddShape(pin);
                map.ShowDashboard();
            }
        }
    </script>

</head>
<body onload="LoadMap();">
    <form id="BingForm" runat="server">
    <div id='BingMap' style="position: relative; width: 800px; height: 600px;">

    </div>
    </form>
</body>
</html><br>
The client-side script is used to load the map. I have used the version 6.3 of the Bing Maps but you can also use the version 7.0. Though you need some additional parameters to use the latest one like the Bing Maps developer API key. The map can be set in the script tag.
A funtion named LoadMap() will doing the rest of the job, like setting the latitude, longitude, adding push pin to the location on the map and customizing other details on the map.
var latlong = new VELatLong(28.63576, 77.22445);
map.SetDashboardSize(VEDashboardSize.Large);
map.LoadMap(latlong, 9, VEMapStyle.Road);
The first line in the above script will set the latitude and longitude. The LoadMap method should always be called after SetDashboardSize. I have set the VEDashboardSize enumeration to Large you can also use Small if you want the navigation controls of the map to appear small. LoadMap method will take 3 parameters, the first is the reference of the latitude and longitude of the location, second is the Zoom Level, which is 9 in my case, you can adjust this value according to your requirement and the third option VEMapStyle enumeration will let you set the style for the map. It can be Road, Aerial, BirdEye etc (Click on the links to know more about these enumerations). And this is it, this will load the map in the browser showing the place of your choice with specified latitude and longitude.
To be more precise an beautify the Bing Map, we can also add a push pin at the specified location and that too can also be done with the help of the client-side script.
var pin = new VEShape(VEShapeType.Pushpin, latlong);
pin.SetCustomIcon(null);
pin.SetTitle(PlaceName);
pin.SetDescription("
" + "Latitude:" + '<%=LocLat%>' + "
" + "Longitude:" + '<%=LocLog%>');
map.AddShape(pin);
To add a new push pin to our location we need to use VEShape class. SetCustomIcon method allows to set the custom icon for your push pin. SetTitle method will set the description for you push pin. SetDescription method sets the description of the push pin, here in the description I have set the other information like location’s latitide and longitude. To add the push pin to the location the AddShape method of the map class will take pin as a parameter and set the push pin on the map.
For showing map I have used a different web page named BingMap.aspx which also includes the code behind (just a few lines) apart from client-side code:
BingMap.aspx.cs:
using System;
using System.Collections.Generic;
using System.Linq;
using System.Web;
using System.Web.UI;
using System.Web.UI.WebControls;

namespace BingMap
{
    public partial class BingMap : System.Web.UI.Page
    {
        public string LocLat = "";
        public string LocLog = "";
        public string Place = "";

        protected void Page_Load(object sender, EventArgs e)
        {
            if (Request.QueryString.AllKeys.Length > 0)
            {
                LocLat = Request.QueryString["lat"].ToString();
                LocLog = Request.QueryString["log"].ToString();
                Place = Request.QueryString["place"].ToString();
            }

            if (LocLat.Equals("") || LocLog.Equals(""))
            {

            }
        }
    }
}
In the code-behind I will check on page load if the count of the query string passed on to the page is greater than zero, if the condition is true then I will set the values in the public variables and set them on the client-side script which actually handles the loading, locating and adding push pin on the map. The URL on calling the BingMap.aspx page will look like this:
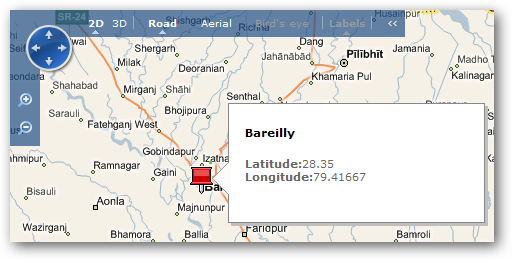
http://localhost:5543/BingMap.aspx?lat=28.35&log=79.41667&place=Bareilly
I have shown my home town on the map. You can also see a push pin and other details in a baloon.
And this is it, I can now locate any place on the Bing Maps which is present with me in Geonames database with the help of ASP.NET. The more can be done with the help of Geonames database like postcode lookup. I hope this tutorial will get you started with Bing Maps integrated with Geonames database with the help of ASP.NET.
Download: BingMap.zip (189.44 kb)
Download the UTF8ToUTF16 conversion tool
Related Links:
Bit.ly is one of the major short URL service provider. There are other also but Bit.ly is used by most of the users because of it’s simplicity, API and statistics. But some notorious users create short URLs for the spam sites which doesn’t make any sense to us. As you know by looking at the short URLs, they won’t reveal anything. But there is a way to get the original/long URL through ASP.NET.
Below is the method which takes short URL as a parameter.
public static string ReverseShortURL(string ShortURL)
{
        HttpWebRequest Webrequest = (HttpWebRequest)HttpWebRequest.Create(ShortURL);
        HttpWebResponse Webresponse = (HttpWebResponse)Webrequest.GetResponse();
        Uri uri = Webresponse.ResponseUri;
        return uri.AbsoluteUri;
}
The Response.Uri will get the actual URL which is being requested.

Download: ReverseShortURL.zip (335.87 kb)
I received an e-mail from a friend of mine who is quite upset after choosing IT as his profession becasue of the list of promises in the e-mail (listed below). Well this is because he didn’t made any of the below listed promises to himself and after reading this e-mail he was more upset. Therefore, if you are willing to be an IT guy, then make sure you have made 9 promises as listed below.
Personally, I will say these 9 promises or points are perfect to define an IT/Tech guy.
This is among one of the best code snippet I have and using since long to export the datagridview to excel. The best part of this code snippet is that it just don’t uses the excel interop, so you need not to worry about the Office version or PIAs installed at user’s machine. What actualy is needed is just a Reflection namespace - System.Reflection and it will bind the data to the instance of the excel application.
private void Export2Excel(DataGridView datagridview, bool captions)
{
    if (datagridview.ColumnCount > 0)
    {
        string[] strArray = new string[datagridview.ColumnCount];
        string[] strArray2 = new string[datagridview.ColumnCount];
        int num = 0;
        int index = 0;
        int num3 = 0;
        for (index = 0; index < datagridview.ColumnCount; index++)
        {
            strArray[index] = datagridview.Rows[0].Cells[index].OwningColumn.Name.ToString();
            if ((num > 0) && ((index % num) == 0))
            {
                num = 0;
            }
            num3 = index / 0x1a;
            if (num3 == 0)
            {
                num = index + 0x41;
                strArray2[index] = Convert.ToString((char)num);
            }
            else
            {
                int num4 = num3 + 0x40;
                num = (index % 0x1a) + 0x41;
                strArray2[index] = Convert.ToString((char)num4) + Convert.ToString((char)num);
            }
        }
        try
        {
            object obj7;
            object target = Activator.CreateInstance(Type.GetTypeFromProgID("Excel.Application"));
            object obj4 = target.GetType().InvokeMember("Workbooks", BindingFlags.GetProperty, null, target, null);
            object obj3 = obj4.GetType().InvokeMember("Add", BindingFlags.InvokeMethod, null, obj4, null);
            object obj5 = obj3.GetType().InvokeMember("Worksheets", BindingFlags.GetProperty, null, obj3, null);
            object[] args = new object[] { 1 };
            object obj6 = obj5.GetType().InvokeMember("Item", BindingFlags.GetProperty, null, obj5, args);
            if (captions)
            {
                index = 0;
                while (index < datagridview.ColumnCount)
                {
                    args = new object[] { strArray2[index] + "1", Missing.Value };
                    obj7 = obj6.GetType().InvokeMember("Range", BindingFlags.GetProperty, null, obj6, args);
                    args = new object[] { strArray[index] };
                    obj7.GetType().InvokeMember("Value", BindingFlags.SetProperty, null, obj7, args);
                    index++;
                }
            }
            for (num = 0; num < datagridview.RowCount; num++)
            {
                for (index = 0; index < datagridview.ColumnCount; index++)
                {
                    args = new object[] { strArray2[index] + Convert.ToString((int)(num + 2)), Missing.Value };
                    obj7 = obj6.GetType().InvokeMember("Range", BindingFlags.GetProperty, null, obj6, args);
                    args = new object[] { datagridview.Rows[num].Cells[strArray[index]].Value.ToString() };
                    obj7.GetType().InvokeMember("Value", BindingFlags.SetProperty, null, obj7, args);
                }
            }
            args = new object[] { true };
            target.GetType().InvokeMember("Visible", BindingFlags.SetProperty, null, target, args);
            target.GetType().InvokeMember("UserControl", BindingFlags.SetProperty, null, target, args);
        }
        catch (Exception exception)
        {
            MessageBox.Show(("Error: " + exception.Message) + " Line: " + exception.Source, "Error");
        }
      }
    }