
© 2026 Pashant Khandelwal

© 2026 Pashant Khandelwal
This is among one of the best code snippet I have and using since long to export the datagridview to excel. The best part of this code snippet is that it just don’t uses the excel interop, so you need not to worry about the Office version or PIAs installed at user’s machine. What actualy is needed is just a Reflection namespace - System.Reflection and it will bind the data to the instance of the excel application.
private void Export2Excel(DataGridView datagridview, bool captions)
{
    if (datagridview.ColumnCount > 0)
    {
        string[] strArray = new string[datagridview.ColumnCount];
        string[] strArray2 = new string[datagridview.ColumnCount];
        int num = 0;
        int index = 0;
        int num3 = 0;
        for (index = 0; index < datagridview.ColumnCount; index++)
        {
            strArray[index] = datagridview.Rows[0].Cells[index].OwningColumn.Name.ToString();
            if ((num > 0) && ((index % num) == 0))
            {
                num = 0;
            }
            num3 = index / 0x1a;
            if (num3 == 0)
            {
                num = index + 0x41;
                strArray2[index] = Convert.ToString((char)num);
            }
            else
            {
                int num4 = num3 + 0x40;
                num = (index % 0x1a) + 0x41;
                strArray2[index] = Convert.ToString((char)num4) + Convert.ToString((char)num);
            }
        }
        try
        {
            object obj7;
            object target = Activator.CreateInstance(Type.GetTypeFromProgID("Excel.Application"));
            object obj4 = target.GetType().InvokeMember("Workbooks", BindingFlags.GetProperty, null, target, null);
            object obj3 = obj4.GetType().InvokeMember("Add", BindingFlags.InvokeMethod, null, obj4, null);
            object obj5 = obj3.GetType().InvokeMember("Worksheets", BindingFlags.GetProperty, null, obj3, null);
            object[] args = new object[] { 1 };
            object obj6 = obj5.GetType().InvokeMember("Item", BindingFlags.GetProperty, null, obj5, args);
            if (captions)
            {
                index = 0;
                while (index < datagridview.ColumnCount)
                {
                    args = new object[] { strArray2[index] + "1", Missing.Value };
                    obj7 = obj6.GetType().InvokeMember("Range", BindingFlags.GetProperty, null, obj6, args);
                    args = new object[] { strArray[index] };
                    obj7.GetType().InvokeMember("Value", BindingFlags.SetProperty, null, obj7, args);
                    index++;
                }
            }
            for (num = 0; num < datagridview.RowCount; num++)
            {
                for (index = 0; index < datagridview.ColumnCount; index++)
                {
                    args = new object[] { strArray2[index] + Convert.ToString((int)(num + 2)), Missing.Value };
                    obj7 = obj6.GetType().InvokeMember("Range", BindingFlags.GetProperty, null, obj6, args);
                    args = new object[] { datagridview.Rows[num].Cells[strArray[index]].Value.ToString() };
                    obj7.GetType().InvokeMember("Value", BindingFlags.SetProperty, null, obj7, args);
                }
            }
            args = new object[] { true };
            target.GetType().InvokeMember("Visible", BindingFlags.SetProperty, null, target, args);
            target.GetType().InvokeMember("UserControl", BindingFlags.SetProperty, null, target, args);
        }
        catch (Exception exception)
        {
            MessageBox.Show(("Error: " + exception.Message) + " Line: " + exception.Source, "Error");
        }
      }
    }
Last year, I blogged about few things related to Windows 7 development which includes Jump Lists and Glass Form. The Windows 7 API Code Pack comes with many other features which can be used while developing applications for Windows 7 platform. The Windows 7 API Code Pack comes with some sample applications which exposes the power of the API.
In one of my previous projects I used the Task Dialog class to use some cool looking message boxes like the one we see in Windows 7. If you see the sample code and and the executable, they are working fine but when you write the same code in the code in your application, this will not turn out to be as you would have expected. You will see a runtime error as the one below.
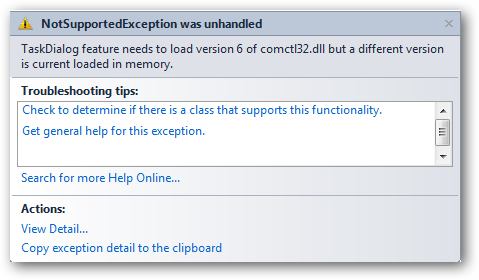
This problem can be resolved by adding a app.manifest file to your project and modifying some part of it. Move to the end of the file and un-comment the <dependency> section of the file.
<dependency>
    <dependentAssembly>
      <assemblyIdentity
          type="win32"
          name="Microsoft.Windows.Common-Controls"
          version="6.0.0.0"
          processorArchitecture="*"
          publicKeyToken="6595b64144ccf1df"
          language="*"
        />
    </dependentAssembly>
</dependency>
Hit F5 again and this will do the trick for you, this time you will be able to view the message box as you wanted to. The API sample contains code for all the possible / available task dialog for you to use. But the usage is bit difficult as this cannot be acaieved in a single line like we do with the MessageBox class. Therefore I suggest you to build a helper class / function to get this easy for you. As I used this in one of my projects I have two functions one for showing the information and error messages respectively. You can also have a overload method for this, but as I have used different method names instead as I will be using only two dialogs throughout my project.
For Error Messages:
public static void ShowErrorMessage(string ErrorTitle, string Instruction, string ErrorMessage, string ErrorTrace)
{
            TaskDialog tdError;
            tdError = new TaskDialog();
            tdError.DetailsExpanded = false;
            tdError.Cancelable = true;
            tdError.Icon = TaskDialogStandardIcon.Error;

            tdError.Caption = ErrorTitle;
            tdError.InstructionText = Instruction;
            tdError.Text = ErrorMessage;
            tdError.DetailsExpandedLabel = "Hide details";
            tdError.DetailsCollapsedLabel = "Show details";
            tdError.DetailsExpandedText = ErrorTrace;

            tdError.Show();
}
All the properties in the above function is self-explainatory. The code at line:12 will have a expander in the dialog box which will contain more details of the exception.
Function for showing information is also the same but with few things “missing”:
public static void ShowInfoMessage(string InfoTitle, string Information, string Message)
{
            TaskDialog tdInfo;
            tdInfo = new TaskDialog();
            tdInfo.DetailsExpanded = false;
            tdInfo.Cancelable = true;
            tdInfo.Icon = TaskDialogStandardIcon.Information;

            tdInfo.Caption = InfoTitle;
            tdInfo.InstructionText = Information;
            tdInfo.Text = Message;
            tdInfo.Show();
}
Sample Usage:
//For Error Dialog
ShowErrorMessage("Application Error", "There was an error in creating XML file", ex.Message, ex.StackTrace);
//For Information Dialog
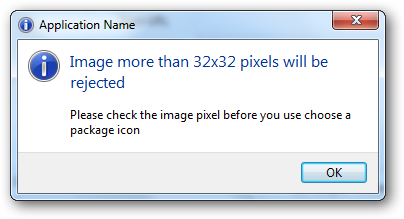
ShowInfoMessage("Application Name", "Image more than 32x32 pixels will be rejected", "Please check the image pixel before you use choose a package icon");
Error Dialog Box
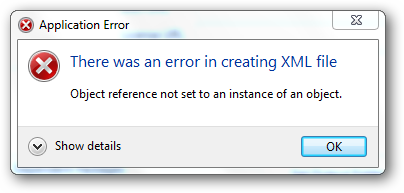
Click the Show Details expander icon to view the complete error stack trace.
Information Dialog Box
This is just the two types of dialogs I have used for my project, but there are more supported in the API. So to get started see the sample project accompanying the API Code Pack including the one you see while running programs as Administrator while UAC is turned on, a dialog box with a progress bar and lots of more to check. The samples above would get you started.
If you are a Visual Studio 2010 user with NuGet installed, then you can add the API reference to your project with the below command.
Install-Package Windows7APICodePack

If you are a blogger and using Twitter, then you must want to show some of your latest tweets on your blog space. I do have a custom widget for my blog which can display 3 of my latest tweets and I can customize it show more of my tweets. But the widgets cannot be used in every scenario and this is why some people find it difficult to use the widget provided by Twitter to display their tweets. What if they want to show their last tweet on the top of the page inside a DIV? A friend of mine set up his new WordPress blog and want to have a DIV on the top of the page which displays his last post and that he can customize. By customize I mean that he can set the number of tweets he wants to display, can show his profile picture and get his last tweet. The script file contains only three methods at this moment. I will add some other functions later on.
How does this work?
It is just a javascript file and there is nothing new about it. What you need to do is to have a DIV or any HTML element or ASP.NET server control with id as 'tweet-div'. For this example I am using a DIV to show my tweets. I choose DIV because I can set it position to absolute and set on the image to show my latest tweet on an image I got from Iconsinder. It is a pretty twitter imageand there are other images also which you can use, but for non-commercial purpose only. First, take a look at the jQuery script I wrote to do all the stuff:
function GetLastTweet(UserName) {
    url = 'http://api.twitter.com/1/statuses/user_timeline/' + UserName + '.json?callback=?';
    $.getJSON(url, function (tweet) {
        $("#tweet-div").html(tweet[0].text);
    });
}

function GetTweets(UserName, NoOfTweets) {
    url = 'http://api.twitter.com/1/statuses/user_timeline/' + UserName + '.json?callback=?';
    $.getJSON(url, function (tweets) {
        for (var i = 0; i < NoOfTweets; i++) {
            $("#tweet-div").append(tweets[i].text + "
");
        }
    });
}

function GetProfileImage(UserName) {
    url = 'http://api.twitter.com/1/statuses/user_timeline/' + UserName + '.json?callback=?';
    $.getJSON(url, function (image) {
        $("#ProfileImage").attr('src', image[0].user.profile_image_url);
    });
}
To communicate with the Twitter API, I am using JSON. Plan to go for XML only if you are using it on the server side code. As you can see it is pretty easy to work with JSON in jQuery. The methods:
*Note: Please change the element ID in the script file according to your element id on the page.*
And just in case if you are feeling lazy to write the the HTML markup:
<html xmlns="http://www.w3.org/1999/xhtml">
<head>
    <title>@prashantmx on Twitter!</title>
    <script src="Scripts/jquery-1.4.1.js" type="text/javascript"></script>
    <script src="Scripts/Tweet.js" type="text/javascript"></script>
    <link href="style/style.css" rel="stylesheet" type="text/css" />
</head>
<body onload="GetLastTweet('prashantmx');">
<img src="images/1293447412_bird_sign.png" alt="twitterbird" />
<div id ="tweet-div">
</div>
</body>
</html>
I am using an image of twitter bird to show my last tweet. And here is what my last tweet looks like:
If you want to use the below image or other images like this then go to Iconfinder. There is a good collection of twitter birds images as shown below and choose which best suites your requirement.

Download: Twitter.zip (159.92 kb)

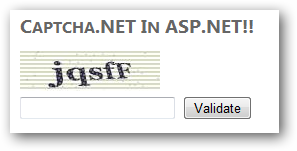
Using CAPTCHA was never easy for me before I got a class from an unknown user on a community forum post. I have just re-used the class to get my work done. The class is extremely easy to use and let you incorporate the CAPTCHA into your application in just few lines of code.
You can set the height and width of the CAPTCHA image while initializing the CAPTCHA class. The CAPTCHA image generated from the class can be set to the image control directly or it can be save to the local path and then set to the image control. For this example I am saving it to the local path and then set to the image control. And the CAPTCHA image code generated by the class is automatically set to the session variable named CaptchaCode.
Time to get some hand on it
On the page get an image control to display CAPTCHA image, a textbox where user will enter the CAPTCHA text and a button when clicked, we can check and validate if the code entered is correct or not. Plug the DLL in your ASP.NET project and go to the Page_Load event. Here we will generate the image of the height and width we wish to have for out CAPTCHA image and then save the image to the CaptchaImages folder with the random image code generated. The code on the Page_Load event goes like this:
protected void Page_Load(object sender, EventArgs e)
{
        if (!Page.IsPostBack)
        {
            CaptchaImage cImage = new CaptchaImage(CaptchaImage.generateRandomCode(), 140, 40);
            cImage.Image.Save(Server.MapPath("~\\CaptchaImages\\" + Convert.ToString(Session["CaptchaCode"]) + ".jpg"), ImageFormat.Jpeg);
            CaptachaImage.ImageUrl = "~\\CaptchaImages\\" + Convert.ToString(Session["CaptchaCode"]) + ".jpg";
            cImage.Dispose();
        }
        CaptchaCode = Convert.ToString(Session["CaptchaCode"]);
}
Before you can use the above code, declare a public variable which I have used to hold the value of the CAPTCHA code. I named it CaptchaCode. You can name it whatever you like it. We will be using this variable later to check it against the user input. Hit F5 to start and test your application. If everything is in place and you will be able to see the below output.
To check if the user enters the correct CAPTCHA code, we must have an event on button click which will validate the user input and prompt the user if CAPTCHA code is correct or incorrect. The code on the button click is:
protected void btn_Validate(object sender, EventArgs e)
{
        if (CaptchaCode == txt_ccode.Text)
        {
            ClientScript.RegisterClientScriptBlock(typeof(Page), "ValidateMsg", "<script>alert('You entered Correct CAPTCHA Code!');</script>");
        }
        else
        {
            ClientScript.RegisterClientScriptBlock(typeof(Page), "ValidateMsg", "<script>alert('You entered INCORRECT CAPTCHA Code!');</script>");
        }
}
The above code will check the CAPTCHA code entered by the user and check against the CAPTCHA code we previously saved in the session variable (CaptchaCode). If the validation is a success, user will get the message notifying him that he enters correct CAPTCHA code or the error message otherwise.
And that’s it, we have successfully implement a CAPTCHA in our ASP.NET application. So, here are few things we can do with this CAPTCHA library:
I have build the sample project in ASP.NET 4.0, if you wanted to use the library in ASP.NET 3.x, then compile the project with lower version of ASP.NET and it will work perfectly. The below zip file contains both the projects.
Download: Captcha.NET.zip (377.63 kb)
Building auto-complete feature with jQuery is easy and you can build this in no time. It’s your wish if you want to use ADO.NET or EF (LINQ) to get this done, it works great for all. The sample application I build is using both ADO.NET and EF. So let’s begin up getting files under one hood.
Use the below live links for jQuery auto-complete and CSS.
<link rel="stylesheet" href="http://dev.jquery.com/view/trunk/plugins/autocomplete/jquery.autocomplete.css" type="text/css" />
<script type="text/javascript" src="http://dev.jquery.com/view/trunk/plugins/autocomplete/jquery.autocomplete.js"></script>
You can also download these files and use them in your project, if you are planning to run your application offline. For this demonstration, I have downloaded the files. I am using both ADO.NET and LINQ to auto-complete with jQuery auto-complete pug-in.
Starting up with ADO.NET, as we were/are using this for so many years now and therefore there should be no problem for anyone using it. Simple page behind code to get the full list of countries in the world (I hope I have all of them) and seperate each country name with a ‘|’ pipe symbol so I can split countries name and set it to the text box for auto-complete.
public partial class _Default : System.Web.UI.Page
   {
       SqlConnection con = new SqlConnection(ConfigurationManager.ConnectionStrings["constr"].ConnectionString);
       SqlCommand cmd;
       SqlDataReader dr;

       public string Listcountries;

       private string countryName()
       {

           StringBuilder sb = new StringBuilder();
           cmd = new SqlCommand("Select country_name from Country order by country_name", con);
           con.Open();
           dr = cmd.ExecuteReader();

           while (dr.Read())
           {
               sb.Append(Convert.ToString(dr[0] + "|"));
           }

           return Convert.ToString(sb);
       }

       protected void Page_Load(object sender, EventArgs e)
       {
           Listcountries = countryName();
       }
   }
Done with code behind and now only requires few lines of client script on the page to get the auto-complete running.
<script type="text/javascript">
        $(document).ready(function () {
            var cc = '<%=Listcountries%>'.split("|");
            $("#autoText").autocomplete(cc);
        });
</script>
The same can be done with LINQ but the jQuery script part will be the same.
public partial class AutocompleteLINQ : System.Web.UI.Page
{
    DeveloperDBEntities db = new DeveloperDBEntities();
    public IQueryable countries;
    public string Listcountries;

    protected void Page_Load(object sender, EventArgs e)
    {
        countries = from c in db.Countries select c;
        foreach (Country cobj in countries)
        {
            Listcountries += cobj.Country_Name + "|";
        }
    }
}
Just for your ease to use this project as it is, I have included the SQL scripts for the country table. Hope this helps you in building another great or a part of your application.
Download: JqueryAutoComplete.zip (210.73 kb)