
© 2026 Pashant Khandelwal

© 2026 Pashant Khandelwal
Windows 7 gives you the power to create Virtual Hard Disk (VHD). If you don’t know how to create a VHD in Windows 7 then you seriously need to learn how to unleash Windows 7 power. You can see the links in the end which will let you create a new VHD on your Windows 7 machine and there are some other recommended links.
I assume that you know or you have created a new VHD and attached or mount on your Windows 7 machine. But this is one time fun…..Once you reboot or logoff the attached VHD is gone. Now you need to follow all those steps again to attach the VHD, not this time but every time you logoff or restart. To get relief from this pain perform the following steps.
Open notepad and add the below command to the file:
Select vdisk file=”D:\SourceSafe.vhd”
Attach vdisk
Now save the file with the name of your choice with “.s” as its extension. Open notepad again and add the following line of code to get your VHD attached at system startup and save this file with file extension as ”.bat”
DISKPART –s "Path of the <.s file> created in the above step"
The path name should be the fully qualified name of the “.s” file. Just in case you face any problem I have attached the files I am using to mount my SourceSafe VHD at system startup. Place the ”.bat” in the startup folder and thats it. Next time you logoff or restart you VHD gets attached automatically.
Download: AttachVHD.zip (313.00 bytes)
Related Links:
A number of existing APIs are deprecated in .NET Framework 4.0. A complete listing of deprecated APIs in .NET Framework 4.0 can be found here at MSDN:
If you are using JQuery controls like date picker, accordion, progress bar, slider, tabs, dialog etc. You can set the theme of your choice or you can also allow the user to set the theme of their choice. For those folks who don’t know about the JQuery Theme Roller, then take a look at official Jquery site demonstrating the Jquery Theme Roller. The best part is when you select the theme from the theme roller control all the JQuery controls on the page will automatically inherit the color scheme of the theme.
To incorporate Theme Roller in your page, build a simple page and link some CSS and some JavaScript
<link type="text/css" rel="stylesheet" href="http://jqueryui.com/themes/base/ui.all.css" />
<link rel="stylesheet"
href="http://ajax.googleapis.com/ajax/libs/jqueryui/1.8.2/themes/base/jquery-ui.css"
type="text/css" media="all" />
<link rel="stylesheet" href="http://static.jquery.com/ui/css/demo-docs-theme/ui.theme.css"
type="text/css" media="all" />
<script type="text/javascript" src="http://jqueryui.com/js/jquery.js"></script>
<script src="http://ajax.googleapis.com/ajax/libs/jquery/1.4.2/jquery.min.js"
type="text/javascript"></script>
<script src="http://ajax.googleapis.com/ajax/libs/jqueryui/1.8.2/jquery-ui.min.js"
type="text/javascript"></script>
Now under the head section we will have the JQuery Theme Roller control.
$(document).ready(function () {
    $('#ThemeRoller').themeswitcher();
});
Notice the ThemeRoller id of the control passed in the JQuery code to initialize the Theme Roller/Switcher. Now in the Body tag of your page set a div with id as ThemeRoller or whatever the name you want to give, but make sure you use the same name as your control id.
<script type="text/javascript"
  src="http://jqueryui.com/themeroller/themeswitchertool/">
</script>
<div id="ThemeRoller"></div>
I have set the theme roller on the body of the page and therefore all the controls on the page will automatically change the theme accordingly set by the user using the theme roller on the page. You can also set a DIV or a form on your page instead of setting it for the complete page. Set some other controls on the page like date picker, progress bar, dialog etc. Html code for the controls.
Set some other controls on the page like date picker, progress bar, dialog etc.
<p>Date: <input id="datepicker" type="text" />
</p>

<div id="dialog" title="Basic dialog">
    <p>
    This is a Demo Dialog box using JQuery!!<br />
    Change theme to see this Dialog in different theme.
    </p>
</div>
    <div id="progressbar" style="width:200px;">

    </div>
Placing HTML code isn’t enough. You also need to set the JQuery code in the head section of the page to get the controls working. When you set all the JQuery code for the controls you body and head section of the page looks something like this.
Body section of the page:
<body style="font-size:62.5%;">

<script type="text/javascript"
  src="http://jqueryui.com/themeroller/themeswitchertool/">
</script>
<div id="ThemeRoller"></div>

<p>Date: <input id="datepicker" type="text" />
</p>

<div id="dialog" title="Basic dialog">
    <p>
    This is a Demo Dialog box using JQuery!!<br />
    Change theme to see this Dialog in different theme.
    </p>
</div>
    <div id="progressbar" style="width:200px;">

    </div>
</body>
Head section of the page:
<head>
<title>JQuery Theme Roller</title>
<link type="text/css" rel="stylesheet" href="http://jqueryui.com/themes/base/ui.all.css" />
<link rel="stylesheet"

href="http://ajax.googleapis.com/ajax/libs/jqueryui/1.8.2/themes/base/jquery-ui.css"

type="text/css" media="all" />
<link rel="stylesheet" href="http://static.jquery.com/ui/css/demo-docs-theme/ui.theme.css"

type="text/css" media="all" />
<script type="text/javascript" src="http://jqueryui.com/js/jquery.js"></script>
<script src="http://ajax.googleapis.com/ajax/libs/jquery/1.4.2/jquery.min.js"

type="text/javascript"></script>
<script src="http://ajax.googleapis.com/ajax/libs/jqueryui/1.8.2/jquery-ui.min.js"

type="text/javascript"></script>


<script type="text/javascript">
//Set theme roller
    $(document).ready(function () {
        $('#ThemeRoller').themeswitcher();
    });

//Show date time picker control
    $(function () {
        $("#datepicker").datepicker();
});

//Show Dialog
    $(function () {
        $("#dialog").dialog();
    });

//Progress Bar
    $(function () {
        $("#progressbar").progressbar({
            value: 50
        });
    });

</script>
</head>
Now try setting the theme of the page in one click using the Theme Roller.
URL Routing was first introduced in .NET framework 3.5 SP1 but MVC has built-in and works pretty decently to create SEO friendly URL and prevents URL hacking. ASP.NET 4.0 is now introduced with a new feature called URL routing with web forms. URL routing help developers to create short and friendly URLs which enhance search engine page ranking. There are few other ways to create short friendly URLs like URLrewriter.net extension or if you have a physical access to IIS you can have installed URL Rewriter extension for IIS 7 to create short friendly URLs. Hey! not everyone has access to IIS!! So if you don’t have the access then also you can re-write the URLs using this new feature in ASP.NET 4.0.
One thing I would like to mention is that when you create a new ASP.NET web application in Visual Studio 2010, it won’t show up with a blank page, but instead build a full applicaton with sample pages with a pretty good design. As you see below I haven’t design this page..actually this is a default template when you create a new ASP.NET web application. What I have done here is just put a text box to enter contact ID and a button to get the details from the Adventure Works sample database.
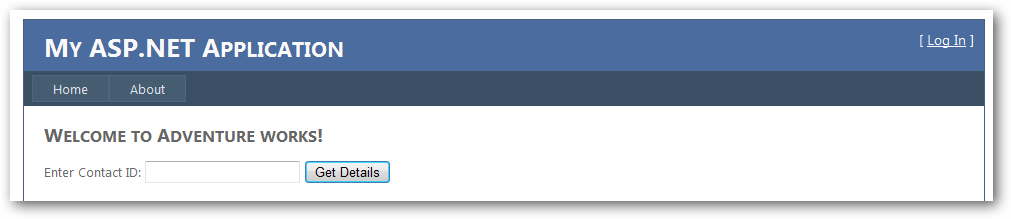
This is a pretty simple interface and now we take a look at some internal work of this web application. My primary focus is on having simple URLs for my application for better search engine optimizations. This application has two main pages apart from the about and other pages that added to the project through the template. The Default.aspx is the main page where we have a field which allow the user to enter the contact ID for the person he want to search. The other page which handles the request and show the details of the contact person is called View.aspx. But this is a really tricky part from a user’s perspective as a user will never see this page on the browser address bar while navigating a website. Check the View.aspx design code and check the <asp:SqlDatasource> tags and notice the SelectParameter tag. As I am using a select query with a parameter to populate the grid, the SelectParameter tag further uses <asp:RouteParameter> with route name and route key.
<asp:SqlDataSource ID="SqlDataSource1" runat="server"
        ConnectionString="<%$ ConnectionStrings:AdventureWorksConnectionString %>"
        SelectCommand="select Title,FirstName,MiddleName,LastName, EmailAddress from Person.Contact where ContactID=@id">
        <SelectParameters>
            <asp:RouteParameter Name="id" RouteKey="id" />
        </SelectParameters>
    </asp:SqlDataSource>
OK! Let’s start up what we have on the Default.aspx page. This is the default page and a user will see this page first. Write the below code on the button to redirect the request to route handler. Here I have used a Regex expression to validate if the user enters a numeric ID and not any alphanumeric or alphabet. This check is just a workaround, I recommend you to use a better validation technique.
if((Regex.IsMatch(txt_pid.Text.Trim(), @"\d+")) == true)
{
          Response.RedirectToRoute("Persons-Details",
          new { id = txt_pid.Text });
}
So does this URL make any sense? Not at this moment but surely it will after if you have registered your routes in the Global.asax file. My Global.asax file has a method called void RegisterRoutes(RouteCollection Route).
void RegisterRoutes(RouteCollection routes)
{
       RouteTable.Routes.MapPageRoute("Persons-Details",
         "Person/{id}",
         "~/View.aspx");
}
The method MapPageRoute accepts some parameters. The first parameter - “Person-Details” you see is the name of the Route which can be any thing you like. The second parameter - “Person/{id}” is the URL which we have generated. In short this is the URL which is visible to the user and outside world, what is happening internally only a developer knows!. The third parameter - “~/View.aspx” is the physical file which actually process the request and return it to the second parameter. The second parameter is the route URL and you can name it what you like except the parameter you are passing, just make sure you use the same parameter name everywhere. In the method void RegisterRoutes(RouteCollection Route) you can register number of route handlers in a single go under void Application_Start method in the Global.asax file.
void Application_Start(object sender, EventArgs e){
// Code that runs on application startup
RegisterRoutes(RouteTable.Routes);
}
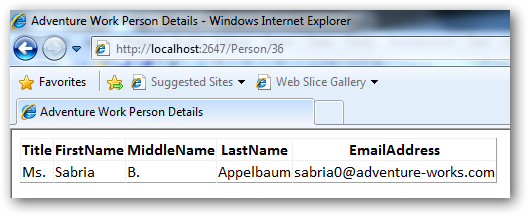
Once you registered the routes in the Global.asax file, you are done. Time to press F5 and see the action. On the default page enter the ID and hit the Get Details button. The page rendered in front of you / user will be having a clean tidy URL.
Download: ASP.NET4URLRouting.zip (175.58 kb)
If you think that Silverlight applications are only intended to be run on web browsers, then you are wrong! Silverlight is now widely used to build Rich Internet Application (RIA) allowing users to work more efficiently and make a working session more interactive and attractive. As we all know a customer will always seek for a short-cut method, he will never listen to your comments or suggestions and wants everything to be done in few mouse clicks. A lazy customer! You build an application with a lot of effort and upload it to the user or customer’s website. Now the customer wants the same application for his desktop - he doesn’t want to open browser and work. Writing the same application again for his desktop won’t help and will also waste a lot of development time, why can’t we make the same Silverlight application to run from his machine?
Silverlight gives you an option to install the Silverlight application from the browser to your desktop called “Out of Browser” application support. Consider if you have built a game on Silverlight and upload it to your blog/website allowing you reader or visitors to play the game. It’s not just the case with games but same can be done with applications or with some general web utility like URL shortening service using Bit.ly API.
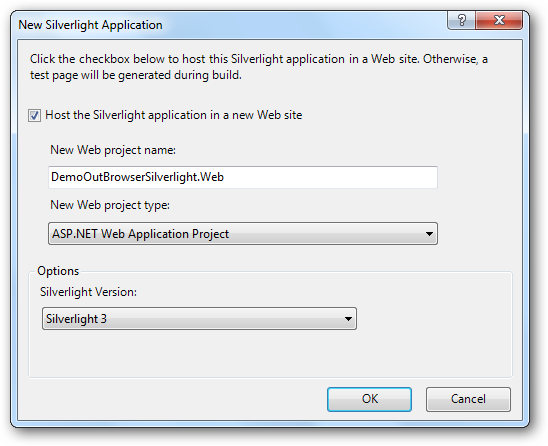
To get started create a new Silverlight application in Visual Studio 2010.
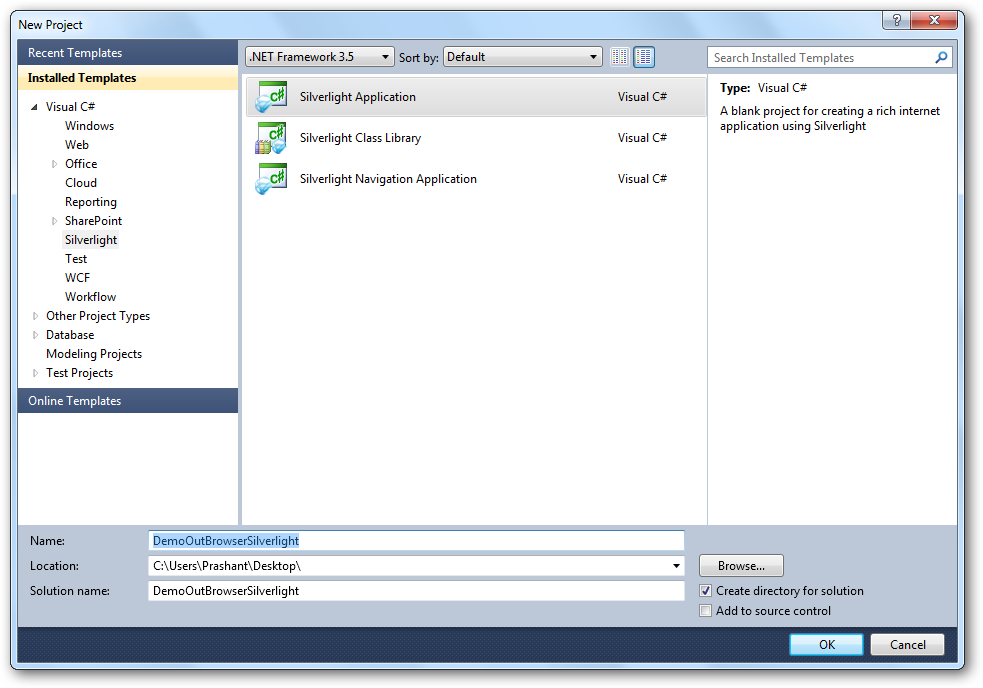
Give the name to your application and click OK.
Design your application put the business logic in (if any). Once you are done designing and building the application go to the project properties. Click Project > APPNAME Properties. APPNAME represents the name of your application. In the project properties check the “Enable running application out of browser”.
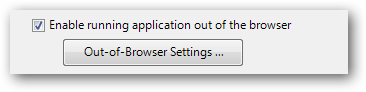
Out-of-Browser Settings button will get enabled which will let you choose out of browser application settings.
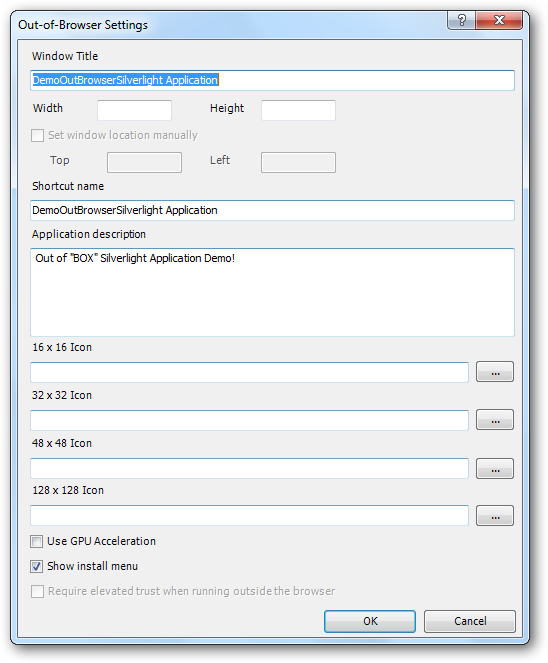
The settings dialogue box is quite self-explanatory. You can set the name of the application which you want to put on the window when it runs out of the browser. You can also set the icon for you application in different sizes. Click OK to save settings.
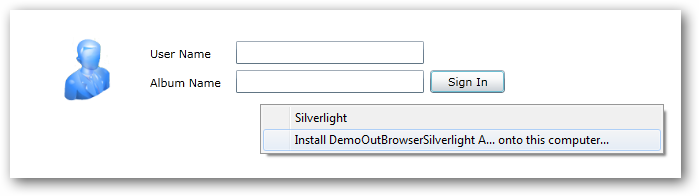
Now, run you application. You will see your Silverlight application running inside your browser. If you want the application to run out of the browser then right-click anywhere in the browser and click “Install
This will prompt you to install the application and place the application icons on your desktop or on your start menu or both. It will give your application the default application install icon. If you have set your own in the Out of Browser Settings then you will see your icon.
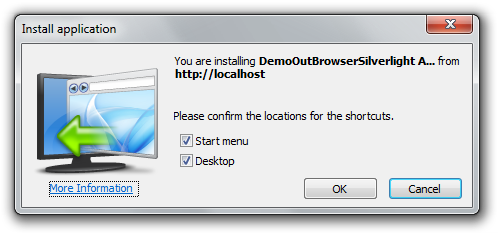
Now your Silverlight application is on your system and can be executed at user’s desktop.