
© 2023 Pashant Khandelwal

© 2023 Pashant Khandelwal
Mostly all web applications out there has some way or the other amazing ways to upload a single or multiple files. While surfing on Github I found this amazing library to upload the files to the server in a unique way with lot of configurations. It support parallel uploads along with cancellation of the files which are in the upload queue along with a good looking progress bar to show the progress of upload.
I get the drag and drop to work in just like 5 minutes. It is super easy and that with some powerful configurations. To install Dropzone you can use the Nuget command.
PM> Install-Package dropzone
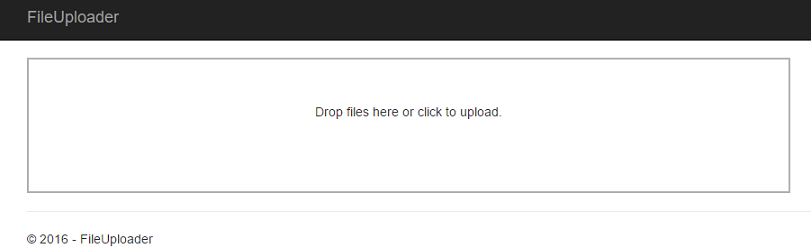
Add reference of js and css files on your page. To get the UI ready use this HTML.
<div class="row">
    <div class="col-md-9">
        <div id="dropzone">
            <form action="/Home/Upload" class="dropzone needsclick dz-clickable" id="uploader">
                <div class="dz-message needsclick">
                    Drop files here or click to upload.<br>
                </div>
            </form>
        </div>
    </div>
</div>
The output of the above HTML looks like this.
There are few points to be noted here in the above HTML. Notice the action and class attributes for the form element. You will also be needing the id attribute as well. Here the action attribute points to the ActionResult which is responsible to handle the file upload. I have pointed it to the Upload ActionResult in my controller class which accepts a parameter of type IFormFile. In case of a MVC application, we would have used HttpPostedFileBase class. Here is the complete code which handles the file upload.
[HttpPost]
public async Task<IActionResult> Upload(IFormFile file)
{
    var uploads = Path.Combine(_environment.WebRootPath, "uploads");
    if (file.Length > 0)
    {
        using (var fileStream = new FileStream(Path.Combine(uploads, file.FileName), FileMode.Create))
        {
            await file.CopyToAsync(fileStream);
        }
    }
    return RedirectToAction("Index");
}
The _environment variable you see in the above code is the instance of IHostingEnvironment interface which I have injected in the controller. Always use IHostingEnvironment interface to resolve the paths. You can hard code the file path but it may not work on other platforms. The combine method returns the correct path based on the platform the code is executing. The WebRootPath property returns the path of wwwroot folder and the second parameter uploads is then appended correctly with the path.
Now it is time to make some adjustment in the Dropzone configuration. Recall the id attribute of the form element. I named it uploader. The Dropzone library has a unique way to set the configuration. Like this.
<script>
    $(document).ready(function () {
        Dropzone.options.uploader = {
            paramName: "file",
            maxFilesize: 2,
            accept: function (file, done) {
                if (file.name == "test.jpg") {
                    alert("Can't upload a test file.");
                }
                else {
                    //Show a confirm alert and display the image on the page.
              }
           }
        };
});
</script>
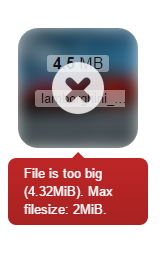
You have to be a bit careful when setting this configuration. In the configuration above the paramName states the name that will be used to transfer the file. This name should be the same as the IFormFile parameter of the Upload method in the controller. In this case I am using file and the same has to be there in the param of the Upload method. If the names mis-match the files will not be uploaded. The other parameter I am using is the maxFileSize and is very much self-explanatory. I have set the size to be 2 MB and because of this configuration, any file above this limit will not be uploaded. Here is an example of such kind of failure.
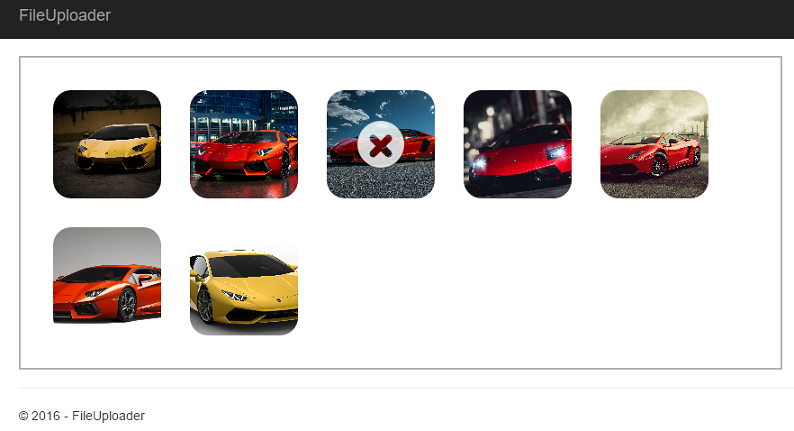
All the other files were uploaded successfully except one file which is 4.32 MB and is way beyond the limit I set in my Dropzone configuration. If you hover the file, you will see why it got failed.
This is the simplest approach through which you can have drag and drop upload support in your applications. The configuration I am using here is the simplest and minimalistic configuration that can get you started in no time. There are some more powerful configurations like parallelUploads and uploadMultiple that you should look into and use it.
 There is no time better to be a developer. With the cloud, you can compose solutions that were never possible before. You can release new features to millions of users within minutes. You can push the boundaries of current technological limitations in days. Developers can turn ideas from the ground up to successful businesses in only months. Companies need apps that allow them to maximize customer engagement and differentiate against competitors. Teams must have agility with app development for faster time to market. Developers need a flexible platform to scale up and down based on business demands, yet rock-solid resources that can withstand failure.
This guide breaks down the “why” and “how” for scenarios suited to the cloud with a focus on building apps using platform services available in Microsoft Azure. The second half of the guide showcases the breadth and depth of the Azure platform and services designed to help developers make truly competitive and differentiated applications.
The intended audience for this guide includes:
Developers wanting to understand why Azure is the best cloud platform for creating applications and how to get started quickly based on the app you want to build today.
Technical leaders considering Azure to support new or existing application development.
I run a custom blog engine I wrote myself on MVC 4 and as you would have thought it is on Windows hosting. I am re-writing my blog engine in .NET Core so that I can get it running on a Linux hosting as well. I am using Windows machine and Visual Studio Community Edition to write it and using a Ubuntu VM box to test it. My current blog uses SQL Server as a back-end but Linux does not support SQL Server and therefore I have to move to MySQL or any other No-SQL database available for Linux distros. For now I will be saving everything on the disk in JSON format.
The problem comes when I switch from database to file system. Both Windows and Linux file systems are different, so when working I hard-coded the data folder which holds all the posts for my blog. I publish the solution and deploy it to Ubuntu VM. I started the server and it ended up showing me this error in the console.
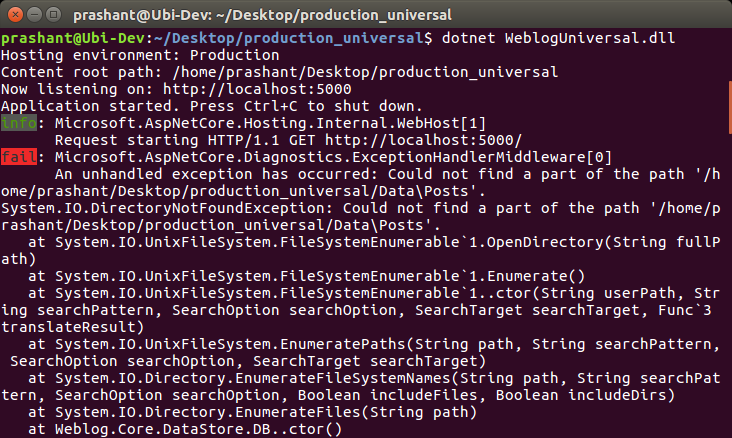
Notice the path of the data folder in the above screenshot. The path I am referring in the code ends up with backward slash which is not a UNIX format. Also a thing to note here is that UNIX follows a strict naming convention unlike Windows. For example, in Windows Data and data are same, but in UNIX they are not. Because I have hard-coded the path in my application while developing, it will end up in an error on UNIX machine.
To make the paths consistent in your application, I have to make use of the System.IO namespace Path class’s Combine method. Combine method is an overloaded method. If you are hearing this method for the first time then make sure you read the documentation. This method renders the correct path based on the platform my code is executing. So instead of doing something like this.
var _posts = Directory.EnumerateFiles("Data\\Posts");
I have done something like this.
string posts = Path.Combine("Data", "Posts");
_files = Directory.EnumerateFiles(posts);
In short, if you are developing a .NET Core application targeting Windows along with UNIX and OSX, then make sure that you follow this approach to get the correct paths or else you will end up with an exception and your website inaccessible.
I have been playing a lot with Raspberry PI and Python these days and have also started a side project to create robot car controller with a Xbox 360 wireless controller. I am planning to controller a robot car using a custom interface from my Windows machine. Initially I tried with PyQt but I dropped the idea for now as Python is not my primary expertise and it will take some time for me to learn the basics and get into some serious coding. Controlling something remotely or visualizing the information from your device on the UI is always better. For a proof of concept I built a Windows Forms application which will request the output from Raspberry PI over TCP and then visualize it on the UI using a wonderful chart library that I found today. There is a slight change in the Python code as I have to transmit readings from Raspberry PI over TCP so my Windows Forms application can read the output and utilize it to visualize it.
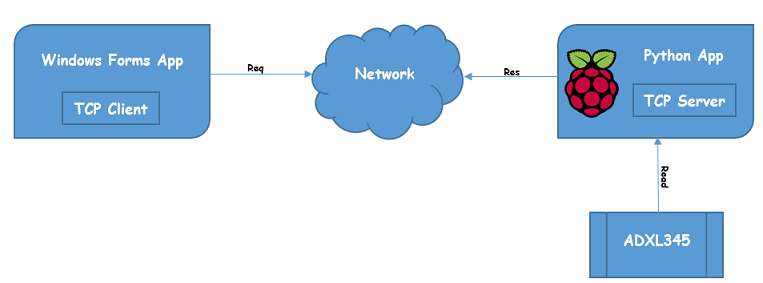
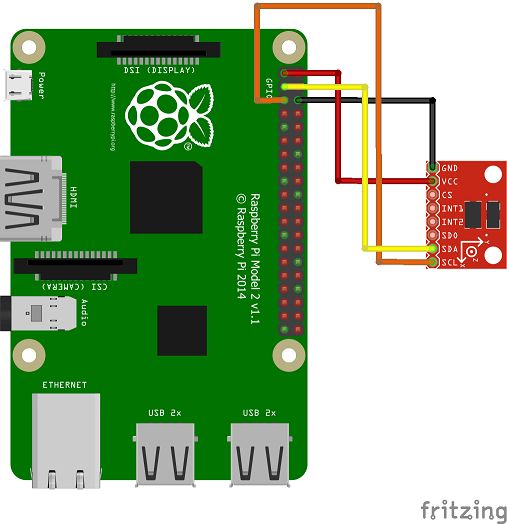
Reading the ADXL345 output is fairly simple and you can do this without any problem by using Adafruit’s ADXL345 Python library. This library will get you started in a jiffy and you will have your readings. I am not going into the details about the different features of the library I am using and ADXL345. The only thing you will have to do is to wire ADXL345 to your Raspberry PI and fire the example code you got from Adafruit’s repository from Github. If you have set it up correctly this, you will see X, Y, Z values on your terminal. If the terminal displays 0s for all the three axis then there is something wrong with the wiring (assuming you are using the example code). This is how your writing should be like.
Now I have made slight changes in the code so that I can send the data over TCP. I have created a simple TCP server which exposes Raspberry PI through IP address and a port number. This is the complete code for reading values from ADXL345.
import Adafruit_ADXL345
import socket

HOST = "192.168.1.8"
PORT = 50007

accel = Adafruit_ADXL345.ADXL345()

s = socket.socket(socket.AF_INET, socket.SOCK_STREAM)
s.bind((HOST, PORT))
s.listen(1)
conn, addr = s.accept()

while 1:
    data = conn.recv(1024)

    if data.strip() == "adxl":
        x, y, z = accel.read()
        data = 'X:' + str(x) + '|Y:' + str(y) + '|Z:' + str(z)
        conn.send(data)
In the code, you can see that I am not just transmitting the readings just like that. I only transmit when there is a request from another application is there to get the readings. This is a good approach as I don’t the PI to transmit the readings even if nobody is requesting it. I am sending a single string as a response which I am going to read at my Windows Forms application and use it.
You need to change the IP address and port number according to your Pi’s configuration.
Once this is done you can then execute the script from the terminal by firing the below command
sudo python adxl.py
This is it from Raspberry PI side. Let’s take a look from the Windows side now.
This will be a simple Windows Forms application which will connect to the Raspberry PI using the Pi’s IP address and the port on which the server is running. The Windows Form application is also a TCP client which sends a request to Raspberry PI for the updated readings from ADXL345. As I mentioned above in the Python code that the readings are not just being transmitted but a client has to send a request to to get the readings.
Let’s get started with the visualizing part. While was searching for a perfect charting library, I came across this wonderful library called Live Charts. This library is open-source, easy to use, has lots of awesome charts and a very robust documentation and moreover it supports Windows Forms as well as on WPF applications. I highly recommend you to look at the examples to get the idea about this library.
As usual, I will be using Nuget command to install the library.
PM> Install-Package LiveCharts.WinForms
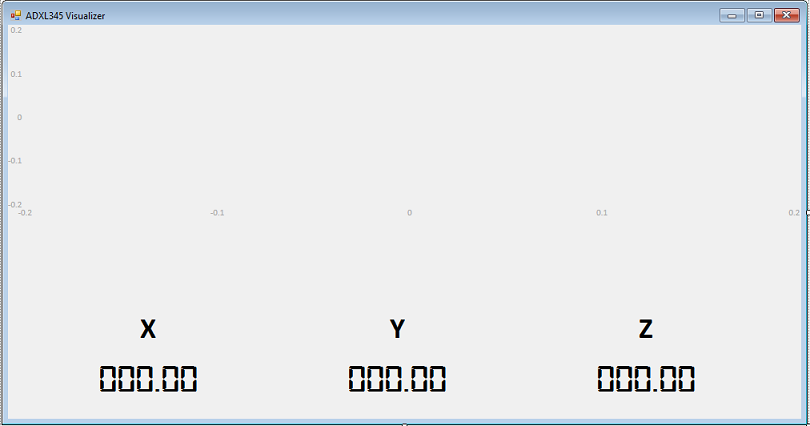
You also have to add the custom controls in the toolbox. You can follow the steps here to add the Live Charts control in the toolbox. In the design mode, choose the Cartesian Chart control from the toolbox and add it to the form. After adding the control to the form, I have dock it to the top of the form so I can utilize the lower section of the form to display the readings in numbers. Here is how my form looks like in design mode.
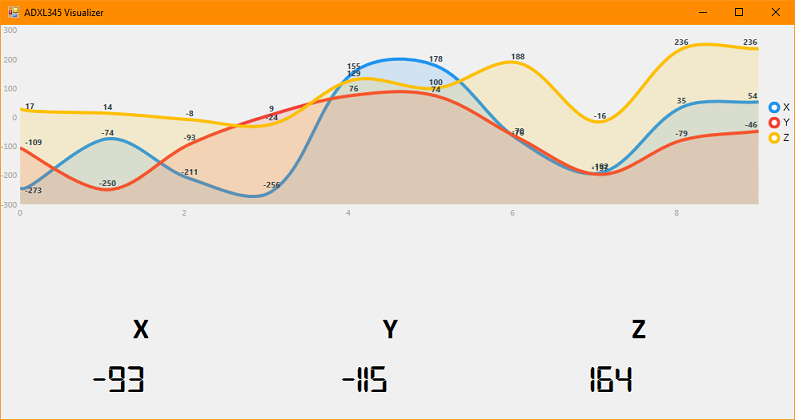
After the designing for the form is complete, I can initialize the chart to display the readings from Raspberry PI. The chart require few things to be setup before it can start displaying the data correctly. The accelerometer I am using is a 3-axis accelerometer and therefore it is going to send me readings for 3 axis i.e X, Y and Z. This means I will be needing 3 line series to visualize the information from accelerometer. To have 3 line series display the data I have to use CharValues class which will let me display the readings in the line series. As I have to update my chart when I request the new readings from Raspberry PI, I have to use ObservableValue type. The ObservableValue will make sure that whenever there is a change in the value, it gets reflected in the chart and therefore keeping the chart always up to date.
public ChartValues<ObservableValue> Values_X { get; set; }
public ChartValues<ObservableValue> Values_Y { get; set; }
public ChartValues<ObservableValue> Values_Z { get; set; }
Because I am going to make request to the server running on my Raspberry PI and request for the ADXL345 readings, I have to create a TCP client in order to do so.
Socket server;
IPEndPoint ipEndPoint;
byte[] data;
When the application is loaded, I want to make connection to Raspberry PI by using it’s IP address and port number on which the server is running on. To do this I will add the below code to the constructor of my application.
ipEndPoint = new IPEndPoint(
                IPAddress.Parse("192.168.1.8"), 50007);

server = new Socket(AddressFamily.InterNetwork,
               SocketType.Stream, ProtocolType.Tcp);

try
{
    server.Connect(ipEndPoint);
}
catch (SocketException)
{
    MessageBox.Show("Unable to connect to server.", "Error", MessageBoxButtons.OK, MessageBoxIcon.Error);
    return;
}
The above code is self-explanatory as I am just connecting to Raspberry PI.
In the form load event, I have to initialize chart values and add 3 line series to my CartesianChart for X, Y and Z axis respectively. In my case the name of the Cartesian Chart is ADXLViz.
Values_X = new ChartValues<ObservableValue>();
Values_Y = new ChartValues<ObservableValue>();
Values_Z = new ChartValues<ObservableValue>();

ADXLViz.Series.Add(new LineSeries
{
    Values = Values_X,
    Title = "X",
    StrokeThickness = 4,
    PointGeometrySize = 0,
    DataLabels = true
});

ADXLViz.Series.Add(new LineSeries
{
    Values = Values_Y,
    Title = "Y",
    StrokeThickness = 4,
    PointGeometrySize = 0,
    DataLabels = true
});

ADXLViz.Series.Add(new LineSeries
{
    Values = Values_Z,
    Title = "Z",
    StrokeThickness = 4,
    PointGeometrySize = 0,
    DataLabels = true
});
Play around with different properties in the LineSeries class and set the output that suits your need or your eye. Notice the Values properties in the LineSeries class which holds the value which is received from Raspberry PI.
I am requesting the readings from Raspberry PI every 500ms and to do this I am using a Timer class. This is easy to use and configure. Just drag and drop the Timer control from the toolbox. In the properties change the Interval property to 500 and Enabled to True. After this I set the Tick event which will request the new readings every 500ms.
string stringData;
server.Send(Encoding.ASCII.GetBytes("adxl"));
data = new byte[1024];
int recv = server.Receive(data);
stringData = Encoding.ASCII.GetString(data, 0, recv);
string[] adxl = stringData.Replace(" ", "").Split('|');

Values_X.Add(new ObservableValue(Convert.ToDouble(adxl[0].Split(':')[1])));
Values_Y.Add(new ObservableValue(Convert.ToDouble(adxl[1].Split(':')[1])));
Values_Z.Add(new ObservableValue(Convert.ToDouble(adxl[2].Split(':')[1])));

if (Values_X.Count > 10) Values_X.RemoveAt(0);
if (Values_Y.Count > 10) Values_Y.RemoveAt(0);
if (Values_Z.Count > 10) Values_Z.RemoveAt(0);

X_Label.Text = Convert.ToString(adxl[0].Split(':')[1]);
Y_Label.Text = Convert.ToString(adxl[1].Split(':')[1]);
Z_Label.Text = Convert.ToString(adxl[2].Split(':')[1]);
The stringData variable holds the response or reading which is received from Raspberry PI. If you check the Python code above you will see that the response is being sent in a single string called data. I am splitting the string here and extracting the values and setting it to ChartValues<ObservableValue> object. This will render all the 3 line series chart and update it with the readings received from PI. But the problem here will be that in few minutes the chart will be hard to see due to lot of data congestion in chart. In order to overcome this problem, I have removed the first value from all the 3 line series when the chart displays more than 10 values. You can change the value from 10 to whatever suits you.
The overall idea of building this application is to see whether it is possible or easy to communicate from Raspberry PI apart from using frameworks like WebioPI or Flask. The complete source code for Raspberry PI and Windows Forms application is available on Github along with Fritzing sketch file and additional instructions to install the dependencies.
Setting up the new Angular 2 app with Web API and .NET core is easy but can be a bit tricky. The older beta releases of Angular 2 works fine as there are not many files to refer and to work with. When I started using Angular 2 it was in RC1 and the way the files are being referenced in the app is bit different than the older versions of Angular 2. I don’t want to repeat these steps again and again so I put up a Github repo for this seed project. You clone it and hit F5 and you will have your Angular 2 app with Web API.
At the time of writing this post I am using .NET Core version 1.0.0-preview1-002702. The complete seed project is available on GitHub.
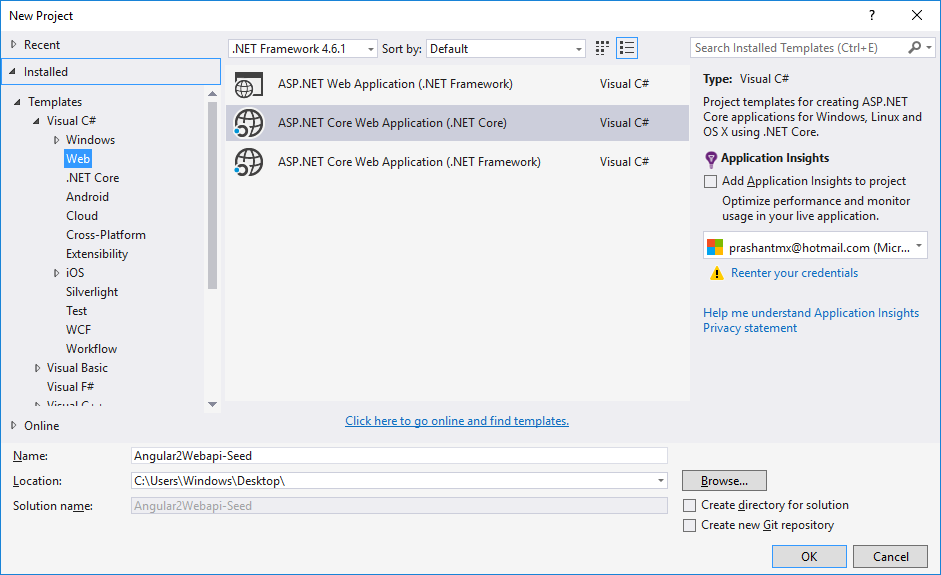
Here is how I did it. Select ASP.NET Core Web Application (.NET Core). I have installed the new .NET Core RC2. Name the project as you like.
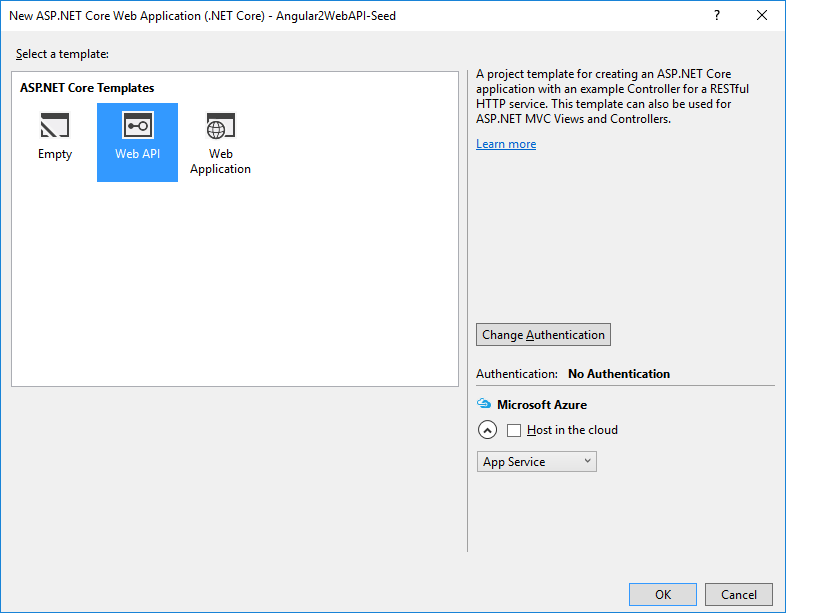
Select the Web API project template.
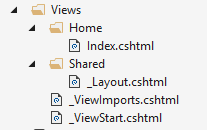
After the project creation is successfull. The first thing is to create a Views folder. The folder structure is like the same like it is for MVC application. This is how the folder structure looks like.
Because its a a Web API project, by default it will not render the views and therefore we have to add some dependencies in project.json file.
"Microsoft.AspNetCore.StaticFiles": "1.0.0-rc2-final",
"Microsoft.AspNetCore.Mvc.TagHelpers": "1.0.0-rc2-final",
"Microsoft.AspNetCore.Mvc.WebApiCompatShim": "1.0.0-rc2-final"
The project.json file is different than that of the older version of the .NET Core. You will see the difference when you see it.
Next we set the routes for the views we have in the Startup.cs file.
app.UseMvc(routes =>
{
    routes.MapRoute("default",
                    "{controller=Home}/{action=Index}/{id?}");

    routes.MapWebApiRoute("defaultApi",
                          "api/{controller}/{id?}");
});
The routes are now set and you can run the application and check if you can see the view or not. Once that is set, let start adding the support for Angular. Here is the list of the files which we need to add.
tsconfig.json file
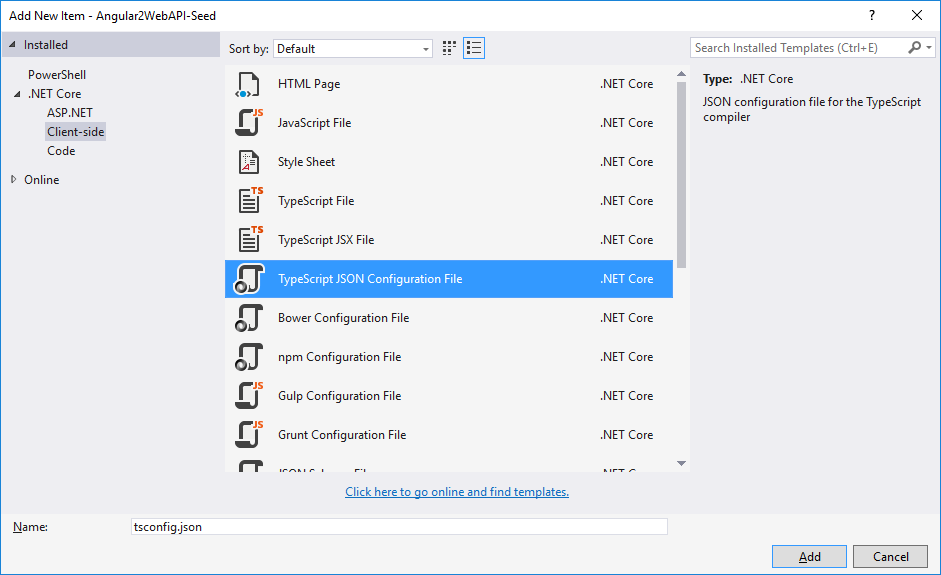
Add the below code to the file and save it.
{
  "compilerOptions": {
    "target": "es5",
    "module": "system",
    "moduleResolution": "node",
    "sourceMap": true,
    "emitDecoratorMetadata": true,
    "experimentalDecorators": true,
    "removeComments": false,
    "noImplicitAny": false,
    "rootDir": "wwwroot",
    "outDir": "wwwroot",
    "listFiles": true,
    "noLib": false,
    "diagnostics": true
  },
  "exclude": [
    "node_modules"
  ]
}
typings.json file
Add a blank .json file and name it typings.json
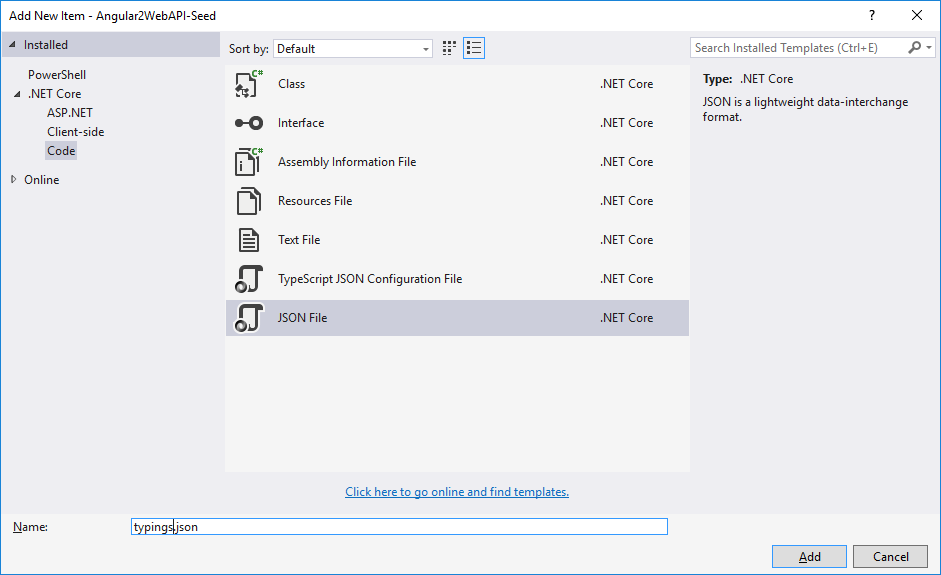
Add below lines to the typings.json file.
{
  "ambientDependencies": {
    "es6-shim": "registry:dt/es6-shim#0.31.2+20160317120654",
    "jasmine": "registry:dt/jasmine#2.2.0+20160412134438"
  }
}
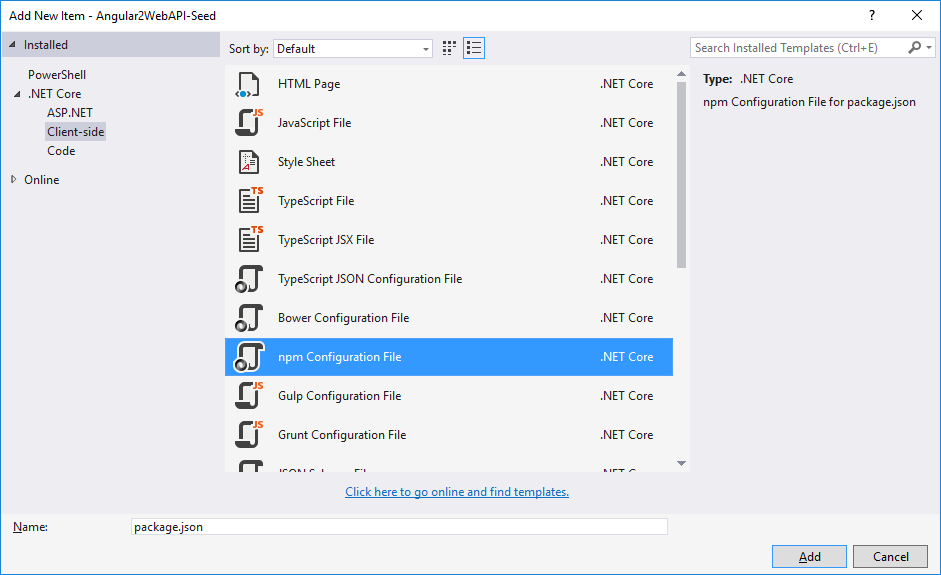
As per the official Angular documentation, we will stick with NPM to fulfill the client-side dependencies. Start with adding new npm Configuration File. The content of the NPM file is almost the same, but I made few changes as per my requirement. Here is the complete configuration file.
{
  "name": "Angular2WebAPI-Seed",
  "version": "1.0.0",
  "scripts": {
    "postinstall": "typings install"
  },
  "license": "ISC",
  "dependencies": {
    "@angular/common": "2.0.0-rc.1",
    "@angular/compiler": "2.0.0-rc.1",
    "@angular/core": "2.0.0-rc.1",
    "@angular/http": "2.0.0-rc.1",
    "@angular/platform-browser": "2.0.0-rc.1",
    "@angular/platform-browser-dynamic": "2.0.0-rc.1",
    "@angular/router": "2.0.0-rc.1",
    "@angular/router-deprecated": "2.0.0-rc.1",
    "@angular/upgrade": "2.0.0-rc.1",

    "lodash": "4.12.0",
    "systemjs": "0.19.27",
    "es6-shim": "^0.35.0",
    "reflect-metadata": "^0.1.3",
    "rxjs": "5.0.0-beta.6",
    "zone.js": "^0.6.12",
    "angular2-in-memory-web-api": "0.0.7",
    "bootstrap": "^3.3.6"
  },
  "devDependencies": {
    "gulp": "3.9.1",
    "concurrently": "^2.0.0",
    "typescript": "^1.8.10",
    "typings": "^0.8.1"
  }
}
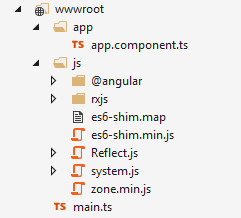
Notice the postinstall section in the npm configuration file. In this section we are installing the types required by our Angular 2 application. Now we can start setting up the Angular stuff in the wwwroot folder. Create an app and js folder inside this folder. Inside app folder create a new .ts file (TypeScript file). Here is the folder structure looks like in the wwwroot folder.
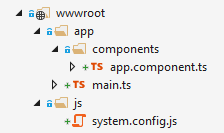
You can see a system.config.js file is the same as you can see the Angular quickstart guide. I just have map the paths for the dependencies so that can be loaded without any problem. The main.ts file will be the main bootstrapper and app.component.ts file is the component file which will render the content on the page. At this point running the application will fail and it will give you several warnings and errors. To resolve that we need to add the references and we can do this easily by using a gulp file. The gulp file will automate the copying of dependencies in the wwwroot folder and ease our task.
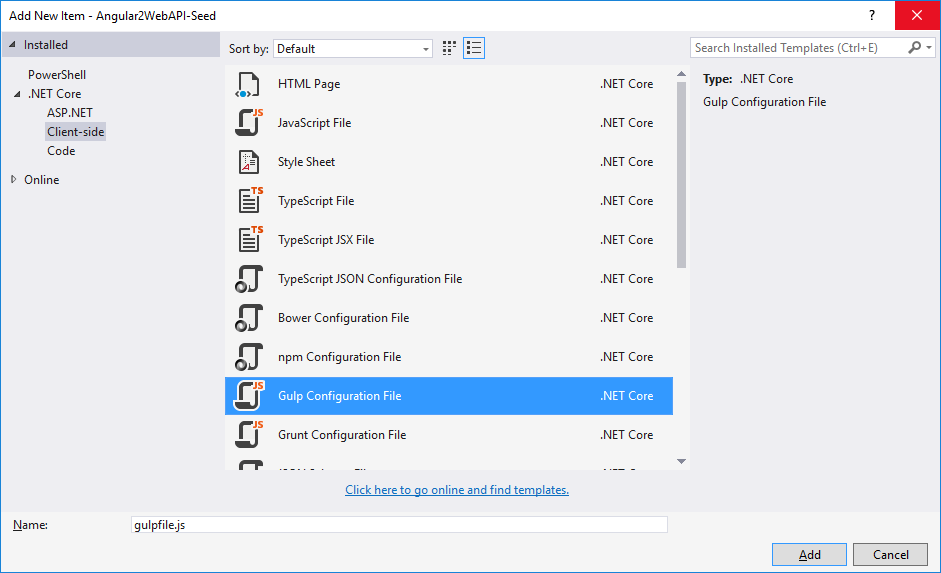
The content of the gulp file in this case looks like this.
///var _ = require('lodash'); var gulp = require('gulp'); var js = [ 'node_modules/zone.js/dist/zone.min.js', 'node_modules/systemjs/dist/system.js', 'node_modules/reflect-metadata/Reflect.js', 'node_modules/es6-shim/es6-shim.min.js' ]; var map = [ 'node_modules/es6-shim/es6-shim.map', 'node_modules/reflect-metadata/reflect.js.map', 'node_modules/systemjs/dist/system.js.map' ]; var folders = [ 'node_modules/@angular/**/*.*', 'node_modules/rxjs/**/*.*' ]; gulp.task('copy-js', function () { _.forEach(js, function (file, _) { gulp.src(file) .pipe(gulp.dest('./wwwroot/js')) }); }); gulp.task('copy-map', function () { _.forEach(map, function (file, _) { gulp.src(file) .pipe(gulp.dest('./wwwroot/js')) }); }); gulp.task('copy-folders', function () { _.forEach(folders, function (folder) { gulp.src(folder, { base: 'node_modules' }) .pipe(gulp.dest('./wwwroot/js')) }); }) gulp.task('default', ['copy-js', 'copy-map', 'copy-folders']);
Notice the very first line in the file above. We want to execute the task on every time before the build is triggered. The gulp file will only be copying the required files to the js folder and other unnecessary files will not be required. After the task is executed here is the how the final directiry structure will look like under wwwroot.
Depending on the selector you have in your component, you need to add the selector to your view. In my case the selector is app, hence add <app></app> in your Index.cshtml file.
After you set up the index page, there is one more thing that you have to do is to set the launch URL.
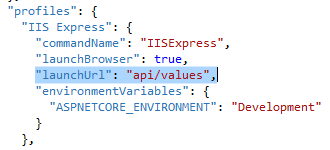
The URL may change and differ as per your API endpoint. Press F5 to run the application.