

I have created a wrapper class to simplify my work with REST API. I assume that you will be using a web application. First step is to create an application at dev.live.com. Once the application is created you will have the ClientID, Client Secret and Redirect domain. We will be using a ClientID and Redirect domain. Remember that the Redirect domain value cannot have localhost. You must provide a correct domain name as after successful authentication you, the user will be redirected to the domain along with the access token.
In the response you will get the access token which will be available to you for the next 3600 seconds. The access token will be in the returning URL of your domain. In my case it is http://midnightprogrammer.net/#access_token=EwBIA…. I will then retrieve the access token and pass it to my wrapper which will do the work for me.
Time to look and understand the code a bit. I have been using SkyDrive a lot for backup and sharing files and I also access SkyDrive from a web application I have built. But the code is pretty messy and needs revision. So I created a wrapper around the API.
First I need to authenticate the user with his/her live credentials with correct scopes. If scopes are wrong you will not be able to perform actions to the SkyDrive. To learn more about scopes read here. As I am working with SkyDrive I am using 2 scopes wl.signin and wl.skydrive_update. wl.skydrive_update is necessary if you want to have write access to SkyDrive. The SkyDriveAPI wrapper class has the Authenticate method which will redirect you to authentication screen of live service. Once you enter your credentials you will then be redirected to the domain (the domain you provided while you created the application) along with the access token. Here is the sample code:
public void Authenticate()
{
    string authorizeUri = AuthUri;
    authorizeUri = authorizeUri + String.Format("?client_id={0}&", _ClientId);
    authorizeUri = authorizeUri + String.Format("scope={0}&", "wl.signin,wl.skydrive_update");
    authorizeUri = authorizeUri + String.Format("response_type={0}&", "token");
    authorizeUri = authorizeUri + String.Format("redirect_uri={0}", HttpUtility.UrlEncode(_SiteURL));
    this.AuthURI = authorizeUri;
}
This is an insight of the wrapper class. In the actual scenario you will never be using it this way:
SkyDrive drive = new SkyDrive(ClientID, Site URL);
drive.Authenticate();
Response.Redirect(drive.AuthURI);
In the constructor of the SkyDrive class, the first parameter will be your ClientID and the second one will be the Site URL or the redirect domain. After this the SkyDrive class object drive (whatever the name you give) will call the Authenticate method to generate the URL with all the required parameters and store the URL in the public variable called AuthURI, which I used to redirect the user to authenticate using his credentials.
Now Once the user is authenticated you will be provided with the access token in the URL. It depends on you how you are going to fetch it. Once you fetch the access token you then need to keep it safe. To make sure that the access token remains with your API calls, save it like this:
drive.AccessToken = "EwBIA.....";
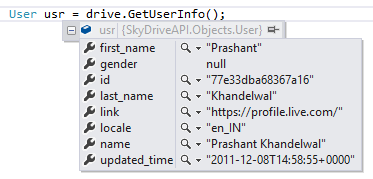
Once you have the access token, you are all good to make your first call to SkyDrive. For the simplicity, I am making a request to call get the basic user information.
User usr = drive.GetUserInfo();
Moreover you can also list all the folders in your SkyDriver with this simple call.
Folder driveFolders = new Folder();
foreach (var folder in driveFolders)
{
    Response.Write(folder.Value + " " + folder.Key +"<br/>");
}
The above code returns a Dictionary which contains the name of the folder and id of the folder. You’ll need the folder id in order to list down all the files in the folder. To list down all the files in a folder use the below code.
FolderContent content = drive.ListFolderContent("folder.77e33dba68367a16.77E33GBA68467A16!2189");
for (int i = 0; i < content.Files.Count; i++)
{
    Response.Write(content.Files[i].name);
}
It is not just the name of the files you get but you get the complete properties of the file. So you can play around with that too.
Coming to the most searched feature of SkyDriver REST API is to how to upload a file using REST API. The MSDN states that you can upload the files to SkyDriver by making HTTP POST or HTTP PUT requests. Here is how I am doing it inside my wrapper class.
public bool UploadFile(string FolderID, string FilePath)
{
    bool Uploaded = false;
    try
    {
        byte[] fileBytes = System.IO.File.ReadAllBytes(FilePath);
        string UploadURI = BaseURI + FolderID + "/files/" + Path.GetFileName(FilePath) + "?access_token=" + AccessToken;

        var request = (HttpWebRequest)HttpWebRequest.Create(UploadURI);
        request.Method = "PUT";
        request.ContentLength = fileBytes.Length;

        using (var dataStream = request.GetRequestStream())
        {
            dataStream.Write(fileBytes, 0, fileBytes.Length);
        }

        string status = (((HttpWebResponse)request.GetResponse()).StatusDescription);

        if (status.ToLower() == "created")
        {
            Uploaded = true;
        }

        return Uploaded;
    }
    catch (Exception)
    {
        return false;
    }
}
I am using a PUT method to upload files to SkyDrive. At this moment I have not implemented the POST method. But in near future I will. If you are using my wrapper class then the just use a single line of code to upload a file to a particular folder.
bool uploaded = drive.UploadFile("folder.77e33dba68367a16.77E33DUA68567A16!104", "D:\\walls\\flowers_442.jpg");
Calling the UploadFile method will upload a file to the folder. The first parameter in the above method is the folder id where you want to upload the folder and the second one is the local file path.
I am currently working and trying to understand the REST API and its features. I will include other functions as more and more I learn about them.
The SkyDrive API Wrapper is hosted on GitHub. Fork it, change it, customize it as you wish. And if you have or found something good, then please do let me know.
I want to give the credit to Christophe Geers for his post which gives me an insight of the API.