

Last month I have blogged on how you can integrate OpenID login support in your ASP.NET aplication. Some of the reader requested me that it would be better if I could show how you can implement membership and roles with OpenID authentication. It doesn’t seems easy in the first place, because you will require a bit more informaton from the user like his name and e-mail address. So, what I am trying to show you here is how you can gather information of the user who has logged in with OpenID and then you can use that information to set roles and membership for your website. I am just extending the old sample project from my previous post to show you how you can get some of the basic information of the user including their e-mail address.
I assume you have downloaded the complete solution from my previous post with OpenID login support, download here if you haven’t yet. There is nothing new to be added in the application, instead we just need to change some properties of the OpenID control we have used. Click the control and press F4 to get the properties up. Set the properties to Request to make sure that whenever a user sign-in with OpenID the API also makes a request to the service provider to get the information of the user signing in. I have request some of the basic information of the user by making them Request. It all depends on the author of the code what information he wants to see/require when the user gets logged in.
Now as you have set the properties, it’s time to make a request to the provider and get the infromation. You need to do something special to get the details, sign-in as normally you would have done, but notice while re-directing the page URL will be something like this (only for a while):
.............&openid.sreg.required=&openid.sreg.optional=nickname%2Cfullname%2Cdob%2Cgender%2Ccountry
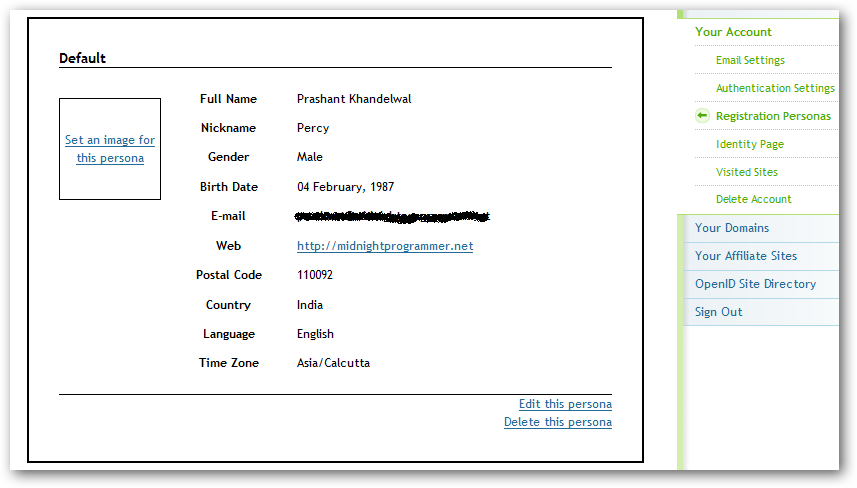
Notice the last few options in the query string is requesting the parameters we have “Requested”. But you should also know that the values will be null if the user has not filled up his Persona (Personal Details). If you try to fetch the details of the user, you will get a null value. So, it’s pretty necessary that the user who has logged in using the OpenID should have his personal details filled up at the provider’s end. This is how my personal details look like at OpenID (website) login.
Personas are actually the information of the user which will be delivered to the site or application where the user has logged in using OpenID. You can add/modify/delete a personas. Once you have the persona of the logged in user you can:
- Set the OpenID control to request the details of the users instead of providing the user to fill out a long registration form.
- Save the values to the database for future use.
- Use the information for setting Roles and Membership for your application.
I’ve already demonstrate in the above steps on how to set the OpenID user control to request the user details or personas.
What else I need to do
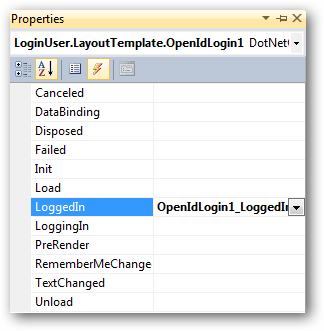
In Visual Studio, select the OpenID control and press F4 to get the properties. Under method section double-click the LoggedIn method (The method name describes itself).
In this method, read the response and set it to the session variable. Give a name to the sesison variable.
protected void OpenIdLogin1_LoggedIn(object sender, DotNetOpenAuth.OpenId.RelyingParty.OpenIdEventArgs e)
{
        Session["OpenID"] = e.Response;
}
When the user is successfully authenticated by the provider, user is re-directed to the default home page. Therefore, we need to handle the response on the home page. Add these two namespaces on the page code-behind.
using DotNetOpenAuth.OpenId.RelyingParty;
using DotNetOpenAuth.OpenId.Extensions.SimpleRegistration;
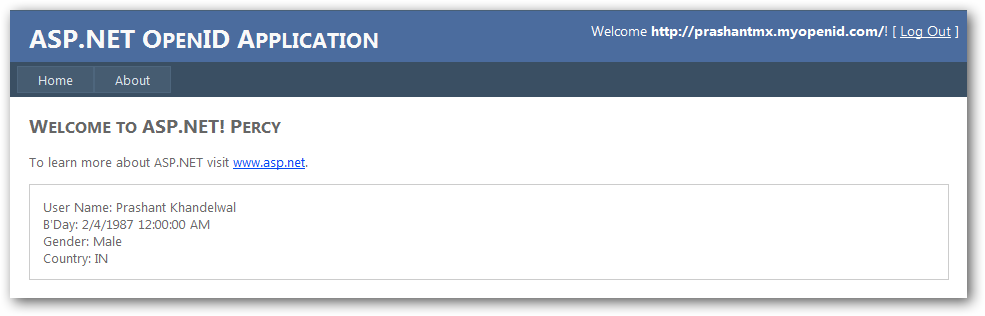
I am using the page load method so as to get the details and display it front of the user, you can also set the same details to fill up a registration form. To read the response from the session variable use the IAuthenticationResponse to read store the session value and then read it with GetResponse<ClaimResponse> method. Below is the complete code for your default.aspx page or the page you want the user to be re-directed. I have store the values in the public variables as I want to show the user details on the default page.
using System;
using System.Collections.Generic;
using System.Linq;
using System.Web;
using System.Web.UI;
using System.Web.UI.WebControls;
using DotNetOpenAuth.OpenId.RelyingParty;
using DotNetOpenAuth.OpenId.Extensions.SimpleRegistration;
namespace DOTNETOAUTH
{
    public partial class _Default : System.Web.UI.Page
    {
        IAuthenticationResponse OResponse;
        public string UserName = string.Empty;
        public string Gender = "No Gender Specified";
        public string Country = string.Empty;
        public string Nick = string.Empty;
        public string Bday = string.Empty;

        protected void Page_Load(object sender, EventArgs e)
        {
            try
            {
                OResponse = (IAuthenticationResponse)Session["OpenID"];
                var details = OResponse.GetExtension<ClaimsResponse>();
                UserName = details.FullName;
                //email = details.Email;
                Gender = details.Gender.ToString();
                Country = details.Country;
                Nick = details.Nickname;
                Bday = details.BirthDate.ToString();
            }
            catch { }
        }
    }
}
If any of the above values are not present in the user persona , it will result in an error, so make sure you have handle the exceptions properly. This is it, once you have the details you can use to store the details in the database, set roles and membership to the user logins. I have skip the part to set user roles and membership, once we have the user information we can use that information to set roles or just save the information in the database.
Download: DOTNETOAUTH - UserData.zip (552.20 kb)