© 2026 Pashant Khandelwal

© 2026 Pashant Khandelwal
A new view engine is introduced in ASP.NET MVC 3 called RAZOR. You can download Preview 1 from Microsoft’s download center and get it running on your machine to check the new features in MVC 3. Just in case if you are thinking that installing MVC 3 will mess your current MVC 2 installation….No, it won’t. I came across a Webcamp video where Phil Haack with James Senior demonstrate this view engine. My this post is also based on the same talk.
So when you install MVC 3 Preview 1 on your machine, jump start by creating a new project in Visual Studio 2010. You will not be able to use this view engine with .NETFX 3.5 (SP1).
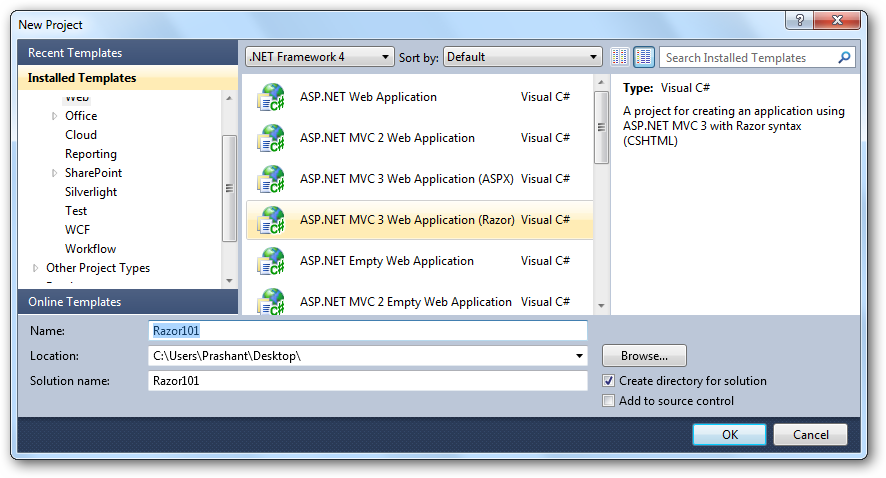
Now when you select new project and under Web templates you will now see ASP.NET MVC 3 application twice. The one template with (ASPX) is using normal web forms as your view engine and the other one with (Razor) is the new view engine. This is only for preview 1, these options will not be present in the final release of the MVC 3, instead you will have an oprion to select the view engine for your application later, I am not very sure how, but it will be more likely the way you select tests.
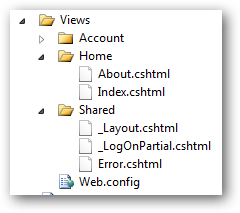
Time to check the Solution Explorer. No .aspx files only .cshtml
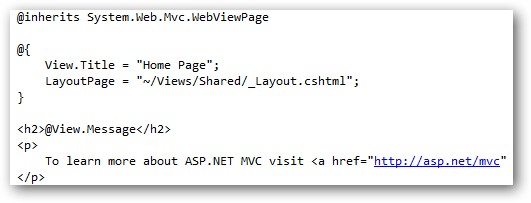
The drawback in Preview 1 is that there is no syntax highlighting and no intellisense. Now that would have made you think “OMG! how am I going to write the code now!?”. But Razor is easy and more over it too light-weight, more then I thought before I used it. Check out Index.cshtml, the markup code looks like this.
Time to take a look at Home Controller. Take a look at the Index() action method, the syntax is bit different with the one we have used previously.
public ActionResult Index()
{
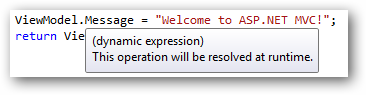
ViewModel.Message = "Welcome to ASP.NET MVC!";
return View();
}
The line ViewModel.Message = “Welcome to ASP.NET MVC!”; is equivalent to:
public ActionResult Index()
{
       ViewData["Message"] = "Welcome to ASP.NET MVC!";
       return View();
}
The ViewModel basically is of type dynamic which means that its operations will be resolved at runtime. Hover your cursor over ViewModel and Message to know about it.

If you need to show some addtional information related your current project you can set it too with ease. In the Index method you can add antoher line like this which says something about your project:
NOTE: *As ViewModel is of Dynamic type, so when you press dot (.) after writing ViewModel don’t expect that something will come up and as said before all expressions will be resolved at runtime.*
public ActionResult Index()
{
      ViewModel.Message = "Welcome to ASP.NET MVC!";
      ViewModel.AboutApp = "This is a sample ASP.NET MVC 3 Preview 1 application!";
      return View();
}
To show this message on the Index view you will just call it by prefixing it with ’@’ symbol. To show the value on the page you simply write below line and prefix it with @ symbol(If you say this is simple, I would rather prefer to say it effortless).
@View.Message
@View.AboutApp
Moving further, add a new class called Contacts (or what ever name you like) with 3 peoperties.
public class Contacts
{
    public string Name{ get; set; }
    public int Age{ get; set; }
    public string Email { get; set; }
}
Moving back to the HomeController add the below lines of code to the Index action method.
var ctc = new Contacts[] {
          new Contacts{Name="Prashant", Age = 23},
          new Contacts{Name="Arvind", Age = 24},
          new Contacts{Name="Max", Age = 23}
};
The view should not be empty this time. And therefore your Index action method return the Contacts we have just created.
public ActionResult Index()
{
    ViewModel.Message = "Welcome to ASP.NET MVC!";
    ViewModel.AboutApp = "This is a sample ASP.NET MVC 3 Preview 1 application!";
    var ctc = new Contacts[] {
          new Contacts{Name="Prashant", Age = 23},
          new Contacts{Name="Arvind", Age = 24},
          new Contacts{Name="Max", Age = 23}
          return View(ctc);
    };
}
This time also Razor makes it simple to view the the data you returned from the controller. In the Index.cshtml you can do it pretty simply and you will still have a pretty looking markup of the view page. Create a list of contacts you have just created. As they are in a set of array, we can then enumerate the array with a foreach loop and show it on the page.
<ul>
@foreach (var c in Model){
<li> My name is @c.Name and I am @c.Age years old. </li>
}</ul>
You can easily get the data in a jiffy without writing a lot of markup. No problem in concatenating the data, the @ symbol and MVC compiler is pretty intelligent and does this for us. So what if we want to add e-mail addresses also. How this view engine will handle this ambiguity? Well let see. Just add an e-mail property to the array of contacts.
var ctc = new Contacts[] {
          new Contacts{Name = "Prashant", Age = 23, Email = "prashant@midnightprogrammer.net"
}
And on the view page the line will be something like this
<ul>
@foreach (var c in Model){
<li> My name is @c.Name and I am @c.Age years old. You can email me at @c.Email.</li>
}</ul>
Hit F5 and see it by yourself. There are lot of features described by Scott Guthrie and Phil Haack on their blog. Well I can go on writing and writing about Razor, so I think I should take a pause now and you can go to below links for more deep information about Razor view engine and to know what’s new in the upcoming release of ASP.NET MVC 3.
Recommend Reading:
If you are not using this free service offered by Microsoft, then stop reading and go to SkyDrive and sign in with your Live ID and get started. A whooping 25 GB of free space to put all your stuff at one place, access anytime, and anywhere you want and just in case if you are aware, which I hope you already are, why I am mentioning about skydrive here? So, here is the case…
I uploaded some videos on my blog a few month ago, the files were physically hosted on my blog space and hogging a lot of space. I am now using SkyDrive since it final launch in August 2007 (if I am not wrong) and just gave a quick thought on hotlinking my files from SkyDrive to my blog. There are two big benefits of using SkyDrive for file hosting:
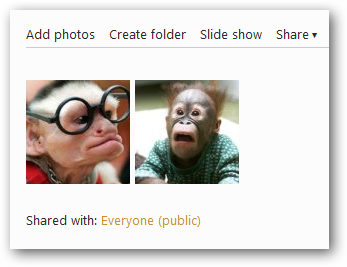
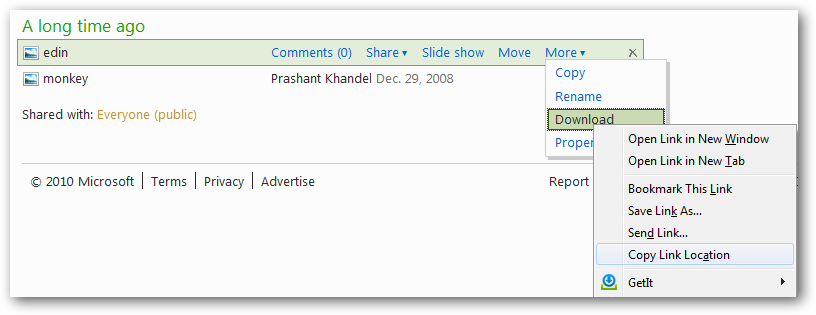
So how can you hotlink files from SkyDrive and use it for your purpose. Go to the folder where you have the file, it can be an image, video or a audio file. You will see something like the below. This is one of my public folder where I have 2 images (funny).
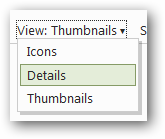
Change the view style from Thumbnail to Details. By default for the folder having images the default view will be Thumbnails.
Now hover the mouse to the image you want to embed or hotlink in your blog post or on a webpage. Click More and then right-click Download and select Copy Link Location. This will copy the download link on your clicb board and now you require some manual work on the link.
Open notepad and and paste the copied text. The link look something like this.
http://5mr9iq.bay.livefilestore.com/
y1pn6wH-ZKbNE3AMAGeZry5db0ukIQqy2ksda2ZHtegsxyJeeN1ufTs4AbT
-iyG2DnYpkLUFyPw5OnTpE_t7p_duRJ5wcVOHoC_/edin.jpg?download&psid=1
Just to hotlink the file remove the text starting from '?' till end (remove ?download&psid=1) and that’s it, your image hotlink is ready and the final version of link looks like this:
http://5mr9iq.bay.livefilestore.com/y1pn6wH-
ZKbNE3AMAGeZry5db0ukIQqy2ksda2ZHtegsxyJeeN1ufTs4AbT-
iyG2DnYpkLUFyPw5OnTpE_t7p_duRJ5wcVOHoC_/edin.jpg
Below is the same image I have hotlinked from my SkyDrive account.

The same can be done for the videos.
Moreover, if you take a look at the status bar of your IE or the browser you are using you will see that the data transfer is from livefilestore.com and not from yourdomain.com. This saves your bandwidth too!!!

This is not enough, now the question here is how can one upload files to SkyDrive, we can use the web interface provided by the SkyDrive…..!!? But how about using it as a network drive on your My Computer. You can download Gladient Cloud Desktop to map the SkyDrive or any other online service you are using to store your files, like Amazon S3 or Picasaweb to share photos.
UPDATE: Greg Duncan share his experience with SkyDrive with me. I recommend you to read it here.
![]()
Few days back I was looking at Scott Hanselman and friend’s Open Source Nerddinner project, learning and grabbing some new things from there. Apart from looking some internals I looked at the OpenID implementation. This was all a week ago and now it’s time for me to write and give some thoughts on DotNetOpenAuth. For folks who are new to OpenID I am going to demonstrate how you can implement one in your project with ease.
To get started download the DotNetOpenAuth API and extract the contents from the zip file. The download also includes some samples for you to get you started. Kickstart by creating a new ASP.NET webforms project. I am just using a default template for my application, you can use the one you like or start by creating a new page. Why I am using the default template for ASP.NET webform project? well you get to know later. So now when we are done creating a new ASP.NET webform project, time to add OpenID stuff in the project. Right click References and select Add Reference. Browse to the bin folder where you have extracted the contents of the downloaded zip file. Select DotNetOpenAuth.dll and click OK.
Changing the web.config:
A minor change in the web.config is required. Find the below lines in your web.config file:
<authentication mode="Forms"><forms loginUrl="~/Account/Login.aspx"
timeout="2880" /></authentication>
and replace it with:
<authentication mode="Forms"><forms defaultUrl="/default.aspx"
loginUrl="~/Account/login.aspx"/></authentication>
In the above configuration, loginUrl will always point towards to the login page and the defaultUrl will always point towards the page/URL which will be displayed when the authentication is successfull.
Implemeting OpenID support:
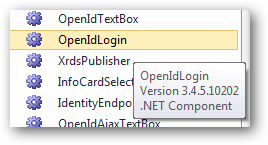
To implement OpenID support, open login.aspx page in the design view and then drag the OpenIdLogin from the toolbox on the page just after the default login implementation ends or where you want to have OpenID login. If you are not able to view the control, then you can browse the same dll you have add a reference in the above step.
If you want to implement this manually then register the control at the top of the page and then use it on the page.
Register the control:
<%@ Register Assembly="DotNetOpenAuth" Namespace="DotNetOpenAuth.OpenId.RelyingParty"
TagPrefix="rp" %>
To use the control on the page you can then simply write:
<rp:OpenIdLogin ID="OpenIdLogin1" runat="server"></rp:OpenIdLogin>
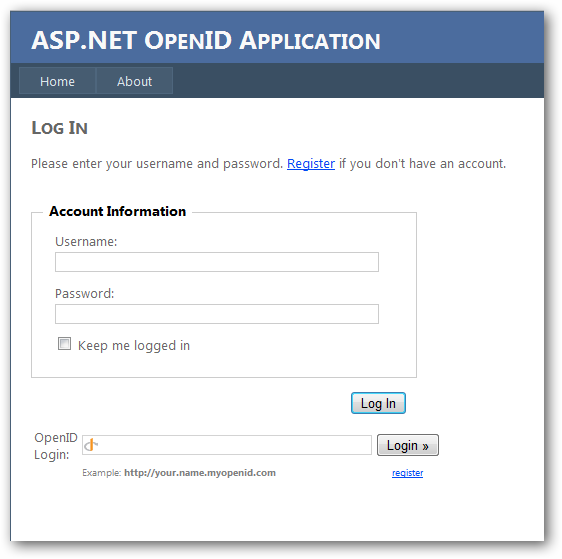
All done now and it’s time to test our application. Hit F5 and login with your openID. The page rendered in front of you is
Enter your openID and click login. You will be redirected to the official OpenID login page.
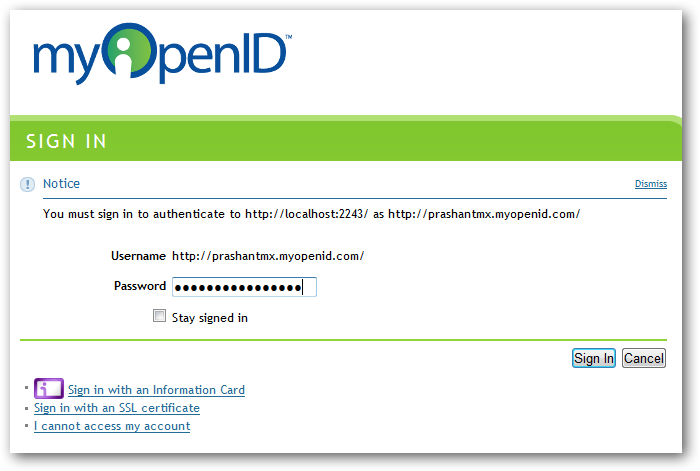
Enter your password for openID account and after the authentication is successfull you will be re-directed to the default page. Remember the web.config configuration we did!!? If everything goes well you can see your openID name login name on the top of the page.

This is the simplest way to implement openID. You can also implement openID on your ASP.NET MVC project to add some flexibility for you site users. Apart from this you can also download the Visual Studio 2010 template.
Download: DOTNETOAUTH.zip (542.85 kb)
Related Links:
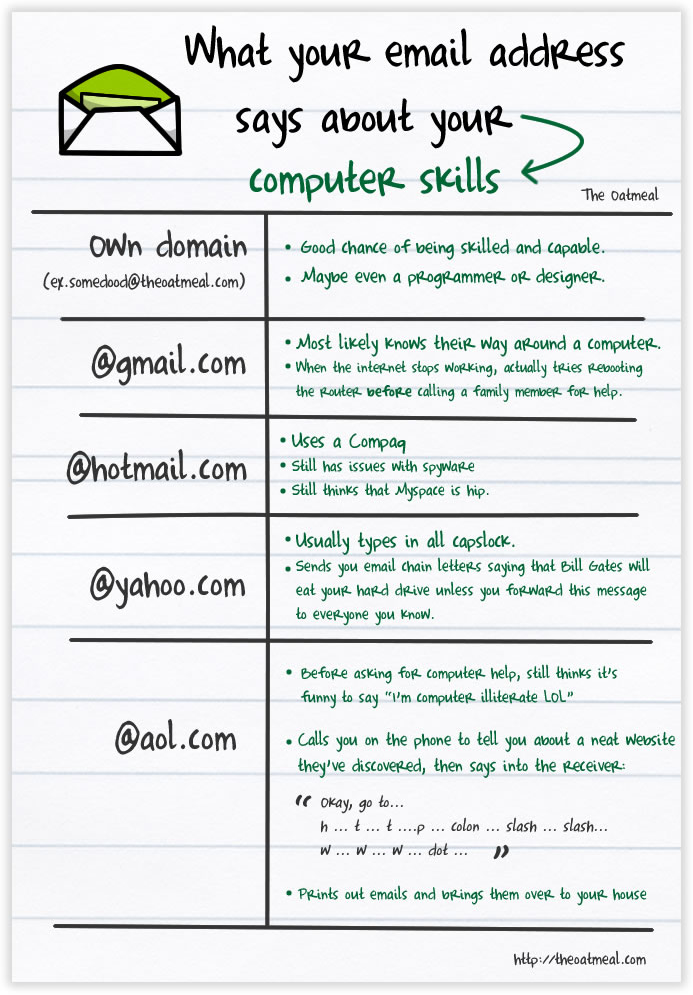
Just stumble upon this pic. Check, what it has to say about your computer skills!
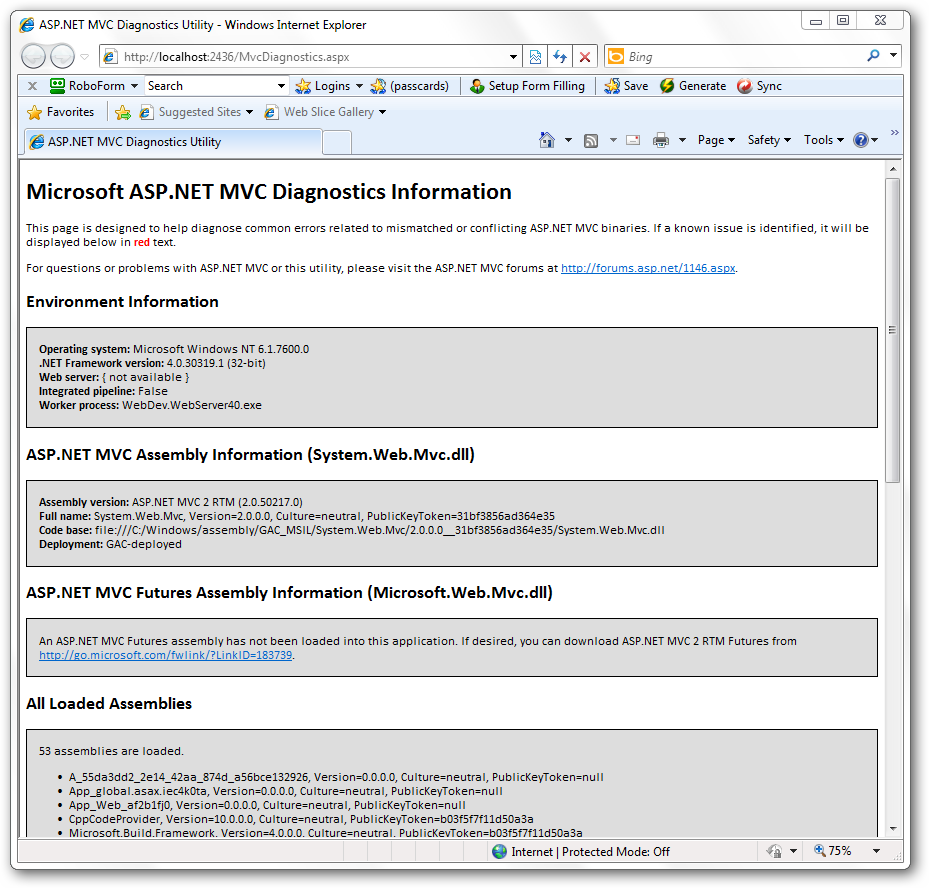
Diagnosing problems in your ASP.NET MVC application is now more easy by using a single file which is included in the MVCFutures package. Download this package from CodePlex and just drag and drop a file called MVCDiagnostics.aspx in the root of your MVC application and thats it.

Press F5 and set the URL pointing to the file diagnostics file and you will be able to see a detailed information about your currently running MVC application. The page you see should look something like this.