Terraform is my go-to IAC tool for building my infrastructure in Azure. I usually use Azure DevOps pipeline to execute my terraform plan, but it would be nice to know if I can execute it programmatically or on request basis. Even on request basis you can trigger a CI/CD pipeline to provision the infrastructure but maybe it is too much for a simple project to have.
One of the biggest pain points has been the authentication in command line tooling. I can execute my terraform plan if I have az cli login done on the shell/terminal I am using. I can also perform the same operation programmatically, but it will still open up a web browser and ask me for authentication. I don’t want user intervention when performing this operation. So, the way I can achieve this is by using Service Principal.
You can also make use of Managed Service Identity or MSI but not all Azure resources support this. You can check the list of the resources here.
The service principal I am planning to use will let me create any Azure resource. This is equivalent to az login cli command.
Setting up Azure
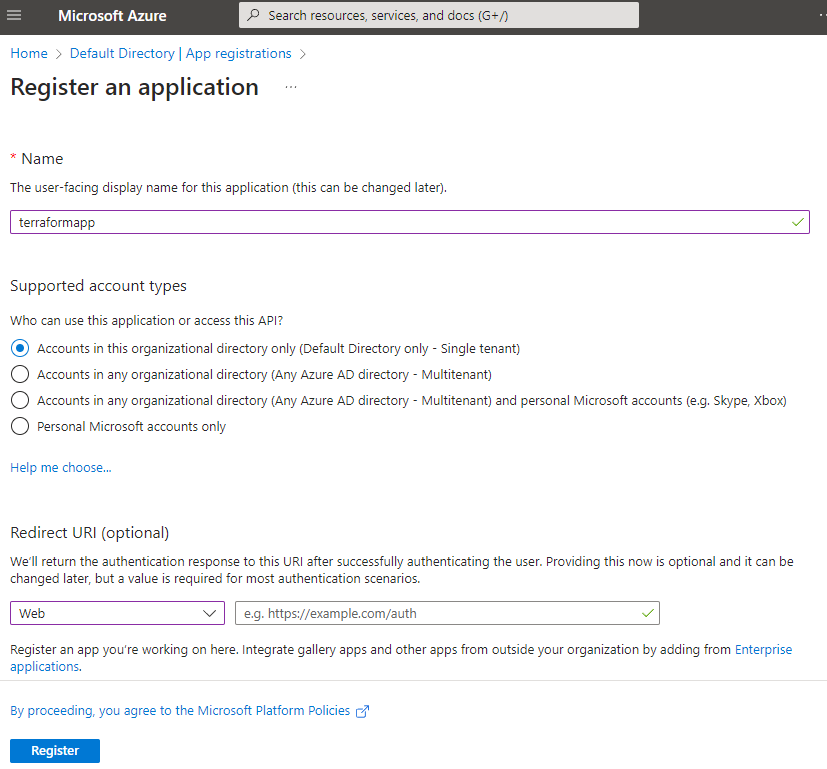
Add a new App registration in Azure Active Directory. Give a name to your application and then select Redirect URI to be web and URL can be left blank. Click Register to create an application.
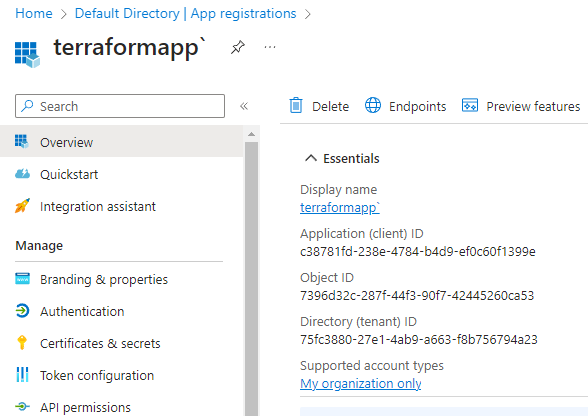
In the Overview section, copy the client id and tenant id. You also need to have a subscription id which you can find in your Active Directory or in your subscription resource in the portal.
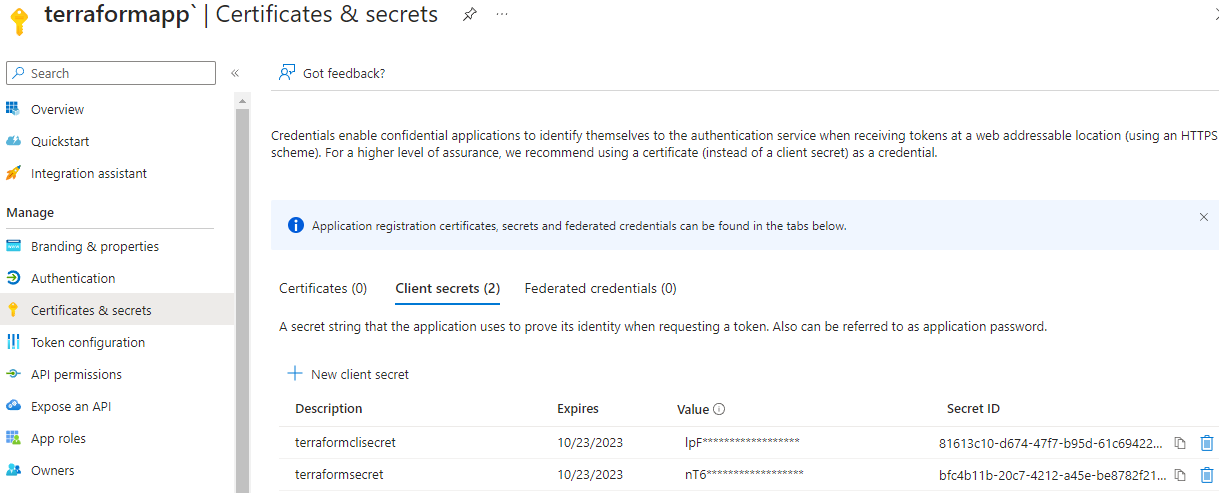
Click on Certificates & secrets, and then click + New client secret. Follow the instructions to create a new secret and once done, you should be presented with a secret which you should copy and save somewhere safe (preferably in Azure KeyVault) as this is the only time it will be visible to you.
In the end you should have these values with you:
- Client Id
- Client Secret
- Subscription Id
- Tenant Id
Now if you try creating a new resource using Terraform, it will fail as the service principal does not have permissions to manage resources in your subscription. To grant permissions, go to Subscriptions in Azure portal and click Access control (IAM).
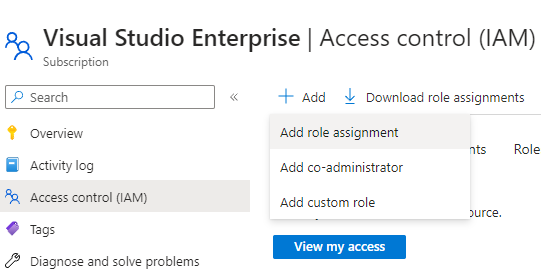
Click on Add role assignment and then click Privileged administrator roles.
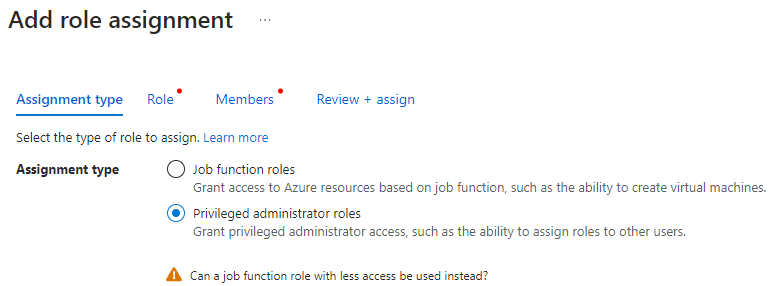
You can ignore the warning shown at the bottom, we need this option for adding contributor access to the subscription we want to manage.
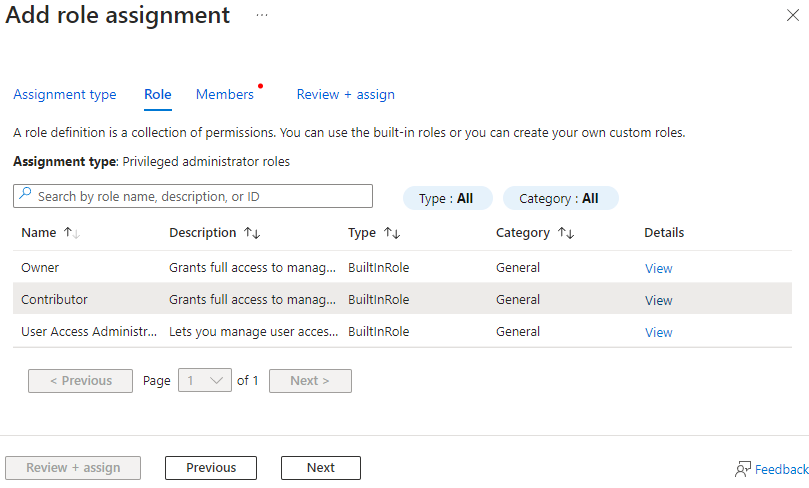
Select Contributor from the list and click Next.
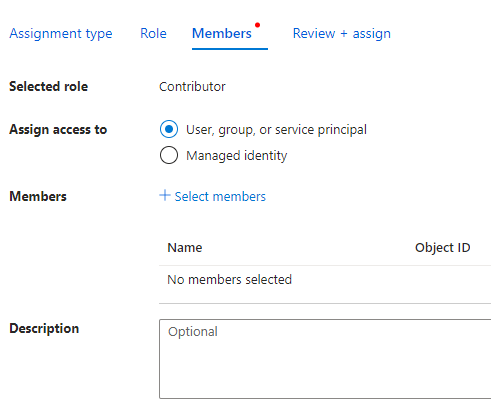
Select User, group or service principal and click + Select members.
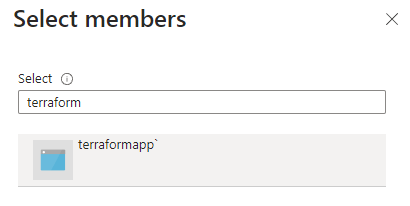
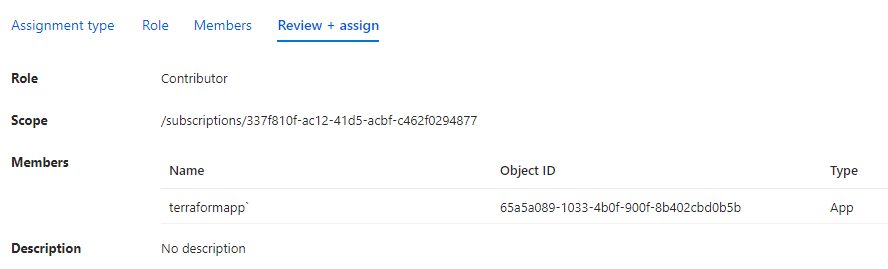
Search your application by name, select it and then click Select. Verify the details in the last step and click Review + assign.
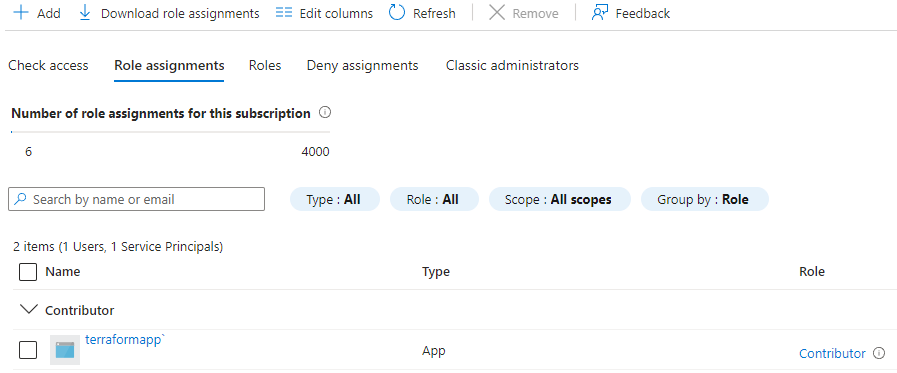
Back to the Access controls (IAM) blade, you can see the role assignment to the subscription.
Setting up Go project
Let’s see with a very basic example of getting this done programmatically. Setup a new go project and import these packages.
import (
    "fmt"
    "log"
    "os"

    "github.com/hashicorp/go-version"
    "github.com/hashicorp/hc-install/product"
    "github.com/hashicorp/hc-install/releases"
)
In the main function, add the below code:
os.Setenv("ARM_CLIENT_ID", "")
os.Setenv("ARM_CLIENT_SECRET", "")
os.Setenv("ARM_TENANT_ID", "")
os.Setenv("ARM_SUBSCRIPTION_ID", "")

//az login --service-principal -u CLIENT_ID -p CLIENT_SECRET --tenant TENANT_ID
cmd := exec.Command("az", "login", "--service-principal", "-u", os.Getenv("ARM_CLIENT_ID"), "-p", os.Getenv("ARM_CLIENT_SECRET"), "--tenant", os.Getenv("ARM_TENANT_ID"))
var stdoutBuf, stderrBuf bytes.Buffer
cmd.Stdout = io.MultiWriter(os.Stdout, &stdoutBuf)
cmd.Stderr = io.MultiWriter(os.Stderr, &stderrBuf)
err := cmd.Run()
if err != nil {
    log.Fatalf("cmd.Run() failed with %s\n", err)
}

outStr := string(stdoutBuf.Bytes())
fmt.Println(outStr)
The first thing we did was to set environment variables.
Name the environment variables as shown in the above example. These are the same names which are internally used by Terraform.
Normally I would use a service principal like this:
$ az login --service-principal -u CLIENT_ID -p CLIENT_SECRET --tenant TENANT_ID
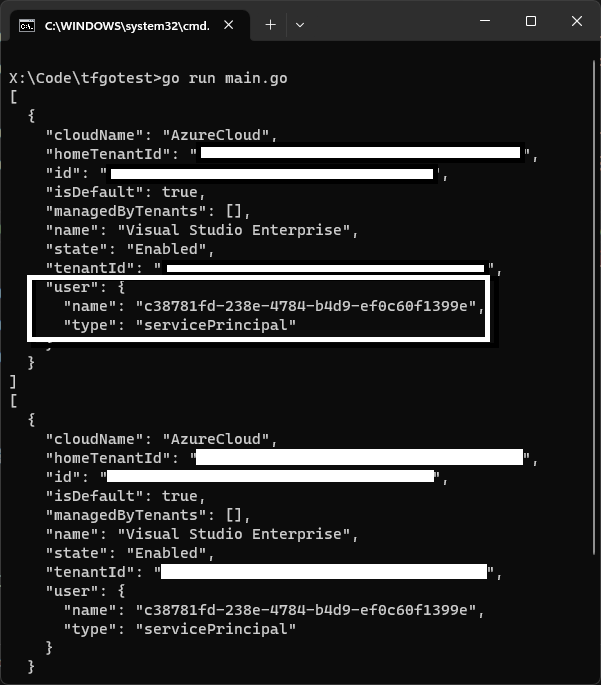
As we are automating this process, we can use the exec.Command to execute this command with parameters like this:
cmd := exec.Command("az", "login", "--service-principal", "-u", os.Getenv("ARM_CLIENT_ID"), "-p", os.Getenv("ARM_CLIENT_SECRET"), "--tenant", os.Getenv("ARM_TENANT_ID"))
This will get the service principal and assign it to the terminal where this application will be running.
Moving ahead you can remove or comment out the above code and leave the environment variables as is in the code file.
As a next step you can also take the terraform binary from the environment variable and automate the execution just like above. But there is an efficient way of doing this and for that we must make slight changes to our code.
First, we need to check if terraform is installed on the machine or not. On my machine I have Terraform installed and added to the environment with the name terraform. In Go, I can get this path with the help of os.Getenv and pass in the name of the environment variable terraform.
If the path exists, then I will use that path and if not then I can install a specific version of Terraform. Here is the is the complete code for the above explanation:
package main

import (
    "context"
    "log"
    "os"

    "github.com/hashicorp/go-version"
    "github.com/hashicorp/hc-install/product"
    "github.com/hashicorp/hc-install/releases"
)

func main() {

    var execPath string
    var tfInstallDir string
    var err error
    tfBin := os.Getenv("terraform")

    if len(tfBin) > 0 {
        log.Printf("Found Terraform: %s", tfBin)
        execPath = filepath.Join(tfBin, "terraform.exe")
    } else {
        log.Print("Terraform not found....installing")
        installer := &releases.ExactVersion{
            Product: product.Terraform,
            Version: version.Must(version.NewVersion("1.4.6")),
        }

        wd, _ := os.Getwd()
        tfInstallDir = filepath.Join(wd, "tf")
        if _, err := os.Stat(tfInstallDir); err != nil {
            log.Printf("Installation directory not found...creating")
            if err = os.MkdirAll(tfInstallDir, os.ModePerm); err != nil {
                log.Fatalf("ERROR: Cannot create \"%s\" directory - %v", tfInstallDir, err.Error())
                panic(err)
            }

            installer.InstallDir = tfInstallDir

            log.Printf("Installing version: %s", installer.Version.String())

            execPath, err = installer.Install(context.Background())
            if err != nil {
                log.Fatalf("Error installing Terraform: %s", err)
            }

            execPath = filepath.Join(installer.InstallDir, "terraform.exe")
            log.Printf("Installed Terraform %s at %s", installer.Version.String(), execPath)
        } else {
            execPath = filepath.Join(tfInstallDir, "terraform.exe")
            log.Printf("Terraform %s found at %s", installer.Version.String(), execPath)
        }
    }
}
The above program first looks for the terraform environment variable and tries to get the value for it. If the value exists, execPath variable will hold its value. If not meaning that Terraform is not installed on this machine and requires installation. The two packages that will help us installing the right version of Terraform are:
- github.com/hashicorp/hc-install/product
- github.com/hashicorp/hc-install/releases
We first prepare the installer by providing the details of the product we want to install, in our case, it is Terraform. You can provide a specific version based on your requirements. If you want to install any specific version like 1.0.6 etc. You can provide the version number and it will be installed.
The installer.Install function will take in the context which will run in the background and perform the installation for us. Once the installation is completed, you can see the path of the Terraform binary.
Note that if I have not provided an installation path or a directory, the installation will be done in a temp location of your machine. If you don’t want the installation to be done in a temporary location and also want to speed up the execution, then set the InstallDir property to set the path for installation.
Check the below code for
InstallDirimplementation.
Next, we set up the working directory where our Terraform code is. We need to import a new package called tfexec:
"github.com/hashicorp/terraform-exec/tfexec"
and the code:
workingDir := "iac"
tf, err := tfexec.NewTerraform(workingDir, execPath)
if err != nil {
  log.Fatalf("Error running NewTerraform: %s", err)
}
The NewTerrafrom function takes in two parameters. First is the working directory where you have kept your .tf files and the second one is the execPath, which is the executable path of the Terraform binary.
After this we can perform terraform init and apply like this:
log.Print("Start executing TF Init")
err = tf.Init(context.Background(), tfexec.Upgrade(true))
if err != nil {
    log.Fatalf("Error running Init: %s", err)
}

log.Print("Finished running TF Init")

log.Print("Start running TF Apply")
err = tf.Apply(context.Background())
if err != nil {
    log.Fatalf("Error running Apply: %s", err)
}

log.Print("Finished running TF Apply")
Both init and apply code are simple to understand. The last one is the show command. If you have worked with terraform cli, you also want to show the output after terraform apply has been successful. The output variables defined in your .tf files will return values like IP address of the virtual machine or the DNS name which you can save or use somewhere else.
These are the contents of my output.tf file:
output "public_ip_address" {
  value = azurerm_linux_virtual_machine.popcorndbvm.public_ip_address
}

output "tls_private_key" {
  value     = tls_private_key.popcornssh.private_key_openssh
  sensitive = true
}
We can also check if the output is marked as sensitive or not. You can see here that I have marked tls_private_key as sensitive. When you traverse the output variables, you can check the Sensitive property and prevent the value to be displayed in your terminal. Below is the code that does the same thing:
state, err := tf.Show(context.Background())
if err != nil {
    log.Fatalf("Error running Show: %s", err)
}

for s, i := range state.Values.Outputs {
    val := i.Value
    if s == "tls_private_key" && i.Sensitive {
        data := val.(string)
        err := ioutil.WriteFile("propcornvm_key.key", []byte(data), 0)
        if err != nil {
            log.Fatalf("Cannot save private key to the local machine. - %s", err.Error())
        } else {
            fmt.Printf("Private Key saved: %s\n", "propcornvm_key.key")
        }
    } else {
        fmt.Printf("%s : %s", s, val)
        fmt.Println()
    }
}
The state variable is a pointer to *tfjson.State and once it runs successfully the output will be stored in a map[string]*tfjson.StateOutput, which we can iterate over to get the values of the output variables.
NOTE: You can use my terraform files to create a web app, app service plan, Linux virtual machine etc. You can view these files here.
Here is the complete code. You need to update the environment variables and replace them with the variables you have obtained from Azure portal. Set workingDir variable with the name of the path where your tf files are.
package main

import (
    "context"
    "fmt"
    "io/ioutil"
    "log"
    "os"
    "path/filepath"

    "github.com/hashicorp/go-version"
    "github.com/hashicorp/hc-install/product"
    "github.com/hashicorp/hc-install/releases"
    "github.com/hashicorp/terraform-exec/tfexec"
)

func main() {

    // Update these environment variables with yours.
    os.Setenv("ARM_CLIENT_ID", "")
    os.Setenv("ARM_CLIENT_SECRET", "")
    os.Setenv("ARM_TENANT_ID", "")
    os.Setenv("ARM_SUBSCRIPTION_ID", "")

    //az login --service-principal -u CLIENT_ID -p CLIENT_SECRET --tenant TENANT_ID
    // cmd := exec.Command("az", "login", "--service-principal", "-u", os.Getenv("ARM_CLIENT_ID"), "-p", os.Getenv("ARM_CLIENT_SECRET"), "--tenant", os.Getenv("ARM_TENANT_ID"))
    // var stdoutBuf, stderrBuf bytes.Buffer
    // cmd.Stdout = io.MultiWriter(os.Stdout, &stdoutBuf)
    // cmd.Stderr = io.MultiWriter(os.Stderr, &stderrBuf)
    // err := cmd.Run()
    // if err != nil {
    //  log.Fatalf("cmd.Run() failed with %s\n", err)
    // }

    // outStr := string(stdoutBuf.Bytes())
    // fmt.Println(outStr)

    var execPath string
    var tfInstallDir string
    var err error
    tfBin := os.Getenv("terraform1")

    if len(tfBin) > 0 {
        log.Printf("Found Terraform: %s", tfBin)
        execPath = filepath.Join(tfBin, "terraform.exe")
    } else {
        log.Print("Terraform not found....installing")
        installer := &releases.ExactVersion{
            Product: product.Terraform,
            Version: version.Must(version.NewVersion("1.4.6")),
        }

        wd, _ := os.Getwd()
        tfInstallDir = filepath.Join(wd, "tf")
        if _, err := os.Stat(tfInstallDir); err != nil {
            log.Printf("Installation directory not found...creating")
            if err = os.MkdirAll(tfInstallDir, os.ModePerm); err != nil {
                log.Fatalf("ERROR: Cannot create \"%s\" directory - %v", tfInstallDir, err.Error())
                panic(err)
            }

            installer.InstallDir = tfInstallDir

            log.Printf("Installing version: %s", installer.Version.String())

            execPath, err = installer.Install(context.Background())
            if err != nil {
                log.Fatalf("Error installing Terraform: %s", err)
            }

            execPath = filepath.Join(installer.InstallDir, "terraform.exe")
            log.Printf("Installed Terraform %s at %s", installer.Version.String(), execPath)
        } else {
            execPath = filepath.Join(tfInstallDir, "terraform.exe")
            log.Printf("Terraform %s found at %s", installer.Version.String(), execPath)
        }
    }

    workingDir := "iac"
    tf, err := tfexec.NewTerraform(workingDir, execPath)
    if err != nil {
        log.Fatalf("Error running NewTerraform: %s", err)
    }

    log.Print("Start executing TF Init")
    err = tf.Init(context.Background(), tfexec.Upgrade(true))
    if err != nil {
        log.Fatalf("Error running Init: %s", err)
    }

    log.Print("Finished running TF Init")

    log.Print("Start running TF Apply")
    err = tf.Apply(context.Background())
    if err != nil {
        log.Fatalf("Error running Apply: %s", err)
    }

    log.Print("Finished running TF Apply")

    state, err := tf.Show(context.Background())
    if err != nil {
        log.Fatalf("Error running Show: %s", err)
    }

    for s, i := range state.Values.Outputs {
        val := i.Value
        if s == "tls_private_key" && i.Sensitive {
            data := val.(string)
            err := ioutil.WriteFile("propcornvm_key.key", []byte(data), 0)
            if err != nil {
                log.Fatalf("Cannot save private key to the local machine. - %s", err.Error())
            } else {
                fmt.Printf("Private Key saved: %s\n", "propcornvm_key.key")
            }
        } else {
            fmt.Printf("%s : %s", s, val)
            fmt.Println()
        }
    }
}
terraform-exec module is used to construct the terraform commands. Take a look at its repository.
Before you plan to use this module in your production environment, consider the below excerpt from the repository readme file:
While terraform-exec is already widely used, please note that this module is not yet at v1.0.0, and that therefore breaking changes may occur in minor releases.
Here is the output of the above example, when I run it with my Azure service principal.
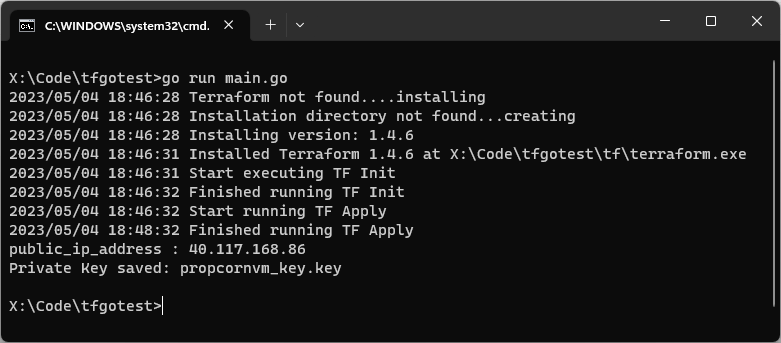
You can see 1 output variable public_ip_address and because we have marked the other output variable as sensitive, it is not shown here in the terminal, instead its output is stored in a file named popcornvm_key.key.
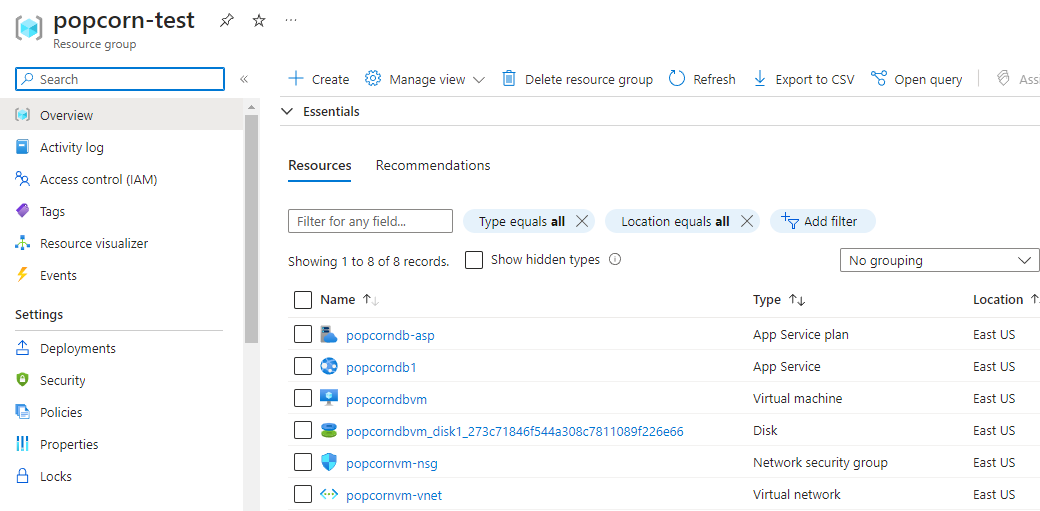
We see all our resources are successfully created in Azure portal.