

A new view engine is introduced in ASP.NET MVC 3 called RAZOR. You can download Preview 1 from Microsoft’s download center and get it running on your machine to check the new features in MVC 3. Just in case if you are thinking that installing MVC 3 will mess your current MVC 2 installation….No, it won’t. I came across a Webcamp video where Phil Haack with James Senior demonstrate this view engine. My this post is also based on the same talk.
So when you install MVC 3 Preview 1 on your machine, jump start by creating a new project in Visual Studio 2010. You will not be able to use this view engine with .NETFX 3.5 (SP1).
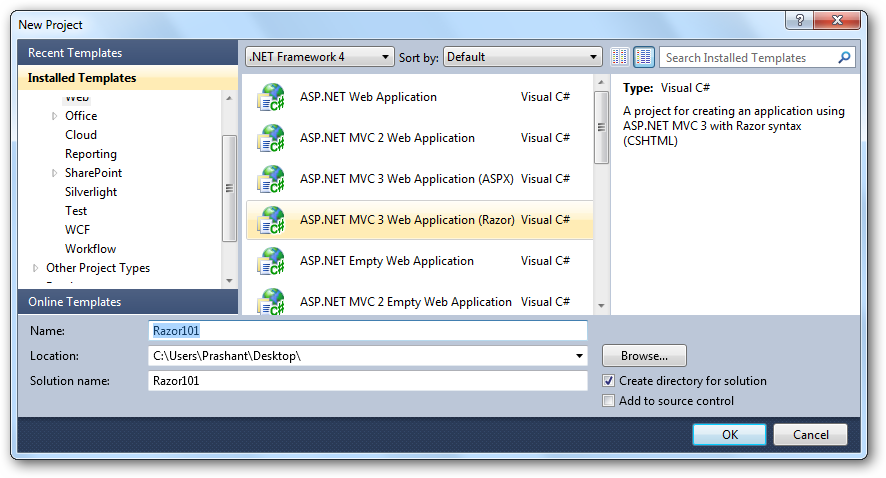
Now when you select new project and under Web templates you will now see ASP.NET MVC 3 application twice. The one template with (ASPX) is using normal web forms as your view engine and the other one with (Razor) is the new view engine. This is only for preview 1, these options will not be present in the final release of the MVC 3, instead you will have an oprion to select the view engine for your application later, I am not very sure how, but it will be more likely the way you select tests.
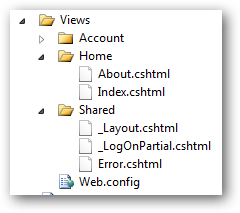
Time to check the Solution Explorer. No .aspx files only .cshtml
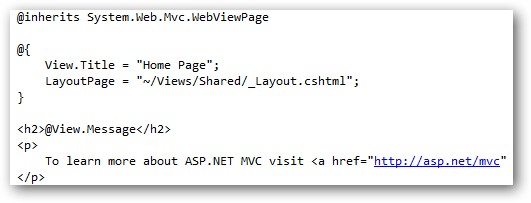
The drawback in Preview 1 is that there is no syntax highlighting and no intellisense. Now that would have made you think “OMG! how am I going to write the code now!?”. But Razor is easy and more over it too light-weight, more then I thought before I used it. Check out Index.cshtml, the markup code looks like this.
Time to take a look at Home Controller. Take a look at the Index() action method, the syntax is bit different with the one we have used previously.
public ActionResult Index()
{
       ViewModel.Message = "Welcome to ASP.NET MVC!";
       return View();
}
The line ViewModel.Message = “Welcome to ASP.NET MVC!”; is equivalent to:
public ActionResult Index()
{
       ViewData["Message"] = "Welcome to ASP.NET MVC!";
       return View();
}
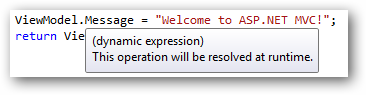
The ViewModel basically is of type dynamic which means that its operations will be resolved at runtime. Hover your cursor over ViewModel and Message to know about it.

If you need to show some addtional information related your current project you can set it too with ease. In the Index method you can add antoher line like this which says something about your project:
NOTE: *As ViewModel is of Dynamic type, so when you press dot (.) after writing ViewModel don’t expect that something will come up and as said before all expressions will be resolved at runtime.*
public ActionResult Index()
{
      ViewModel.Message = "Welcome to ASP.NET MVC!";
      ViewModel.AboutApp = "This is a sample ASP.NET MVC 3 Preview 1 application!";
      return View();
}
To show this message on the Index view you will just call it by prefixing it with ’@’ symbol. To show the value on the page you simply write below line and prefix it with @ symbol(If you say this is simple, I would rather prefer to say it effortless).
@View.Message
@View.AboutApp
Moving further, add a new class called Contacts (or what ever name you like) with 3 peoperties.
public class Contacts
{
    public string Name{ get; set; }
    public int Age{ get; set; }
    public string Email { get; set; }
}
Moving back to the HomeController add the below lines of code to the Index action method.
var ctc = new Contacts[] {
          new Contacts{Name="Prashant", Age = 23},
          new Contacts{Name="Arvind", Age = 24},
          new Contacts{Name="Max", Age = 23}
};
The view should not be empty this time. And therefore your Index action method return the Contacts we have just created.
public ActionResult Index()
{
    ViewModel.Message = "Welcome to ASP.NET MVC!";
    ViewModel.AboutApp = "This is a sample ASP.NET MVC 3 Preview 1 application!";
    var ctc = new Contacts[] {
          new Contacts{Name="Prashant", Age = 23},
          new Contacts{Name="Arvind", Age = 24},
          new Contacts{Name="Max", Age = 23}
          return View(ctc);
    };
}
This time also Razor makes it simple to view the the data you returned from the controller. In the Index.cshtml you can do it pretty simply and you will still have a pretty looking markup of the view page. Create a list of contacts you have just created. As they are in a set of array, we can then enumerate the array with a foreach loop and show it on the page.
<ul>
@foreach (var c in Model){
<li> My name is @c.Name and I am @c.Age years old. </li>
}</ul>
You can easily get the data in a jiffy without writing a lot of markup. No problem in concatenating the data, the @ symbol and MVC compiler is pretty intelligent and does this for us. So what if we want to add e-mail addresses also. How this view engine will handle this ambiguity? Well let see. Just add an e-mail property to the array of contacts.
var ctc = new Contacts[] {
          new Contacts{Name = "Prashant", Age = 23, Email = "prashant@midnightprogrammer.net"
}
And on the view page the line will be something like this
<ul>
@foreach (var c in Model){
<li> My name is @c.Name and I am @c.Age years old. You can email me at @c.Email.</li>
}</ul>
Hit F5 and see it by yourself. There are lot of features described by Scott Guthrie and Phil Haack on their blog. Well I can go on writing and writing about Razor, so I think I should take a pause now and you can go to below links for more deep information about Razor view engine and to know what’s new in the upcoming release of ASP.NET MVC 3.
Recommend Reading: