
© 2026 Pashant Khandelwal

© 2026 Pashant Khandelwal
Few years back I blogged about adding OpenID login support in ASP.NET application. This time I am blogging about adding Google login support in ASP.NET application. A friend of mine is trying to integrate multiple third party authentication support for one of the application he is developing for his client. He is using DotNetOpenAuth for Google authentication. the code I am using here is from my friend and I am sharing it with his explicit permission.
First, download the latest version of DotNetOpenAuth and add its reference in your web application and these two namespaces.
using DotNetOpenAuth.OpenId;
using DotNetOpenAuth.OpenId.RelyingParty;
After adding the reference, add a normal button with CommandArgument to point https://www.google.com/accounts/o8/id.
<asp:Button ID="btnGoogleLogin" runat="server" CommandArgument="https://www.google.com/accounts/o8/id"
        OnCommand="btnGoogleLogin_Click" Text="Sign In with Google" />
On the button click event on the server side:
protected void btnGoogleLogin_Click(object sender, CommandEventArgs e)
{
    string discoveryUri = e.CommandArgument.ToString();
    OpenIdRelyingParty openid = new OpenIdRelyingParty();
    var URIbuilder = new UriBuilder(Request.Url) { Query = "" };
    var req = openid.CreateRequest(discoveryUri, URIbuilder.Uri, URIbuilder.Uri);
    req.RedirectToProvider();
}
Now when you click the button it will take you to Google login page which look something like this.
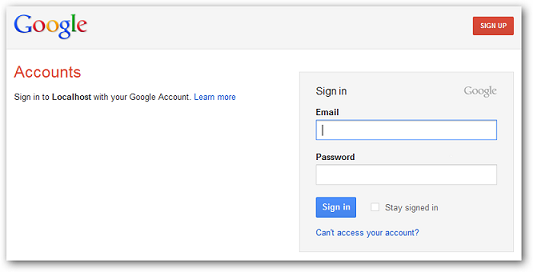
You can see on the right side of the screen with the information of the site requesting the authentication. Once you get successfully authenticated with your entered user name and password, you will then redirect to the confirmation page:
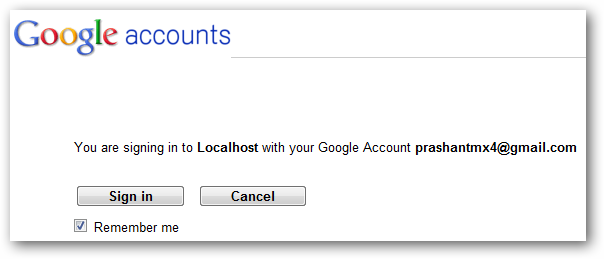
As I am using my local development server, you will see Locahost. Once you deploy the application in the production environment it will automatically get the name of the domain. Clicking on the Sign in button you will then be redirected to the main page, but before you get to the main page you need to check whether the authentication was successful or was it cancelled by the user or was failed. To make sure use the below code on the load event of the login page:
protected void Page_Load(object sender, EventArgs e)
{
    OpenIdRelyingParty rp = new OpenIdRelyingParty();
    var response = rp.GetResponse();
    if (response != null)
    {
        switch (response.Status)
        {
            case AuthenticationStatus.Authenticated:
                Session["GoogleIdentifier"] = response.ClaimedIdentifier.ToString();
                Response.Redirect("Default.aspx");
                break;
            case AuthenticationStatus.Canceled:
                Session["GoogleIdentifier"] = "Cancelled.";
                break;
            case AuthenticationStatus.Failed:
                Session["GoogleIdentifier"] = "Login Failed.";
                break;
        }
    }

}
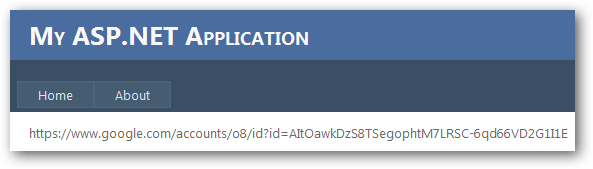
On Default.aspx page I have set the ClaimedIdentifier:
The response/status returned from Google will be checked here and we will redirect the application to work the way accordingly. My friend sends me the above code to find out whether there is any way we can logout from the service. Well, unfortunately there isn’t any specific way to log out using DotNetOpenAuth? But there is a workaround. I don’t know if it is a good practice or bad but it worked out for me. To logout, I am just calling this logout URL used by Google.
http://accounts.google.com/logout
If you have some suggestions or you know a better way or approach of doing this then please drop a line in the comments sections.
I came across an article on Tutorialzine which demonstrate file drag and drop upload with jQuery and PHP. As a curious reader, I downloaded the sample files and took a look and also get it running on my LINUX VM. It worked like a charm. But I am a Windows user and .NET programmer, the question is how can I do the same in ASP.NET?
So, to get myself started I used the same downloaded files that I used to check the PHP version of the file drag and drop. The only thing that we are not going to re-use out of these files is the php file. You can delete it if you wish or keep it, it’s of no harm to our ASP.NET app.
This example uses an awesome plugin from Weixi Yen and you can found the plugin and it’s sample usage (documentation) on GitHub. The basic or I should say the default functionality provided by this plugin is to allow users to drag and drop the files from desktop to the browser. But before you actually get started with the plugin, I strongly recommend that you make yourself familiar with the parameters and configurations of the plugin.
Open the script.js file and change the URL to point to the web service or the page which will upload the posted file. Here I want you to pay attention to the javascript function named createImage. This method accepts the file as a parameter and returns the image or file data in Base64 format. This is the data which actually gets posted when the user drops a file to the upload area on the web page. This is all up to you whether you want to use a web service or a normal web page to accept the posted file/data. Here is my script.js file looks like after the changes.
$(function () {

    var dropbox = $('#dropbox'),
        message = $('.message', dropbox);

    dropbox.filedrop({
        paramname: 'pic',
        maxfiles: 5,
        maxfilesize: 100,
        //url: '/Uploader.asmx/Upload',
        url: '/Default.aspx',

        uploadFinished: function (i, file, response) {
            $.data(file).addClass('done');
        },

        error: function (err, file) {
            switch (err) {
                case 'BrowserNotSupported':
                    showMessage('Your browser does not support HTML5 file uploads!');
                    break;
                case 'TooManyFiles':
                    alert('Too many files! Please select 5 at most! (configurable)');
                    break;
                case 'FileTooLarge':
                    alert(file.name + ' is too large! Please upload files up to 2mb (configurable).');
                    break;
                default:
                    break;
            }
        },

        // Called before each upload is started
        //        beforeEach: function (file) {
        //            if (!file.type.match(/^image\//)) {
        //                alert('Only images are allowed!');

        //                // Returning false will cause the
        //                // file to be rejected
        //                return false;
        //            }
        //        },

        uploadStarted: function (i, file, len) {
            createImage(file);
        },

        progressUpdated: function (i, file, progress) {
            $.data(file).find('.progress').width(progress);
        }

    });

    var template = '<div class="preview">' +
                        '<span class="imageHolder">' +
                            '<img />' +
                            '<span class="uploaded"></span>' +
                        '</span>' +
                        '<div class="progressHolder">' +
                            '<div class="progress"></div>' +
                        '</div>' +
                    '</div>';


    function createImage(file) {

        var preview = $(template),
            image = $('img', preview);

        var reader = new FileReader();

        image.width = 100;
        image.height = 100;

        reader.onload = function (e) {

            // e.target.result holds the DataURL which
            // can be used as a source of the image:
            //alert(e.target.result);
            image.attr('src', e.target.result);
        };

        // Reading the file as a DataURL. When finished,
        // this will trigger the onload function above:
        reader.readAsDataURL(file);

        message.hide();
        preview.appendTo(dropbox);

        // Associating a preview container
        // with the file, using jQuery's $.data():

        $.data(file, preview);
    }

    function showMessage(msg) {
        message.html(msg);
    }

});
Check out line number 10 and 11. I have change the url parameter to the one where my files are going to be posted. It can be a webservice or just a normal web page. The other two parameters maxfiles and maxfilesize defines the number of file that can be uploaded asynchronously and maximum size of the file that can be uploaded in MBs respectively. Also note that the demo that you download from the original source will have a validation that the files that are being uploaded by the user should only be images. If you want to override this rule then uncomment the lines from 33-42. This is it from the jQuery/script part. Now time to move on the server side code.
To remind you again that we are posting a file to a web service or to a web page and therefore that code for our web service or on our page will look something like this:
If you are using a web service to upload the posted file:
[WebMethod]
[ScriptMethod(ResponseFormat = ResponseFormat.Json)]
public string Upload()
{
       HttpContext postedContext = HttpContext.Current;
       HttpPostedFile file = postedContext.Request.Files[0];
       string name = file.FileName;
       byte[] binaryWriteArray = new
       byte[file.InputStream.Length];
       file.InputStream.Read(binaryWriteArray, 0,
       (int)file.InputStream.Length);
       FileStream objfilestream = new FileStream(Server.MapPath("uploads//" + name), FileMode.Create, FileAccess.ReadWrite);
       objfilestream.Write(binaryWriteArray, 0,
       binaryWriteArray.Length);
       objfilestream.Close();
       string[][] JaggedArray = new string[1][];
       JaggedArray[0] = new string[] { "File was uploaded successfully" };
       JavaScriptSerializer js = new JavaScriptSerializer();
       string strJSON = js.Serialize(JaggedArray);
       return strJSON;
}
Nothing fancy or complicated in the above code. Remember, the files will send to the web service one by one and not in a collection and this is the reason I am working with one file at a time and not with file collections. In my case I have used a web service that return me JSON result which I can show it to the user, though it is not necessary, but just in case if you want to have one for your web service you need to use 2 using statements:
using System.Web.Script.Serialization;
using System.Web.Script.Services;
If you are using a web page to upload the posted file:
HttpContext postedContext = HttpContext.Current;
HttpPostedFile file = postedContext.Request.Files[0];
string name = file.FileName;
byte[] binaryWriteArray = new
byte[file.InputStream.Length];
file.InputStream.Read(binaryWriteArray, 0,
(int)file.InputStream.Length);
FileStream objfilestream = new FileStream(Server.MapPath("uploads//" + name), FileMode.Create, FileAccess.ReadWrite);
objfilestream.Write(binaryWriteArray, 0,
binaryWriteArray.Length);
objfilestream.Close();
string[][] JaggedArray = new string[1][];
JaggedArray[0] = new string[] { "File was uploaded successfully" };
JavaScriptSerializer js = new JavaScriptSerializer();
string strJSON = js.Serialize(JaggedArray);
Response.Write(strJSON);
Response.End();
Same code as I have for the web service, put the above code on the page_load event.
While I was working around with the above code and configuration of the plugin I came across an error that won’t allow me to upload heavy files or I should say large files. The error that I received is:
System.Web.HttpException: Maximum request length exceeded
To overcome this error you have make the below configuration in your web.config file inside <system.web>
<httpRuntime maxRequestLength="102400" executionTimeout="1200" />
A word of caution here, though it will solve your problem but:
maxrequestLength is TOO BIG then you will be open to DOS attacks.executionTimeout is 360 seconds. Change it accordingly and only if you are running on really slow connections.This is it, if you have followed the steps above then try uploading some file. And if you haven’t and lazy to put all the pieces together then download the code from the below and try it.
Download: HTML5DragNDrpFileUpload.zip (58.15 kb)
![]()
Another awesome stuff for developers from Microsoft! This past Wednesday Microsoftie Karsten Januszewski announced the Visual Studio Achievement Beta at Channel9. Guess what? as a developer, you are writing hundred lines of code every day without even getting noticed by the community!!? Well, you will get noticed now. Here is an extract from the official post from Channel9:
Bring Some Game To Your Code!
A software engineer’s glory so often goes unnoticed. Attention seems to come either when there are bugs or when the final project ships. But rarely is a developer appreciated for all the nuances and subtleties of a piece of code–and all the heroics it took to write it. With Visual Studio Achievements Beta, your talents are recognized as you perform various coding feats, unlock achievements and earn badges.
Learn More About Visual Studio
Visual Studio is a powerful tool with tons of features, many of which you may not know about. Earning some of the badges may result in learning about features you didn’t even know existed!
How It Works
With the Visual Studio Achievements Extension, achievements are unlocked based on your activity. Your code is analyzed on a background thread each time you compile. In addition, the extension listens for certain events and actions that you may perform in Visual Studio, reporting progress on these events to the server.
Download the Visual Studio Achievement Extension from Visual Studio Gallery. Install the extension and fire Visual Studio, sign in with your LiveID and straight away you will achieve 5 points for installing Visual Studio Achievement Extension. Every time you achieve, a pop-up in will be shown inside Visual Studio IDE.
Now you are earning some achievements huh!? Why not show it off on your blog. Grab the script to show off your Visual Studio Achievements. You can see my achievements widget on the right hand side of my blog. Just in case you don’t like the widget, then you can customize the look and feel using CSS and providing additional parameters. You can see more widget examples here and customize it as you like. Apart from this you can also see the leading achievers at the Leaderboard.

Introducing the Achievement and that too with API is super awesome. I haven’t gone through the Achievement API yet, but if you are planning to write a custom tool then mash it up and share with the community.
So, what are the achievements that we are going to get? There are 6 different badges at the moment and we are going to see more badges in future. Here is a snap of the 6 badges:
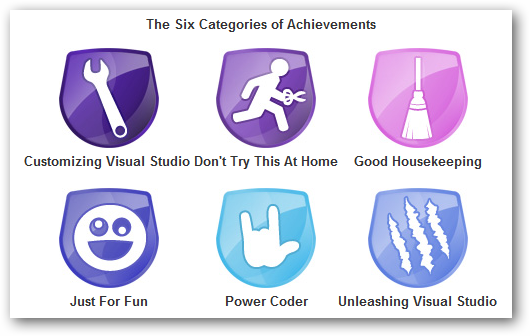
Need to know more in detail about these badges then read about them here. Let’s get started people, bring some game to the code you write from now on!!

Visual Studio comes up with loads of stuff making everyday life of a developer easy. But there are few extensions which Microsoft and other developers have created and are available for free to the community members. I have compiled a list of free and powerful extensions which will take your programming experience few more steps ahead with Visual Studio.
You should have a very good reason if you are not using this or if you are not aware what NuGet is. NuGet is a free, open source developer focused package management system for the .NET platform intent on simplifying the process of incorporating third party libraries into a .NET application during development.
Visual Studio Achievement Extension
Get noticed, earn achievements while you write code. An awesome extension from Microsoft for programmers to get them in light while they right code. Bring on the game to the code!!
A powerfull extension from Microsoft with tons of features to make your work a lot easier. A MUST HAVE for every developer.
VSCommands provides code navigation and generation improvements which will make your everyday coding tasks blazing fast and, together with tens of essential IDE enhancements, it will take your productivity to another level.
PowerCommands For Visual Studio 2010
PowerCommands 10.0 is a set of useful extensions for the Visual Studio 2010 adding additional functionality to various areas of the IDE.
You must have witnessed most of the features provided by this extension in VS 2011 Developer Preview. For Visual Studio 2010, you can make use of these features with this extensions.
This extension provides outlining and matching braces highlighting features for Visual Studio JavaScript and CSS editor. Works both in JS/CSS files and HTML script/style blocks. Outlining is like in C# editor. It outlines {}s, []s and #region tags.
Microsoft has now introduced feature in Visual Studio 2011 Developer Preview, it is a color picker stuff in the CSS window for the ease of the developers so they don’t have to remember the color codes. But for Visual Studio 2010 developers this is an excellent extension that gives you a similar flexibilty.
CSSCop - FxCop for Stylesheets
We use FxCop to follow beat coding practices, but we neglect when we work with CSS. CSSCop makes it easy to adhere to best practices for writing stylesheets. It catches common errors that affect browser compatibility and much more. You can think of it as FxCop for stylesheets.
If you are analysing your code using FxCop, then get the FxCop extension for Visual Studio. FxCop is also available if you are using VS 11 Developer Preview.
Adds a right-click menu to any folder and image in Solution Explorer that let’s you automatically optimize all PNG, GIF and JPEG files in that folder. The optimization doesn’t affect the quality of the images, but optimizes them using industry proven algorithms for removing EXIF and other metadata.
Code Compare is a powerful file and folder comparison tool that demonstrates new level of code comparison.
The next time you comment on your code or someone else code, be sure that you are using the correct spellings. Plain text files, source code comments and strings and thing that are not HTML/ASP tags are spell checked.
A great extension which will automatically generates XML documentation comments for methods and properties based on their type, parameters, name and other contectual information.
Creating bookmarks in Visual Studio and then remembering them is a tough task when you have thousands lines of code. Numbered Bookmarks allows users to create and recall bookmarks by using numbers. User can create 10 bookmarks (starting from 0 to 9). User can add or navigate to the particular bookmark by using the same shortcut key.
The Snippet Designer is an open source plugin which enhances the Visual Studio IDE to allow a richer and more productive code snippet experience.
For the moment, this is it, but I will update the list once I get to know more excellent extensions. Are you aware of any other extensions you think is really cool and excellent, then please do share with me/us.
![]()
If you really love working with HTML5 the this is then time to show some support for HTML5. Use the HTML5 badge builder to create a badge and use it on your blog/website to show your support. The badge builder allows you to customize the badge with tech you use with HTML5. You can see the badge I customized with the tech under badge section on the right.
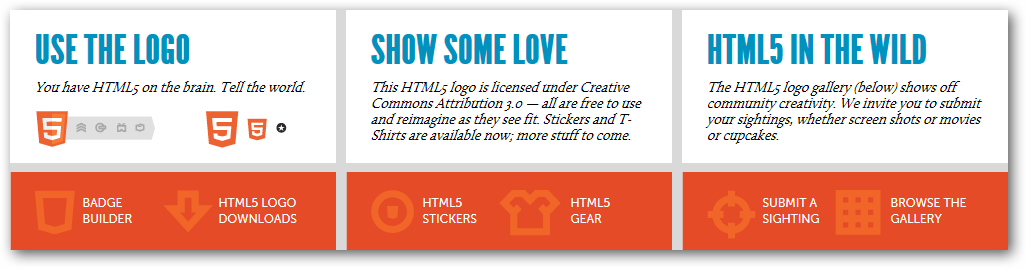
The w3.org site for HTML5 has to offer more than just a badge. You can download HTML5 Logos, stickers, T-shirts, jacket, grey hoodie and beanie to show your love or I must say more precisely show off your HTML5 love. The HTML5 T-shirts are awesome and worth buying if you want to show off. Take a look at HTML5 Logo T-Shirts and buy one if you really like HTML5 and yes if you want to show off and make other jealous.