Performance of an application matters a lot for a developer. None of the developer wants his application freezes or crashes. But what are measures a developer should takes to keep it all good going. When I used to develop application I saw whenever I try to perform some heavy or bulky task like uploading files, copying files from place to other and other DB related but heavy task which includes CPU as well as hard drive.
Most of our application that we develop today require simultaneous functions to perform but with performance. We guarantee our client…yes the application can handle all the functions but on the stake of performance. The major fallback of any application is limiting a user to perform one task at a time. So how do we deal with application freezing and crashing?
Working with Microsoft .NET framework we have worked with threads through which we can handle all the tasks simultaneously under one main application thread. You can perform smaller operations with the help of Threading class, instead I prefer using Background Worker class to implement to perform all my heavy duty operations. Background worker class is introduced in .NET framework 2.0 and using this class makes it easy to execute long running operations on a separate thread, support cancellation, progress reporting and marshalling results back to the UI thread.
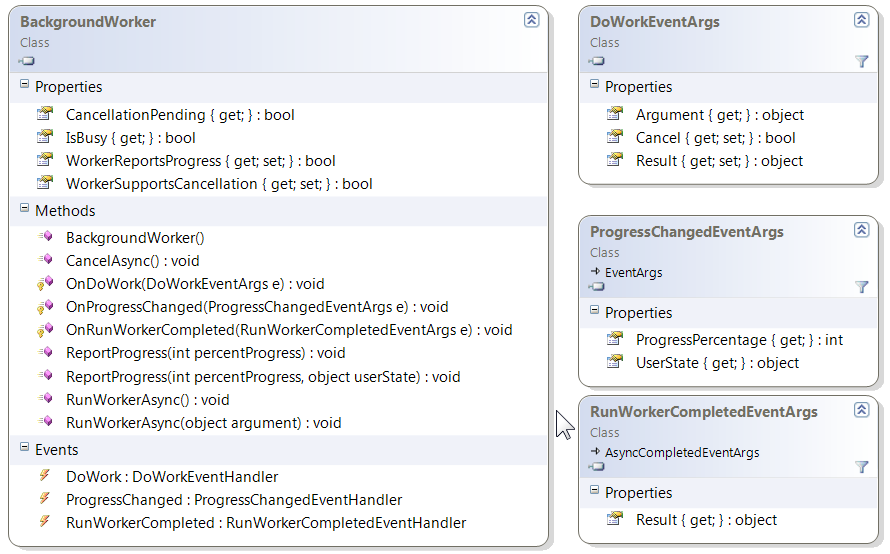
Below image which provides an overview of background worker class which found here.
Now we will see how to use background worker class to perform heavy operations.
First create a new windows application as shown below.

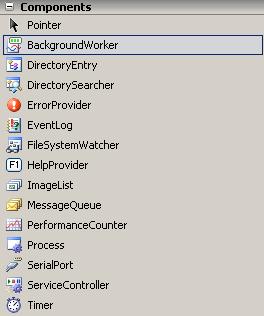
Get to the design mode and drag & drop the background worker component.
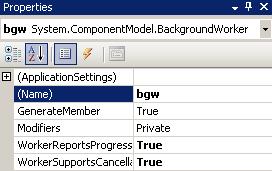
Set the properties of the background worker:
Set GenerateMember and Modifiers as it is. In the sample application we have a progress bar which reports the percentage of the task completed so we need to set the WorkerReportsProgress to true and similarly if we want the user to cancel the running operation then set the WorkerSupportsCancellation to true.
Now the next step is to create 3 methods:
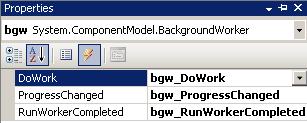
So how do we code these methods? It’s easy and not a complex task as it sounds, so let’s have a look at these methods….
To carry on with this example, I am using an AventureWorks database I have query the table Person.Contact as it has a large number of records, around 19K. Now here, to set the progress bar you first need to set the maximum property of the progress bar so we can show the progress completed.
Starting with the Start button:
private void btn_start_Click(object sender, EventArgs e)
{
//Starts the backgroundworker process asynchronously
bgw.RunWorkerAsync();
btn_start.Enabled = false;
}
The DoWork method:
//Background worker DoWork method. Here we will perform our heavy duty tasks.
//I have used a simple datareader object to traverse all the rows in the table.
//The table has around 19K rows.
private void bgw_DoWork(object sender, DoWorkEventArgs e)
{
  try
  {
    int i = 0;
    cmd = new SqlCommand("SELECT * FROM Person.Contact", con);
    con.Open();
    dr = cmd.ExecuteReader();
    while(dr.Read())
    {
        i = i + 1;
        //report to the backgroungworker progreechanged event of the background worker class
        bgw.ReportProgress(i);
        Thread.Sleep(1);
        //Called and check if the cancellation of the operation is pending. If returned true
        //DoWorkEventArgs object cancels the operation.
        if (bgw.CancellationPending)
        {
            e.Cancel = true;
            return;
        }
    }
   }
   catch (Exception x)
   {
    MessageBox.Show("An error occured while performing operation" + x);
   }
   finally
   {
    con.Close();
   }
}
The RunWorkerCompleted Method:
private void bgw_RunWorkerCompleted(object sender,RunWorkerCompletedEventArgs e)
{
    if (e.Cancelled)
    {
        MessageBox.Show("Operation Cancelled");
        btn_start.Enabled = true;
    }
    else
    {
        MessageBox.Show("Operation Completed");
        btn_start.Enabled = true;
    }
}
The ProgressChanged Method:
private void bgw_ProgressChanged(object sender, ProgressChangedEventArgs e)
{
    //Report porogress bar change
    progress.Value = e.ProgressPercentage;
}
Ending up with the cancel button:
//To cancel async operation
private void btn_cancel_Click(object sender, EventArgs e)
{
     //To cancel the asynchronous operation
     bgw.CancelAsync();
     progress.Value = 0;
     btn_start.Enabled = true;
}
So when your application is traversing the records and suddenly you think that you should quit the job and work on other part of the application, just hit the cancel button and the large operation will get cancelled withoud any freezing and hanging of your application.
Download: BackgroundWorkerDemo.zip (43.69 kb)
Here in this tutorial I have used a word document template and mail merge option of the Word to automate the word document creation.
I have use mail merge option to set the fields and make the document fill through my application. We can also set the location of the text that we want to display in the word document programmatically.
So to get started we have to first make a template which is a word document template file (.dot file).
Open a new word document. Design the template as you like and once you are done then save the document in a word 97-2009 template.
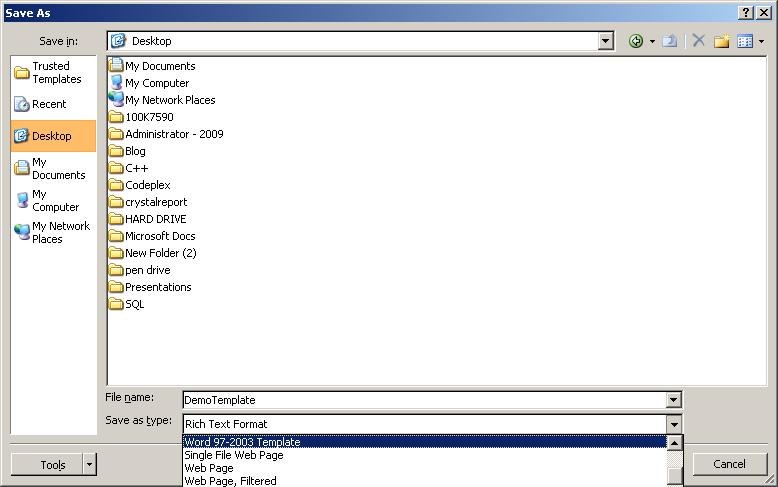
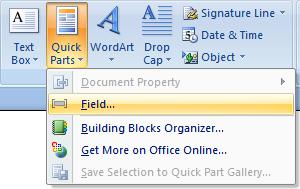
Once the document is designed, it’s now time to set the merge fields. To set the mail merge fields in word 2007, navigate to Insert>Quick Parts>Fields.
Select Merge Field from the Field names: and give a Field Name: a name which we will need in our code.
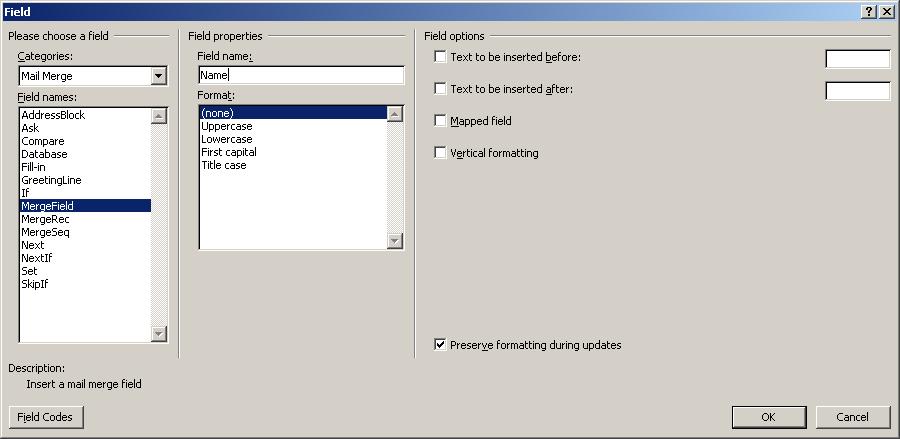
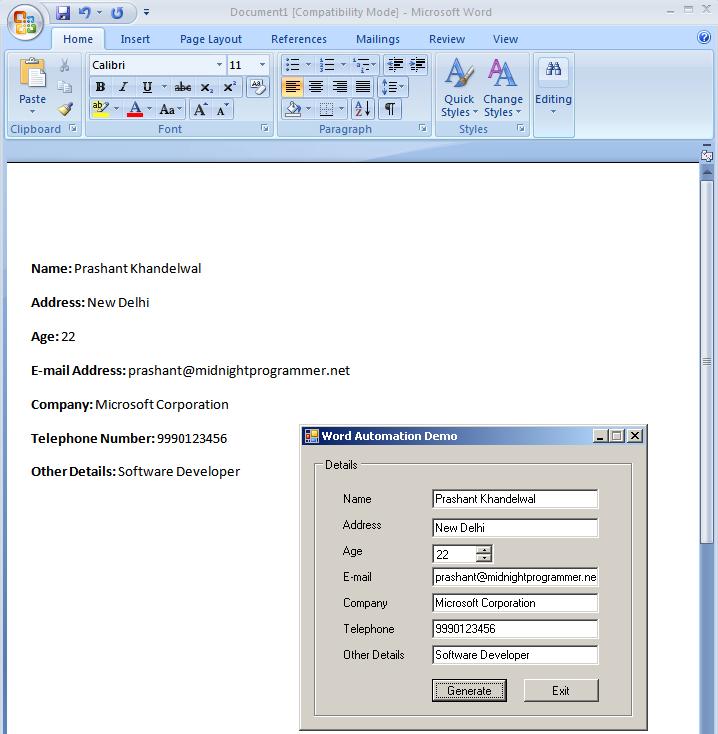
Likewise, we need to set all the fields in the document and in the end the document looks like this:
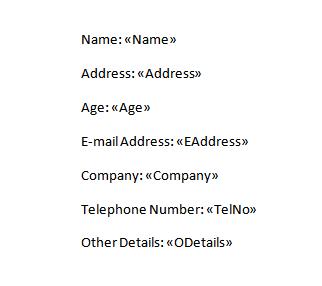
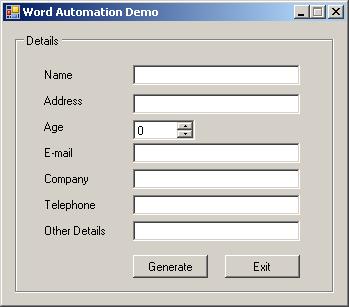
Create a new windows application in Visual Studio.
Design application so that you have all the text fields. I have created small and very simple interface to demonstrate this automation.
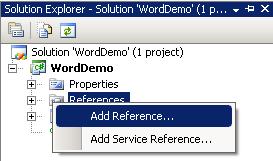
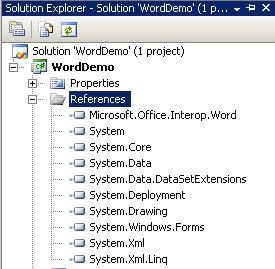
As we are performing office automation we first need to add requisite libraries. Library name can be different as it depends on the office version installed on your machine. To add reference in your application, right-click References in solution explorer.
You will be prompted with Add Reference box.
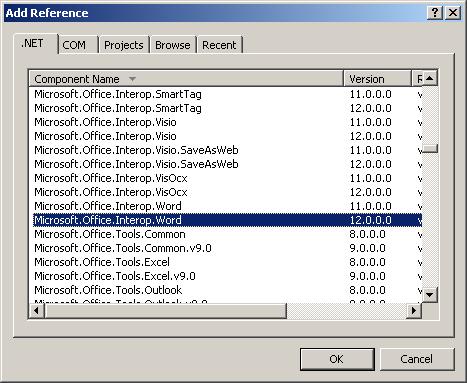
Here under .NET tab choose Microsoft.Office.Interop.Word. You need to check the version as office 2003 and office 2007 will get different version installed on the system. Select the appropriate version and click OK.
When you add the reference, you will see the following reference added under reference which you can see under solution explorer.
To get the word document reference in the code we need to use the below references (namespaces).
using Microsoft.Office;
using Word = Microsoft.Office.Interop.Word;
Initialize the word application with word document
Object oMissing = System.Reflection.Missing.Value;
Object oTrue = true;
Object oFalse = false;
Word.Application oWord = new Word.Application();
Word.Document oWordDoc = new Word.Document();
To make sure that the application preview the word document, set the Visible property to true of word application.
oWord.Visible = true;
Set the template path This is the same word template file which you have created.
Object oTemplatePath = System.Windows.Forms.Application.StartupPath+"\\Report.dot";
Then pass the template object path to the word document object.
oWordDoc = oWord.Documents.Add(ref oTemplatePath, ref oMissing, ref oMissing, ref oMissing);
Now count all merge fields in the document so we can have the field name through which we can access their location in the document. We are not, in actual accessing the location but want their reference so we can set their text and auto fill the document. I have used foreach loop to traverse all the merge fields.
foreach (Word.Field myMergeField in oWordDoc.Fields)
{
    iTotalFields++;
    Word.Range rngFieldCode = myMergeField.Code;
    String fieldText = rngFieldCode.Text;

    if (fieldText.StartsWith(" MERGEFIELD"))
    {
        Int32 endMerge = fieldText.IndexOf("\\");
        Int32 fieldNameLength = fieldText.Length - endMerge;
        String fieldName = fieldText.Substring(11, endMerge - 11);
        fieldName = fieldName.Trim();
        if (fieldName == "Name")
        {
            myMergeField.Select();
            oWord.Selection.TypeText(txt_name.Text);
        }
        }
}
One thing that you should notice that the merge field starts with MERGEFIELD MERGEFIELD\\NAME, MERGEFIELD\\ADDRESS, and likewise for every mergefield. And in the end a simple if condition which check the name of the field and update the field text.
Execute you application and fill in all the text boxes in the application and hit Generate button, after which you will see the document completed.
Download: WordDemo.zip (51.65 kb)
Picasa is an online photo sharing portal from Google. Users from around the globe use Picasa for storing and sharing their photos online. We can view and download images from the album, but only if it is public. We cannot view private albums and also cannot download images from any of the public albums if the owner of the album has denied the access for other users to download the images.
But there is a way from which you can download the images. We are here going to use Google API to achieve this. You can download the Google API for .NET here.
To get started we have to first import the namespaces.
using Google.GData.Photos;
using Google.GData.Client;
using System.IO;
using System.Net;
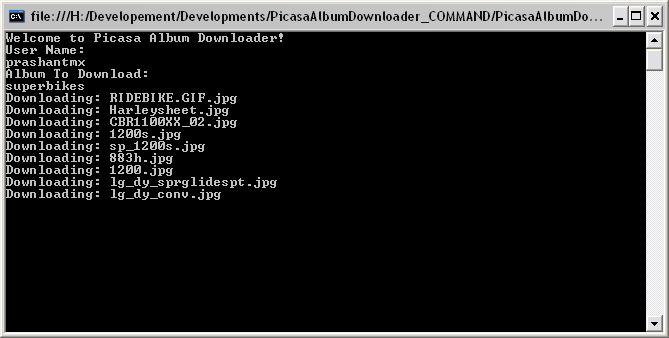
Now here is the method which we are going to use to download the images. The methods takes in two parameters username and the album name. To get the username for the album, check the url of the user profile. For e.g.: http://picasaweb.google.com/prashantmx. Here the username is prashantmx, so the first parameter, username will be prashantmx and the albumname will be superbikes. Point to be noted is that there cannot be a white space between the username and albumname.
private static void DownAlbum(string UserN, string AlbumN)
{
    string fileName;
    Uri uriPath;
    WebClient HttpClient = new WebClient();
    PhotoQuery query = new PhotoQuery();
    query.Uri = new Uri(PhotoQuery.CreatePicasaUri(UserN, AlbumN));
    PicasaService service = new PicasaService("PicasaAlbumDownloader");
    PicasaFeed feed = (PicasaFeed)service.Query(query);
    Directory.SetCurrentDirectory(Application.StartupPath+"\\Downloads");

    foreach (AtomEntry aentry in feed.Entries)
    {
        uriPath = new Uri(aentry.Content.Src.ToString());
        fileName = uriPath.LocalPath.Substring(uriPath.LocalPath.LastIndexOf('/') + 1);
        try
        {
            Console.WriteLine("Downloading: " + fileName);
            HttpClient.DownloadFile(aentry.Content.Src.ToString(), fileName);
        }
        catch (WebException we)
        {
            Console.WriteLine(we.Message);
        }
    }

    Console.WriteLine("Download Complete!");
}
Output:
The WMI Code Creator tool generates code that uses WMI to obtain management information or perform management tasks. You can use the tool to learn how to manage computers using WMI scripting and WMI .NET. The tool generates code that runs on the local computer, a remote computer, or a group of remote computers based on your selection from the Target Computer menu on the tool. You can also execute the generated code directly from the tool.
The tool is meant to help IT Professionals quickly create management scripts and to help developers learn WMI scripting and WMI .NET. The tool helps take the complexity out of writing code that uses WMI and helps developers and IT Professionals understand how powerful and useful WMI can be for managing computers.
Using the tool, you can query for management information such as the name and version of an operating system, how much free disk space is on a hard drive, or the state of a service. You can also use the tool to execute a method from a WMI class to perform a management task. For example, you can create code that executes the Create method of the Win32_Process class to create a new process such as Notepad or another executable. The tool also allows you to generate code to receive event notifications using WMI. For example, you can select to receive an event every time a process is started or stopped, or when a computer shuts down.
The tool also allows you to browse through the available WMI namespaces and classes on the local computer to find their descriptions, properties, methods, and qualifiers.
The code that creates the tool is also included in the download. The tool was created using WMI .NET, and the code for the tool can help developers understand how WMI .NET is used to create applications and manage information. Be sure to read the end-user license agreement that is included in the download.
The above overview and other technical details about Microsoft WMI Code Creator can be found here at Microsoft download center.
Download: WMICodeCreator.zip (121.38 kb)
When we design application we always face problems to save settings for the application and to achieve that we use different options available to us. A very common method to use in accordance of complexity XML files, Registry, Application.config or other/normal files. Best option is to use application configuration file but it seems that most of the people are not fully aware with the usage of the application configuration file. I will discuss late on the application configuration file a.k.a. app.config, but here is the way to use the INI files to save application settings.
Here I am using a simple class which has two methods Write & Read methods which internally calls the functions inside the Kernel32.dll which are WritePrivateProfileString and ReadPrivateProfileString. Both methods take parameters and write it to the INI file. Here is the complete listing of the class which can be use to read and write settings to the INI file.
INI files have sections and keys from where the data can be read on the combination of the sections and keys. As there can be a common key in different sections of the INI file. A section is defined in [SECTION NAME] and then it have a Key and its KeyValue.
class INIFile
{
    private string filePath;

    [DllImport("kernel32")]
    private static extern long WritePrivateProfileString(string section,
    string key,
    string val,
    string filePath);

    [DllImport("kernel32")]
    private static extern int GetPrivateProfileString(string section,
    string key,
    string def,
    StringBuilder retVal,
    int size,
    string filePath);

    public INIFile(string filePath)
    {
        this.filePath = filePath;
    }

    public void Write(string section, string key, string value)
    {
        WritePrivateProfileString(section, key, value.ToLower(), this.filePath);
    }

    public string Read(string section, string key)
    {
        StringBuilder SB = new StringBuilder(255);
        int i = GetPrivateProfileString(section, key, "", SB, 255, this.filePath);
        return SB.ToString();
    }

    public string FilePath
    {
        get { return this.filePath; }
        set { this.filePath = value; }
    }
}
Now when you have to perform the read and write operations to the INI file you have to just call the Write and Read method from the above class. Initialize the above class anywhere in your application and then call the below methods to work.
To write a new entry to an INI file use the write method. As you can see in the below method you need to first initialize a class which takes in the path of the INI fie. The write method takes 3 arguments which have Section, Key and KeyValue respectively. I have used a single section and a key to demonstrate the usage, but you can call the write method a number of time to write different settings value.
INIFile inif = new INIFile("D:\\config.ini");
inif.Write("Database", "Devs", "sa");

To read the particular value from the INI file use the read method. It takes in 2 arguments i.e. Section and Key respectively to read a KeyValue.
INIFile inif = new INIFile("D:\\config.ini");
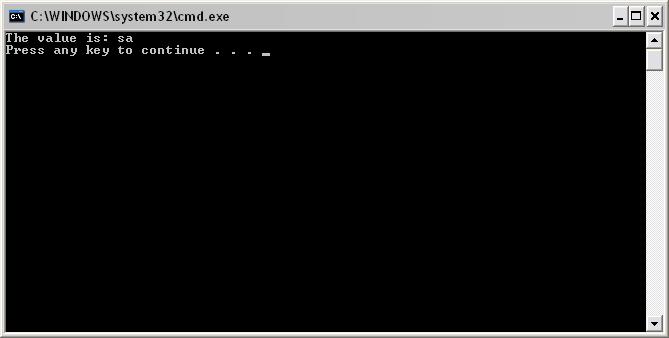
Console.WriteLine("The Value is:" +inif.Read("Database", "Devs"));
I have just displayed the value after reading from the file after the write operation is completed. You can set a local variable to preserve the value and then take a required action.
