© 2025 Pashant Khandelwal

© 2025 Pashant Khandelwal

In this post, I will walk through how you can create and host a simple website using Python and serve it as a Tor hidden service — nothing shady, just pure geeky fun.
Let’s begin by installing Tor. If you’re already familiar with the Tor browser, feel free to proceed. But if you’re new to it, you can learn more about the service here.
The Tor browser includes a Tor binary (tor.exe) that can be used to start a service or install it as a Windows service. To locate it, navigate to the folder where Tor is installed. On my system, it’s located at: D:\Programs\Tor Browser\Browser\TorBrowser\Tor.
While the initial part of the path may vary depending on your installation location, the rest of the directory structure remains consistent.
Since we’re hosting a website using Python, there’s no need to launch the Tor Browser. Instead, we’ll start Tor as a service using the tor.exe binary. Normally, launching the Tor Browser automatically starts this service in the background, but when running it manually, we need a runtime configuration file (torrc). Below is a sample configuration file with minimal settings—just enough to get the site up and running. For security reasons we would like to have the Tor control port to be password protected . You can generate the password using the tor.exe with this command.
tor.exe --hash-password Msft#win123
Copy the output of the above command and save it to the torrc file along with other configurations. Here is the final configuration file.
ControlPort 9151
SOCKSPort 9050
HashedControlPassword 16:EA735EE7099CC752600CFC4A4BD2F0CE737BA55864A78711C7672E699C
The port settings mentioned above might differ on your system. If the service fails to start or your web application can’t connect to it, this is likely the cause.
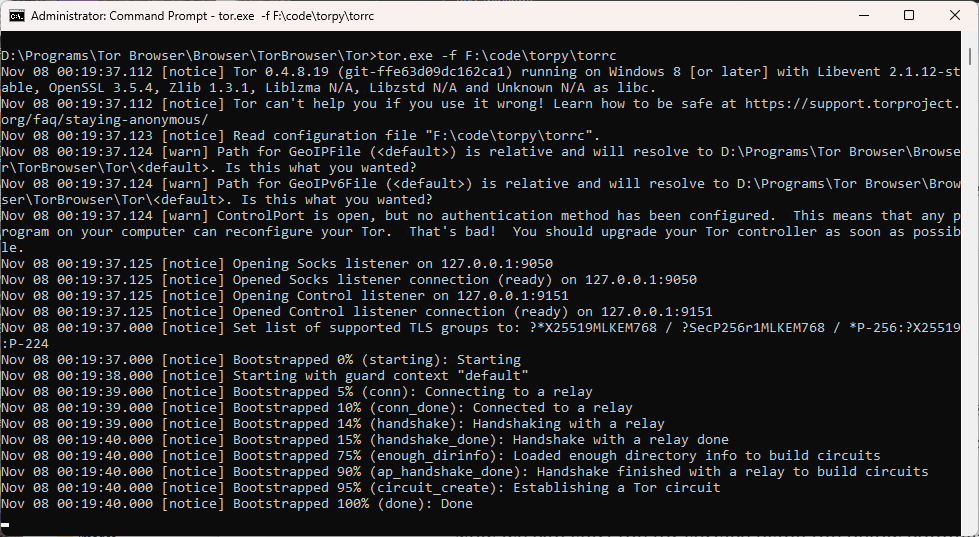
Open command prompt in administrator mode if you are on Windows. Start the tor service by executing the below command.
tor.exe -f
If you do not want to get into a hassle of running this command for starting the service again and again, then you can install tor as a service. To do that use the tor.exe with --service install arguments and pass the torrc file path as a argument to -f flag.
tor.exe --service install -options -f F:\code\torpy\torrc
On Windows, you can place the torrc file at C:\Users\AppData\Roaming\tor, which is the default location used by tor.exe. Once it’s in place, you can run the command as shown below.
tor.exe --service install
If you wish to delete the installed service, use the sc command available on Windows.
sc delete tor
With the Tor service now running, create a new folder — feel free to name it TorWeb or anything you prefer. Inside this folder, set up a Python virtual environment and install the necessary dependencies to enable communication with the Tor service.
pip install stem flask
Here is the entire Python code.
from stem.control import Controller
from flask import Flask, render_template

if __name__ == "__main__":

    app = Flask("TorWeb")
    port = 5000
    host = "127.0.0.1"
    hidden_svc_dir = "e:/web"

    @app.route('/')
    def index():
        return render_template('index.html')

    print('* Getting controller')
    controller = Controller.from_port(address="127.0.0.1", port=9151)
    try:
        controller.authenticate(password="Msft#win123")
        controller.set_options([
            ("HiddenServiceDir", hidden_svc_dir),
            ("HiddenServicePort", "80 %s:%s" % (host, str(port)))
        ])
        svc_name = open(hidden_svc_dir + "/hostname", "r").read().strip()
        print("* Created host: ", svc_name)
    except Exception as e:
        print(e)
    app.run()
stem.control: Lets you interact with the Tor process via control port.flask : Python web framework. You can use some other light-weight framework of your choice.render_template: Lets you render HTML templates.controller = Controller.from_port(address="127.0.0.1", port=9151)
Connects to the Tor control port (usually 9051 or 9151 depending on your setup).
controller.set_options([
    ("HiddenServiceDir", hidden_svc_dir),
    ("HiddenServicePort", "80 127.0.0.1:5000")
])
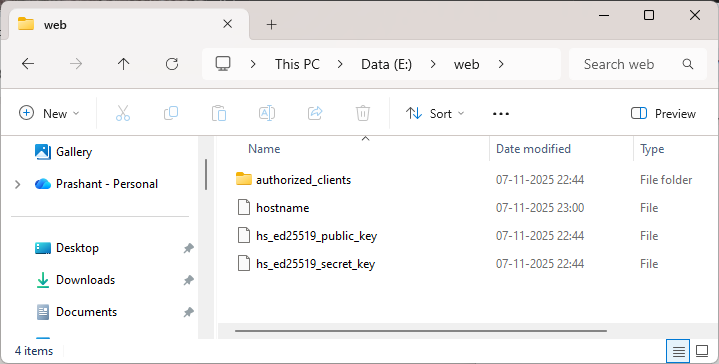
HiddenServiceDir is a path to the directory where Tor will store hidden service data like hostname, private_key etc. This code tells Tor to create a hidden service and store its config in E:\web folder. HiddenServicePort forwards incoming traffic on port 80 to flask application at 127.0.0.1:5000.
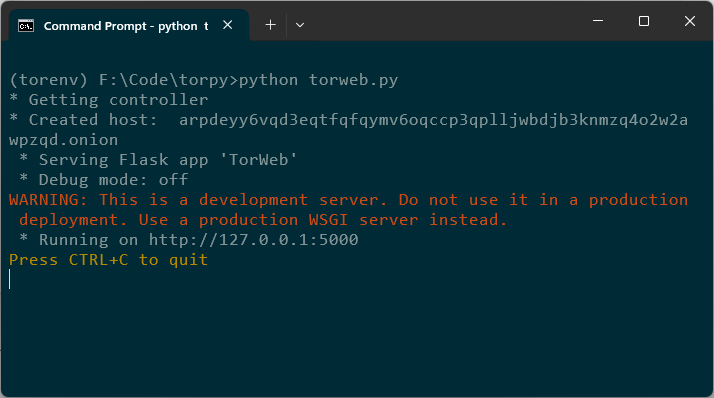
svc_name = open(hidden_svc_dir + "/hostname", "r").read().strip()
print("* Created host: ", svc_name)
This reads the generated .onion address from the hostname file and prints it.
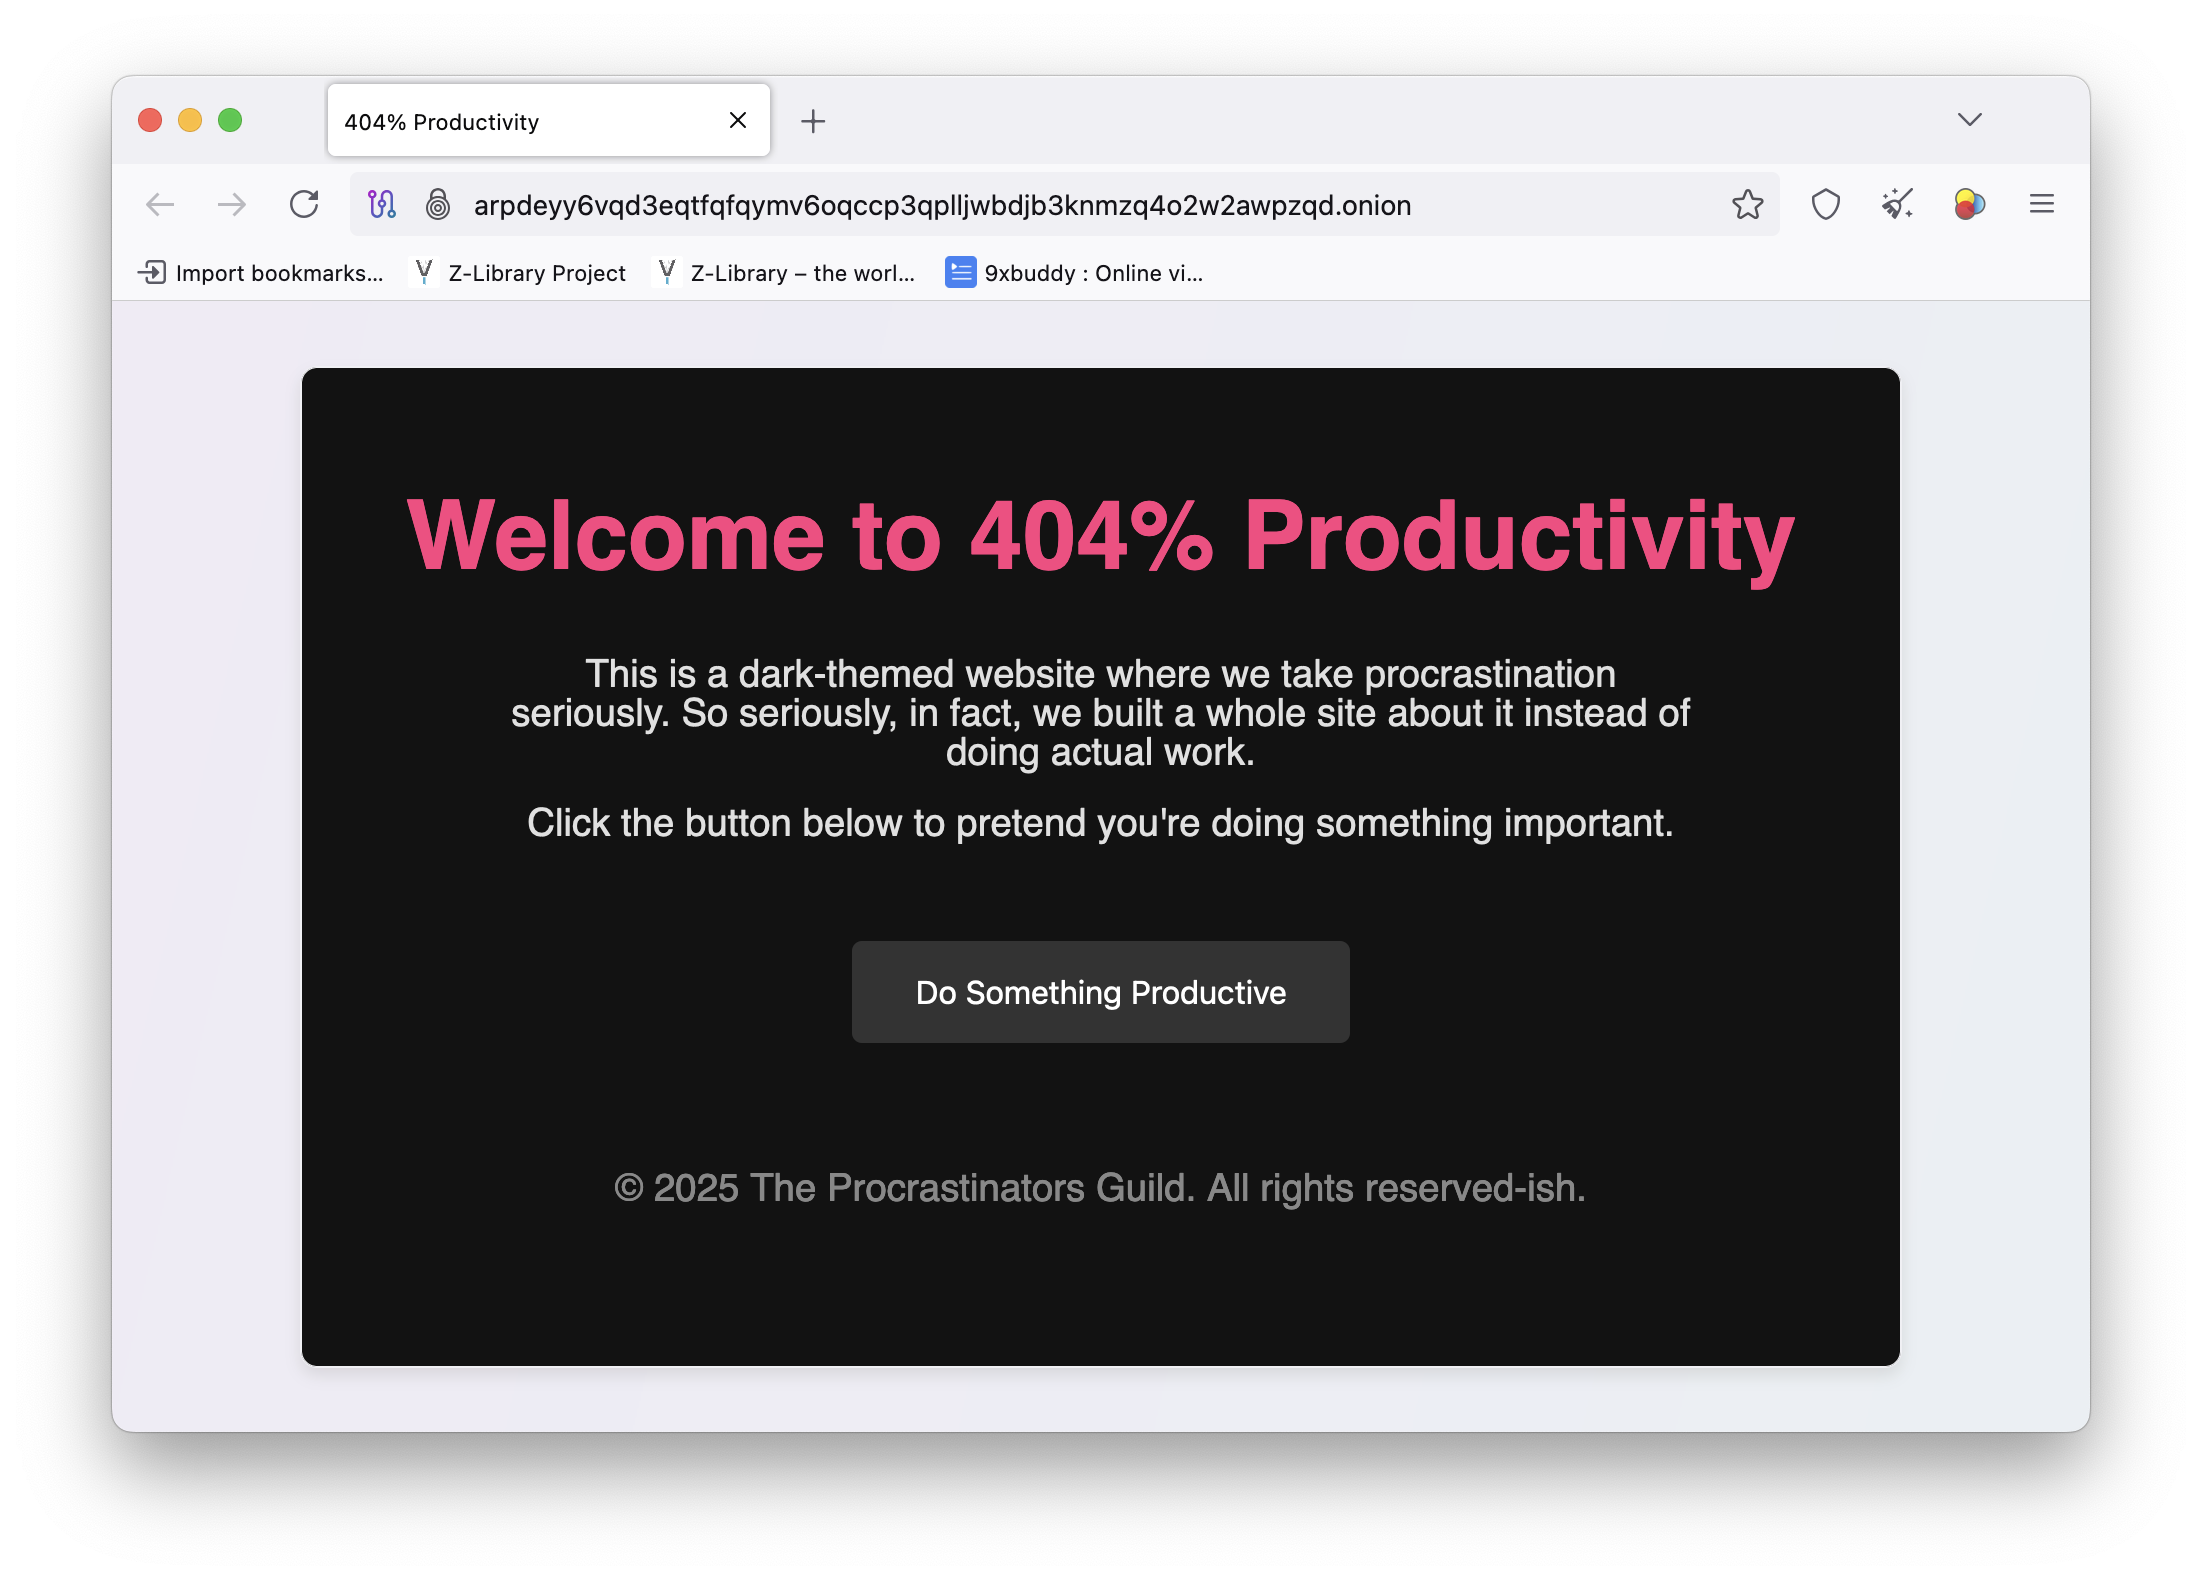
Just to make my first dark web page cool, I asked ChatGPT to render a cool looking HTML page. Copy this HTML page inside a template folder so it can be used with Flask.
Run the app
For enhanced security and greater control, it’s advisable to use a dedicated web server configured with recommended best practices.
You will not be able to open the Tor browser on your system as the Tor service is already running and the browser will not be able to connect to the instance which is already running. Although, Tor browser can connect to the existing Tor service but this is not typical and is not recommended to use.
I am using a different machine to view my application using a Tor browser.
Note that the loading of the page might be slow as it solely depends on the Tor network connectivity. It can take up to several minutes for the page to load.
The souce code along with the torrc file used above can be found in this repo path.
I was checking out the OpenObserve — an open-source observability tool which you can self-host or use their cloud offering which offers free, standard and enterprise tier to choose from.
Written completely in rust so I thought of checking the codebase on Github to get myself more aquatinted with rust language. While doing so I found a #[cfg(feature = "enterprise")] being used in many places.
Looking at it, one can tell that any function or block decorated with this attribute is conditional, available only if the feature is enabled. But does this happen at compile time or runtime? If it’s compile time, the code will be compiled into the binary solely when the feature is turned on.
To test this and to gain more understanding on this, I created a rust application where I added features section in the cargo.toml file and added two features opensource and enterprise Kind of similar to the offering of OpenObserve. Here is my final cargo.toml file.
[package]
name = "cfgfeature"
version = "0.1.0"
edition = "2024"

[features]
community = []
enterprise = []
I updated my main.rs to this. I kept the hello world in the end.
fn main() {
   #[cfg(feature = "enterprise")]
   enterprise_feature();

   println!("Welcome to the app!");
}

#[cfg(feature = "enterprise")]
fn enterprise_feature() {
    println!("Enterprise feature activated!");
}
If I use just the cargo run command without specifying the --features flag, you will see the output Welcome to the app! which is expected. But the other function call like enterprise_feature was not even considered for execution. This is because of the #cfg[(feature)] attribute in Rust which is used to conditionally compile code only when the enterprise feature is enabled in the crate and passed as a parameter with the --features flag while building or running the program.
To make a binary which has the enterprise feature enabled, I can re-run the same command but this time, I will use --features flag.
$ cargo run --features enterprise
Now you we can see the output from our enterprise_feature function as well.
$ cargo run --features enterprise
   Compiling cfgfeature v0.1.0 (F:\Code\rust\cfgfeature)
    Finished `dev` profile [unoptimized + debuginfo] target(s) in 0.31s
     Running `target\debug\cfgfeature.exe`
Enterprise feature activated!
Welcome to the app!
When the enterprise feature is not enabled, any code marked with #[cfg(feature = "enterprise")] is completely excluded from compilation. That means:
enterprise_feature function won’t be compiled.This is one of Rust’s powerful mechanisms for feature gating, allowing you to build modular, efficient binaries tailored to specific use cases or environments.
Let’s modify the above code a bit and look at some other ways of using this. Notice how I am marking a println! macro with #[cfg(not(feature = "enterprise"))] This will print the lineEnterprise features are not enabled if I do not compile the code with --features enterprise flag. This line will not be printed if you pass the --features enterprise flag.
fn main() {
    println!("Welcome to the app!");

    #[cfg(feature = "enterprise")]
    enterprise_feature();

    #[cfg(not(feature = "enterprise"))]
    println!("Enterprise features are not enabled.");
}

#[cfg(feature = "enterprise")]
fn enterprise_feature() {
    println!("Enterprise feature is enabled!");
}
Running the above program with cargo run results in this output —
$ cargo run
   Compiling cfgfeature v0.1.0 (F:\Code\rust\cfgfeature)
    Finished `dev` profile [unoptimized + debuginfo] target(s) in 0.34s
     Running `target\debug\cfgfeature.exe`
Welcome to the app!
Enterprise features are not enabled.
Here is a final example I would like to share. Consider the below code where I have two features enterprise and community and two functions enterprise_feature and community_feature marked with them respectively. But the main eye-catcher in code below are 3 different main functions.
#[cfg(feature = "enterprise")]
fn enterprise_feature() {
    println!("Enterprise feature activated!");
}

#[cfg(feature = "community")]
fn community_feature() {
    println!("Community feature activated!");
}

#[cfg(feature = "enterprise")]
fn main() {
    enterprise_feature();
}

#[cfg(feature = "community")]
fn main() {
    community_feature();
}

#[cfg(not(any(feature = "enterprise", feature = "community")))]
fn main() {
    println!("Not using enterprise or community feature.");
}
This code uses conditional compilation to define different main functions based on enabled feature flags:
enterprise feature is enabled, the main function calls enterprise_feature().community feature is enabled, the main function calls community_feature().enterprise nor community features are enabled—i.e., the program is built without the --features flag—the fallback main function runs, printing a default message.Here is the output of the above program if I try to run it without any feature flag —
$ cargo run
   Compiling cfgfeature v0.1.0 (F:\Code\rust\cfgfeature)
    Finished `dev` profile [unoptimized + debuginfo] target(s) in 0.54s
     Running `target\debug\cfgfeature.exe`
Not using enterprise or community feature.
Output of the above program when I run it using the --features enterprise flag —
$ cargo run --features enterprise
   Compiling cfgfeature v0.1.0 (F:\Code\rust\cfgfeature)
    Finished `dev` profile [unoptimized + debuginfo] target(s) in 0.35s
     Running `target\debug\cfgfeature.exe`
Enterprise feature activated!
Here are other logical combinations that you can use —
enterprise is enabled — #[cfg(feature = "enterprise")]enterprise and community are enabled — #[cfg(all(feature = "enterprise", feature = "community"))]#[cfg(any(feature = "enterprise", feature = "community"))]#[cfg(not(any(feature = "enterprise", feature = "community")))]You can also use this with modules and crates to conditionally compile them based on feature flags. Here is an example.
#[cfg(not(feature = "enterprise"))]
pub mod basic_features;

#[cfg(feature = "enterprise")]
pub mod enterprise_features;
This ensures that only one of the modules is compiled depending on the feature flag. You can also use it inside the module itself to conditionally compile functions or structs.
You can conditionally include dependencies based on features.
Ollama is a lightweight and user-friendly way to run LLMs locally. No need for complex setups and it makes it super easy to explore AI chat models from the comfort of your own device.
This tutorial is a small part of a broader project I’m working on, which involves using local LLMs and vision models to analyze data directly on-device. This approach helps reduce costs and addresses some of the privacy concerns raised by our customers.
Installation and Setup
Download and install Ollama from here.
Once the setup is complete, simply launch the Ollama application—it will open a ChatGPT-like interface that lets you interact with local LLMs.
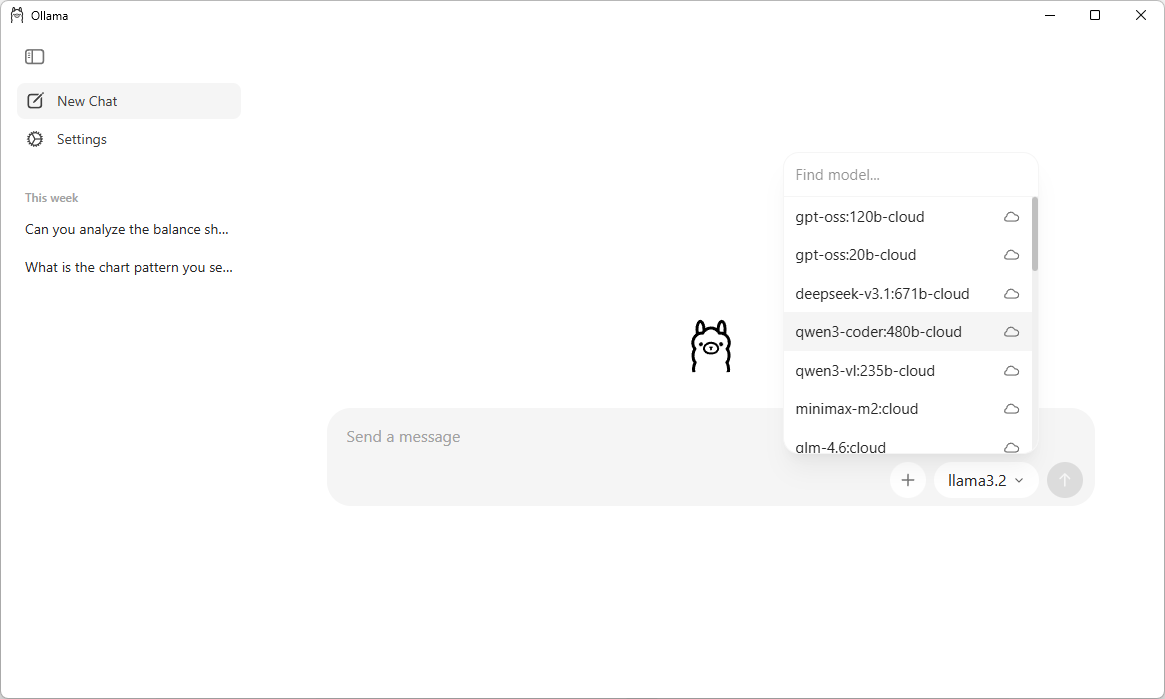
This UI makes it very easy for searching, downloading and communicating with different LLMs. You can also chat with the models which are in the cloud without downloading them. Note that you require a Ollama account in order to communicate with a cloud model.
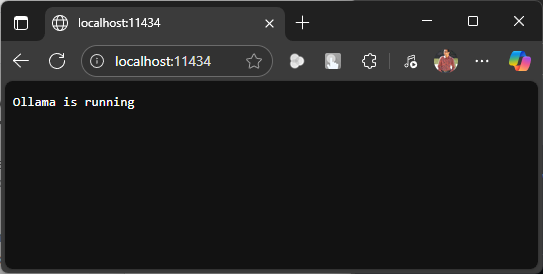
But we need to build a web based chat application and that means that we have to interact with Ollama API which is running at https://localhost:11434
Everyting seems to be set up properly. Let’s create a Python FastAPI endpoint which allows us to communicate with Ollama API. You can also use NodeJS, Go or .NET WebAPI to create a service endpoint.
Create a Python virtual environment and install the below dependencies.
pip install fastapi uvicorn requests httpx
The API uses a POST request and accepts three parameters: prompt, model, and stream.
prompt – The input message or query from the user.model – Specifies which model to run the prompt against. If not provided, it defaults to llama3.2:latest.stream – Optional setting that defaults to false. Set it to true if you want the response to appear in a typing animation, similar to ChatGPT.Note: enabling streaming requires additional changes to the code below. For below version of code, requests and httpx packages are not required.
from fastapi import FastAPI
from pydantic import BaseModel
import requests

app = FastAPI()

class PromptRequest(BaseModel):
    prompt: str
    model: str = "llama3.2:latest"  # Default model, can be overridden in the request

@app.post("/generate")
async def generate_text(request: PromptRequest):
    ollama_api_url = "http://localhost:11434/api/generate"

    payload = {
        "model": request.model,
        "prompt": request.prompt,
        "stream": False # True for streaming responses
    }

    try:
        response = requests.post(ollama_api_url, json=payload)
        response.raise_for_status()  # Raise an exception for bad status codes

        # Extract the generated text from Ollama's response
        generated_text = response.json()["response"]
        return {"response": generated_text}

    except requests.exceptions.RequestException as e:
        return {"error": f"Error communicating with Ollama: {e}"}
Run this API using uvicorn.
uvicorn main:app
The API server will start on default 8000 port. If you wish to change the port then start the API using the below command.
uvicorn main:app --port 8080
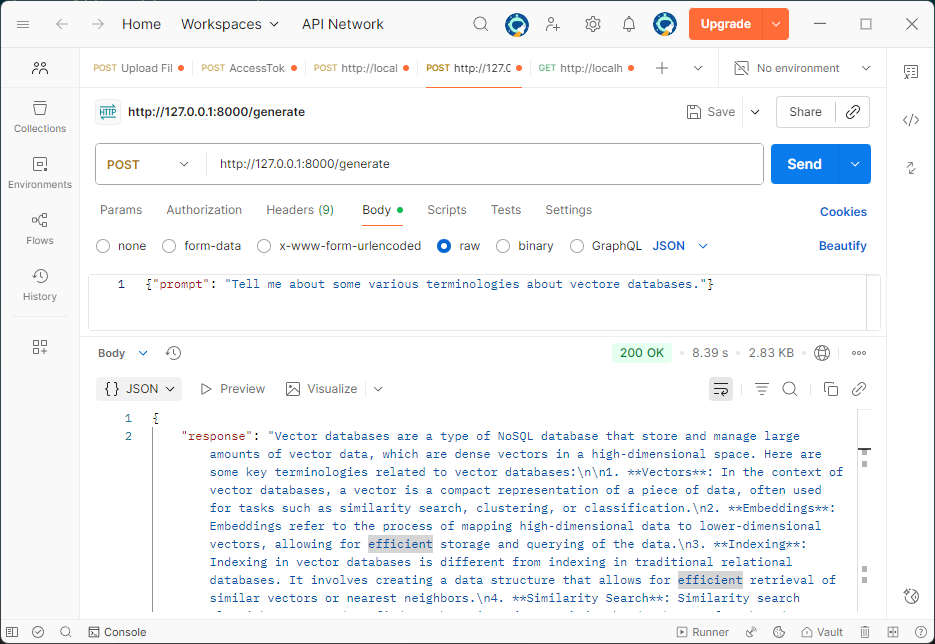
Let’s check the API response using Postman.
It’s quite helpful to see the response streamed in real time, just like how ChatGPT displays it. So let’s change the stream parameter to true and update our API code.
from fastapi import FastAPI
from fastapi.responses import StreamingResponse, HTMLResponse
from fastapi.staticfiles import StaticFiles
from pydantic import BaseModel
import httpx
import json
import os

app = FastAPI()

class PromptRequest(BaseModel):
    prompt: str
    model: str = "llama3.2:latest"

@app.post("/generate")
async def generate_text(request: PromptRequest):
    ollama_api_url = "http://localhost:11434/api/generate"
    payload = {
        "model": request.model,
        "prompt": request.prompt,
        "stream": True
    }

    async def stream_text():
        async with httpx.AsyncClient(timeout=None) as client:
            async with client.stream("POST", ollama_api_url, json=payload) as response:
                async for line in response.aiter_lines():
                    if line.strip():
                        try:
                            data = json.loads(line)
                            chunk = data.get("response", "")
                            if chunk:
                                yield chunk
                        except json.JSONDecodeError:
                            continue

    return StreamingResponse(stream_text(), media_type="text/plain")
Now we have a streaming response, let’s make a UI, I am using Svelte. Start by creating a new project.
npm create vite@latest ollama-chat -- --template svelte-ts
Update the vite.config.ts file to include a custom proxy setting for the development server. This setup ensures that any requests made to /generate are forwarded to http://localhost:8000, allowing the frontend to communicate seamlessly with a backend API like FastAPI. It also helps prevent CORS-related issues during development.
export default defineConfig({
  plugins: [svelte()],
   server: {
    proxy: {
      '/generate': 'http://localhost:8000'
    }
  }
})
The response is formatted in Markdown, so to render it correctly, you’ll need an additional npm package called marked. You can install it using the command below.
npm install marked
Remember to change the port if your have setup the custom port for your API via uvicorn.
Replace the code in App.svelte with the below code.
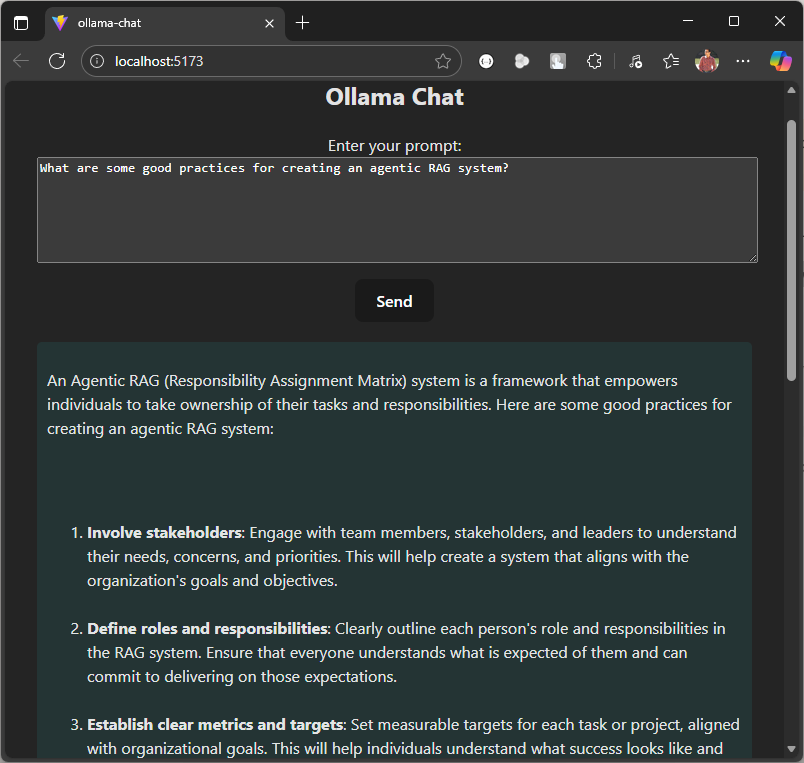
Ollama Chat
{#if loading}Loading...
{:else if chatHtml}{@html chatHtml}{:else}No response yet.
{/if}Ollama Chat
{chat}
Start the UI using this command.
npm run dev
We are now all set to run our local LLM based chat agent. Let’s start by asking a question.
This code serves as a starting point. You can extend it by adding image or file upload functionality, allowing users to summarize content or ask questions based on the data within the uploaded document or image.
Here is the Github repo where you can find the entire code.

Today, my Amazon feed was flooded with mouse jiggler suggestions in various shapes, sizes, and features. A few days ago, during a chat with a friend, he mentioned wanting a device to keep his status active on Microsoft Teams while doing household chores. It was my first time hearing about such a gadget, and I found it fascinating to explore what it can do.
In a nutshell, mouse jiggler is a device which moves your mouse or simulate its movement to keep your computer active.
The cheapest mouse jiggler I can found on Amazon was around Rs. 880 or $11 (approx.). Now mouse and keyboard are Human Interface Device (HID) and this can be easily mimic with something like a cheap Raspberry PI Pico and the total cost of this will be around Rs. 330 or $4.00.
Grab a Raspberry PI Pico from Robu.in or ThingBits.in as these are the official reseller of Raspberry PIs in India.
Thonny is a Python IDE which has excellent support for Raspberry PI. I will be using this IDE so the steps are more clear to anyone who is working with a RPI for the first time.
After the installation is complete, plug the Pico to your computer while holding the BOOTSEL button on the PICO. This will put the PICO in the bootloader mode.
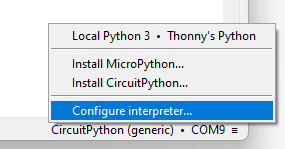
Click the bottom right corner of the main window, and select Configure interpreter.
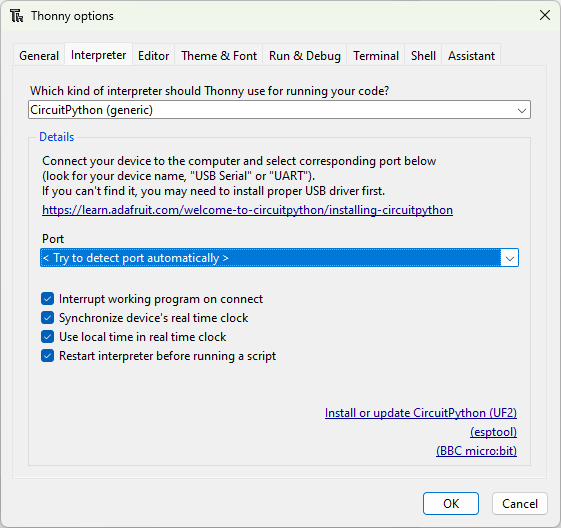
Thonny options window will pop up where you will now click Install or update CircuitPython(UF2).
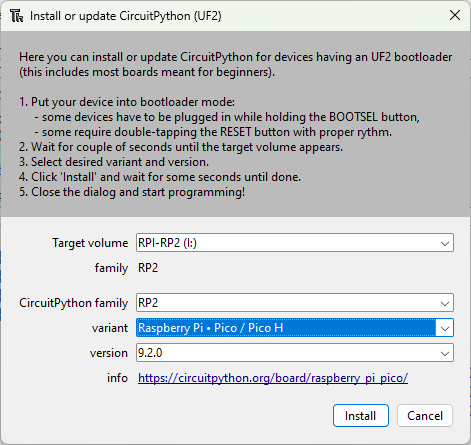
Click Install to start the installation and wait for it to finish. The device will restart after the installation is completed.
We need Adafruit’s HID library which you can download from here. Extract the contents of the zip file and copy adafruit_hid folder to the lib folder which is at the root of the Pico.
If you are using Thonny then open code.py file by pressing CTRL + O and paste in the following code.
NOTE: You will not see this dialog box if you have a wrong backend or no backend selected. You can change or select the right backend from the bottom right corner of of the Thonny IDE.
import usb_hid
from adafruit_hid.mouse import Mouse
from time import sleep

m = Mouse(usb_hid.devices)

while True:
       m.move(-5, 0, 0)
       sleep(0.5)
       m.move(5, 0, 0)
       sleep(0.5)
The line from adafruit_hid.mouse import Mouse imports the Mouse dependency, allowing us to control the mouse programmatically. The code is straightforward and can be tailored to your specific needs. In my case, I want to move the mouse slightly to keep my status active while I’m away. You can increase the time interval beyond 0.5 seconds, as both Teams and Slack take a while to detect inactivity before marking your status as inactive.
Currently, this Raspberry Pi Pico-based Mouse Jiggler is a fixture on my other always-on machine, saving me from having to re-login whenever I forget to move the mouse while deep in work.
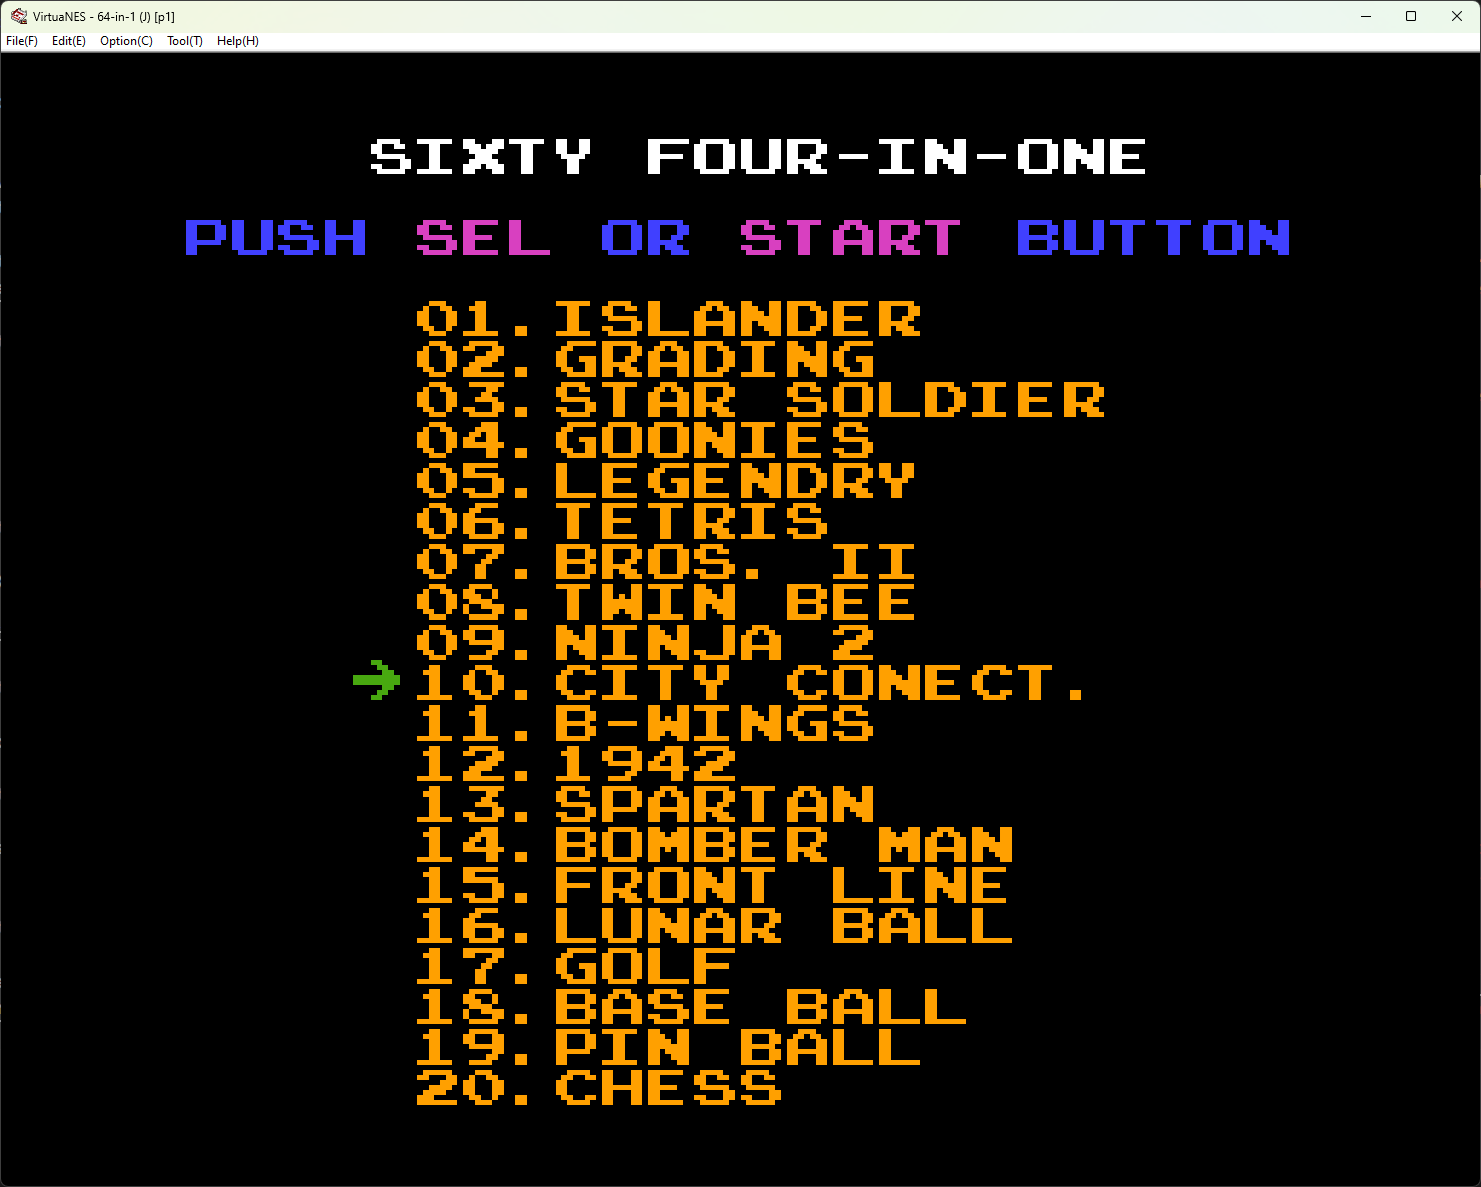
I grew up playing all the 90s games and I still love them. For quite a sometime I am now using VirtuaNES emulator to do retro gaming on my Windows machine. There are other NES emulators out there but this is the one I have been using now for a while and it has been good so far.
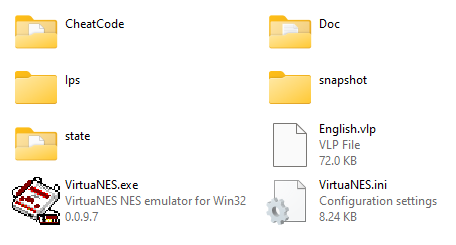
To setup VirtuaNES emulator on Windows, download it from here and here. Once you download the zip file, extract the content to any folder and double click the VirtuaNES.exe to run the emulator.
After the emulator is launched, we can start configuring the sound and controller. If you are a keyboard person, then no configuration is needed, you can instantly load a ROM and start playing the game. The default keys are as follows (yours might look a little different):
Go to Options -> Controller to change the keyboard bindings or your controller bindings.
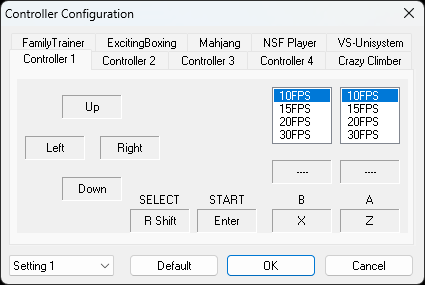
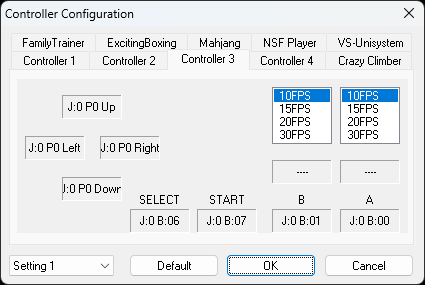
XBOX One controller is also compatible and you can configure it easily. Make sure to turn on or plug in the controller before you start the emulator.
Here is the screenshot of the bindings of my XBox One controller.
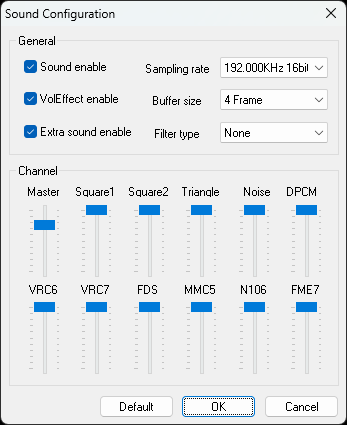
For configuring the sound settings, go to Options -> Sound
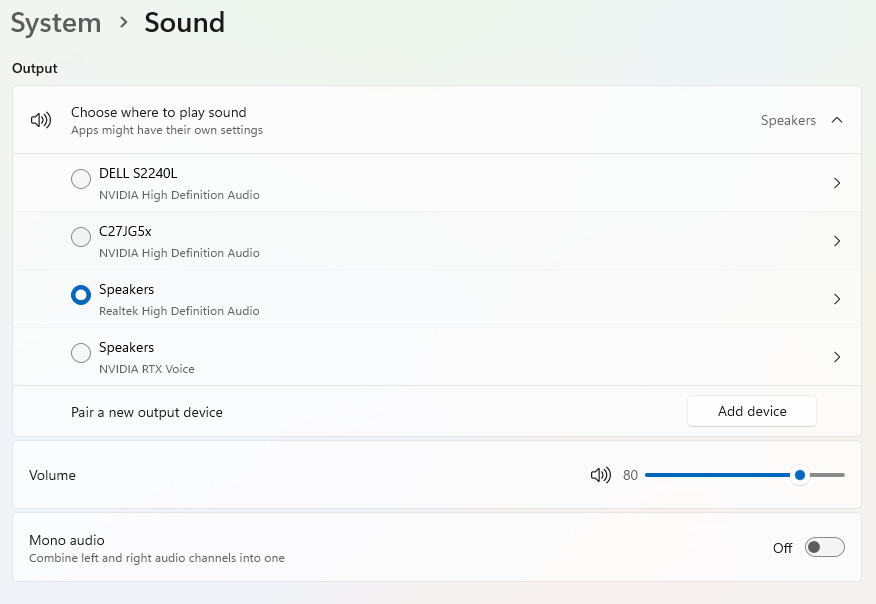
Even after setting up the sound, there is a chance that you can’t hear it when you play the game. That is due to a setting in the audio settings section in Windows. Refer the below screenshot and check whether the Mono audio is off or on. If it is off, then you have to turn it on and that will solve the sound problem in the emulator.
All set now!! Let’s get some games or ROMs as we call it and load it in the emulator. I downloaded few ROMs from Emulatorgames.net. Extract the zip file and load the ROM in the emulator by going to File -> Open. You should now see your childhood retro gaming console in front of you.