
ReCaptcha is now being used widely by many websites especially where there is a possibility of spamming the website, blog or a forum. Here I will show you on how you can use ReCaptcha in ASP.NET and MVC. Get a ReCaptcha Gobal Key and ASP.NET ReCaptcha DLL. Once you get the global key we are ready to go.
ReCaptcha in WebForms
Fire Visual Studio and create a new ASP.NET web forms project. First add a ReCaptcha DLL in the project and as we are talking about a user control we will have to register the control. On the top of the page use the register directive to register the ReCaptcha control.
<%@ register tagprefix="recaptcha" namespace="Recaptcha" assembly="Recaptcha" %>
Now on the page, we will use the control.
<recaptcha:recaptchacontrol id="recaptcha" runat="server" publickey="public key" privatekey="private key" />
You will get the public key and the private key when you register for the ReCaptcha global key. This will render the ReCaptcha control on the page.
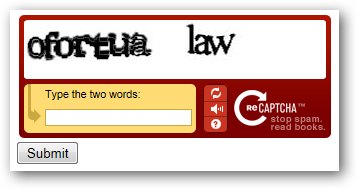
Notice that I have also placed a button and the label (with no text) on the page along with the ReCaptcha control. On the submit button we will check the Page.IsValid method. If the ReCaptcha text entered by the user is correct then the Page.IsValid method will return true else it will return false. Therefore the code on the submit button will be as follows:
if (Page.IsValid)
{
      lblStatus.Text = "Captcha Validated!";
}
else
{
      lblStatus.Text = "Invalid Captcha!";
}
This is it, hit F5 and try it out. We are now done implementing ReCaptcha in web forms and now we will see it in action in MVC.
ReCaptcha in MVC
Create a new MVC project in Visual Studio and I am using MVC 3 with RAZOR View Engine. To implement ReCaptcha in MVC, we will be using Microsoft Web Helpers. I assume you are aware of NuGet. Just in case if you are not aware of the Microsoft Web ` read my post on Working With Microsoft Web Helpers In MVC 3 Razor View. Microsoft web helpers allow us to use ReCaptcha in a very easy way. In WebForms we have used a DLL to render the ReCaptcha control on the page, but with Microsoft web helpers we can render the control with a single line of code. As you have used NuGet to install Microsoft Web Helpers library, make sure that you also use the correct namespace on the top of the page.
@using Microsoft.Web.Helpers;

@using (Html.BeginForm("Submit", "Home", FormMethod.Post))
{
    @ReCaptcha.GetHtml(publicKey: "<public key>", theme: "red")
}
I have rendered the control inside the form because when the data gets submitted after user enters the text the Submit method of the Home controller gets fired and check the captcha text entered by the user. As you know we have two keys with us, one is a public key and the other is a private key. We have used the public key to render the control on the page and we will now use the private key to validate the captcha. Also make sure that in order to use the ReCaptcha class on server side code you need to add the Microsoft.Web.Helpers namespace.
[HttpPost]
public ActionResult Submit()
{
        if (ReCaptcha.Validate(privateKey: "<private key>"))
        {
             return Content("Valid Captcha");
        }
        else
       {
            return Content("InValid Captcha");
       }
}
The ReCaptcha class of the web helpers provides a method to validate the entered text by the user. The private key of the ReCaptcha is passed as a parameter in order to validate the captcha text.
Using ReCaptcha with ASP.NET WebForms or MVC is pretty simple and easy. Here are some of the links which I feel you might find useful.
In my quest of learning MVC I came across many problems and here is one of them. I was trying to fire an event whenever a text changed event occurred. I am using JQuery to handle the text changed event but eventually the text changed event doesn’t seems to be working in MVC as it is working for a text box changed event in web forms. The solution I found seems to be working fine for me as I don’t want to fire an event on every key press.
To get started fire Visual Studio and create a new MVC 3 application with RAZOR view engine. I have build a simple contact manager application which allows the user to create a new contact, edit and delete existing contacts. While creating a new contact, what I want is when the user enters the e-mail address of the contact I want to make an AJAX call, which then call the method in the controller and return the HtmlString which will then show the Gravatar on the webpage.
Here is the default view of the index view. I will ask the user to enter some very basic information like name, address, email and phone.
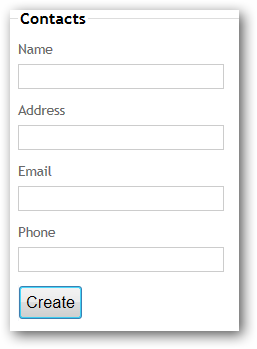
Now, when the user enters the email address of the contact and press TAB key to move to another field or just click somewhere else on the page, the focus on the text field will be changed and the controller function then returns HtmlString to show the Gravatar image.
Here is the markup of the Create View (Create.cshtml):
@model TextChangedMVC.Models.Contacts
@{
    ViewBag.Title = "Create";
}
<h2>
    Create</h2>
<script src="@Url.Content("~/Scripts/jquery.validate.min.js")" type="text/javascript"></script>
<script src="@Url.Content("~/Scripts/jquery.validate.unobtrusive.min.js")" type="text/javascript"></script>
@using (Html.BeginForm())
{
    @Html.ValidationSummary(true)
    <fieldset>
        <legend>Contacts</legend>
        <div class="editor-label">
            @Html.LabelFor(model => model.Name)
        </div>
        <div class="editor-field">
            @Html.EditorFor(model => model.Name)
            @Html.ValidationMessageFor(model => model.Name)
        </div>
        <div class="editor-label">
            @Html.LabelFor(model => model.Address)
        </div>
        <div class="editor-field">
            @Html.EditorFor(model => model.Address)
            @Html.ValidationMessageFor(model => model.Address)
        </div>
        <div class="editor-label">
            @Html.LabelFor(model => model.Email)
        </div>
        <div class="editor-field">
            @Html.EditorFor(model => model.Email)
            <div id="Gravatar">
            </div>
            @Html.ValidationMessageFor(model => model.Email)
        </div>
        <div class="editor-label">
            @Html.LabelFor(model => model.Phone)
        </div>
        <div class="editor-field">
            @Html.EditorFor(model => model.Phone)
            @Html.ValidationMessageFor(model => model.Phone)
        </div>
        <p>
            <input type="submit" value="Create" />
        </p>
    </fieldset>
}
<div>
    @Html.ActionLink("Back to List", "Index")
</div>
Check the highlighted code in the above markup where I have a DIV called Gravatar. This is where I will display the Gravatar of the person. Remember, when the user enters the email address we need to make sure that the Gravatar of the person displays without being an obstruction to the user, so an AJAX request to the controller will help in achieving this.
Below is the Jquery which will call the controller method called Avatar which accepts email as a parameter of string type.
<script type="text/javascript">
    $('#Email').change(function () {
        $('#Gravatar').html('');
        var selection = $('#Email').val();
        if (selection.length > 0) {
            $.post("/Home/Avatar", { email: selection },
        function (data) {
            $('#Gravatar').html(data)
        })
        }
    });
</script>
The above script is simple and here I am calling the controller’s Avatar method which returns an HtmlString. At line 6, we are making a request and calling the controller’s method. At line 8, the data (which is a HTML) returned will be set on the DIV called Gravatar (the placeholder for the Gravatar image).
![]()
The controller method Avatar is as follows:
public HtmlString Avatar(string email)
{
      return Gravatar.GetHtml(email, defaultImage: "http://midnightprogrammer.net/pics/default.gif");
}
Gravatar is a method is a part of the Microsoft Web Helpers. You can use web helpers by downloading it via NuGet. Check it out here if you miss my blog post on how to use Microsoft Web Helpers in MVC.
Related Post:
If you love playing Angry Birds on your PC or on your phone, then you will also love Angry Birds theme for Windows 7. The sound effects are cool, just like the one you hear while you play the game and the wallpapers are cool too. I like the red angry bird to sit on my desktop as it is the best wallpaper I can choose among the 6 wallpapers that comes with the theme.
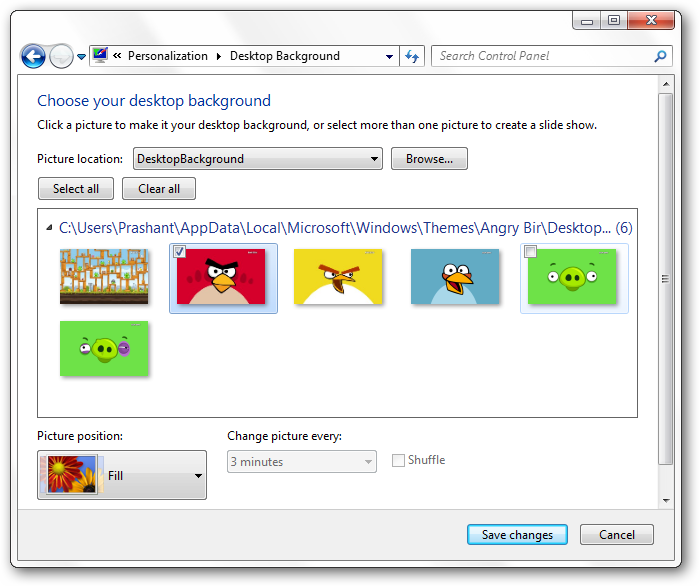
You can download the Angry Birds theme from the Microsoft downloads center here
A few days back Phil Haack wrote a blog post on how to bin deploy ASP.NET MVC 3 application on the web server where ASP.NET MVC 3 is not installed. Like many users I am also on shared hosting and therefore I do not have full control over IIS or the remote machine so I can install or update ASP.NET MVC 3, SQL Server CE 4.0 and other development related stuff. Phil did an excellent post but that works only if you are deploying application with SQL Server as a database. If you are planning to deploy your application with SQL CE as your application backend then here are the steps you need to perform.
I assume that you have your ASP.NET MVC 3 application ready to be deployed with SQL CE 4.0 and EF 4.1. But make sure you have add assembly and for SQL CE 4.0 using NuGet. I recommend you to use NuGet here because it will add all the necessary configurations in Web.config file and also add the correct references to your project. If you have MVC 3 tools update installed then there is no need to add the references for SQL CE 4.0 and for EF 4.1, the default MVC 3 template will do it for you. But there are still some changes to be done in Web.config file.
To deploy your application with SQL CE 4.0 you need to make below changes to the web.config file:
Comment or delete everything inside the connectionStrings tag. The connection string by default is pointing to your default SQL Server instance and as we are going to deploy our application with SQL CE 4.0 we need to change the value under connectionStrings tag like the one below.
<add name="ContactEntities" connectionString="Data Source=|DataDirectory|DB.sdf" providerName="System.Data.SqlServerCe.4.0" />
Next is to add DbProviderFactories under System.Data tag. If you run the application on your local development server then it will run without any problems, but if you deploy the web application to the hosting web server where SQL CE 4.0 is not installed then you will get the below error.

To avoid this error you need to manually add the DbProviderFactories in the Web.config file. Below in the markup you need to add to your web.config file.
<system.data>
    <DbProviderFactories>
      <remove invariant="System.Data.SqlServerCe.4.0" />
      <add name="Microsoft SQL Server Compact Data Provider 4.0" invariant="System.Data.SqlServerCe.4.0" description=".NET Framework Data Provider for Microsoft SQL Server Compact" type="System.Data.SqlServerCe.SqlCeProviderFactory, System.Data.SqlServerCe, Version=4.0.0.0, Culture=neutral, PublicKeyToken=89845dcd8080cc91" />
    </DbProviderFactories>
</system.data>
The best way to do this and to avoid any unnecessary error is to use NuGet. If you use NuGet to deploy SQL CE 4.0 then it will add all necessary configurations to the web.config file, add the correct dependent assembly to the project.
Copy all the dependencies to the BIN folder
The question here is how the one knows what are the dependencies and where to find them all so that they can be deployed with the application? To perform this step you should have Visual Studio 2010 Service Pack 1 (VS 2010 SP1) installed on your machine. After installing VS 2010 SP1 there will be an option called Add Deployable Dependencies added when the user right-click the project icon in the solution explorer. When you click this option a dialog box appears which allows you to select the dependencies required for the project.
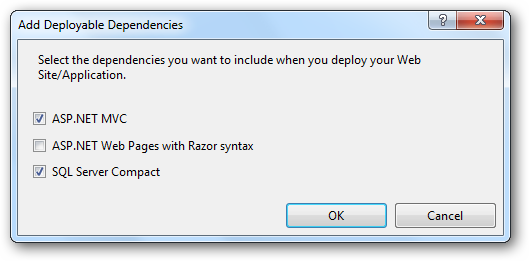
If you have read Phil’s post by now, you might know the difference of all the above options. Here, as we are deploying SQL CE 4.0 database we will also check SQL Server Compact also. Click OK button to add all the required dependencies. As soon as you click OK button you will notice that a new folder named _bin_deployableAssemblies gets added to the solution explorer.
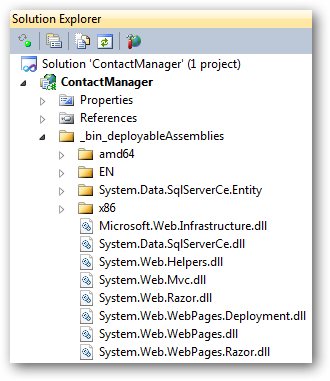
After adding all the dependencies you then need to build you web application which then copies all the dependencies to the project’s or web application’s bin folder. While deploying the application we will place each file with similar directory structure in the BIN folder on the hosting web server where ASP.NET MVC 3, SQL CE 4.0 and EF 4.1 is not installed. Just in case if you are wondering on how to deploy EF 4.1, then there is no other thing to be done to deploy EF 4.1, a DLL named EntityFramework inside the bin folder will do the work for us.
Note: I have made no changes to the directory structure while placing files at the remote hosting server.
My Netduino card arrived this Sunday but I was not able to play with my new development board due to some serious “crap work” I was doing. Today I was able to run a small piece of code which blinks the user LED on the Netduino board. The code is simple enough and just like “hello world” example like we have for all other programming languages.
Here is my Netduino kit:
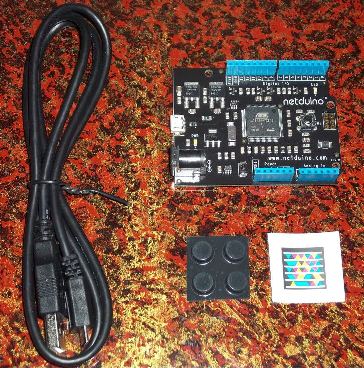
The best part of this development board is that it is the advanced version of the very famous Ardunio boards. Below is the detailed comparison of the three boards.
| Netduino | Arduino Uno | Arduino Mega 2560 | |
|---|---|---|---|
| CPU | Atmel ATSAM7X | Atmel ATmega328 | Atmel ATmega2560 |
| Architecture | 32-bit ARM7 | 8-bit AVR | 8-bit AVR |
| Clock | 48 Mhz | 16 Mhz | 16 Mhz |
| MIPS / Mhz | 0.9 | 1 | 1 |
| MIPS | 43.2 | 16 | 16 |
| Code | 128 KB | 32 KB | 256 KB |
| RAM | 60KB | 2 KB | 8 KB |
| Flash | 512 KB | 32 KB | 256 KB |
| SRAM | 128 KB | 2 KB | 8 KB |
| EEPROM | – | 1 KB | 4 KB |
| Pins | 14 Dig. I/O (4 PWM) | 14 Dig. I/O (6 PWM) | 54 Dig. I/O (14 PWM) |
| 6 analog-in or digital I/O | 6 analog-in | 16 analog-in | |
| UARTs | 2 | 1 | 4 |
| output limits | 8 mA / pin & 16 mA / PWM | 40 mA per Pin | 40 mA per Pin |
As you can see from the above comparison, the Netduino board is 3x faster than the Arduino and on the top it has 30x the RAM and check the processor 32-bit ARM7 awesome!!
Getting Started
To get started, you first need to set up your machine with some SDKs from Microsoft and Netduino. Below is the list of the SDKs you need to install on your development machine:
This is it and you are good to go with your first Netduino application. Fire Visual Studio and create new project under Micro Framework and select Netduino Application.
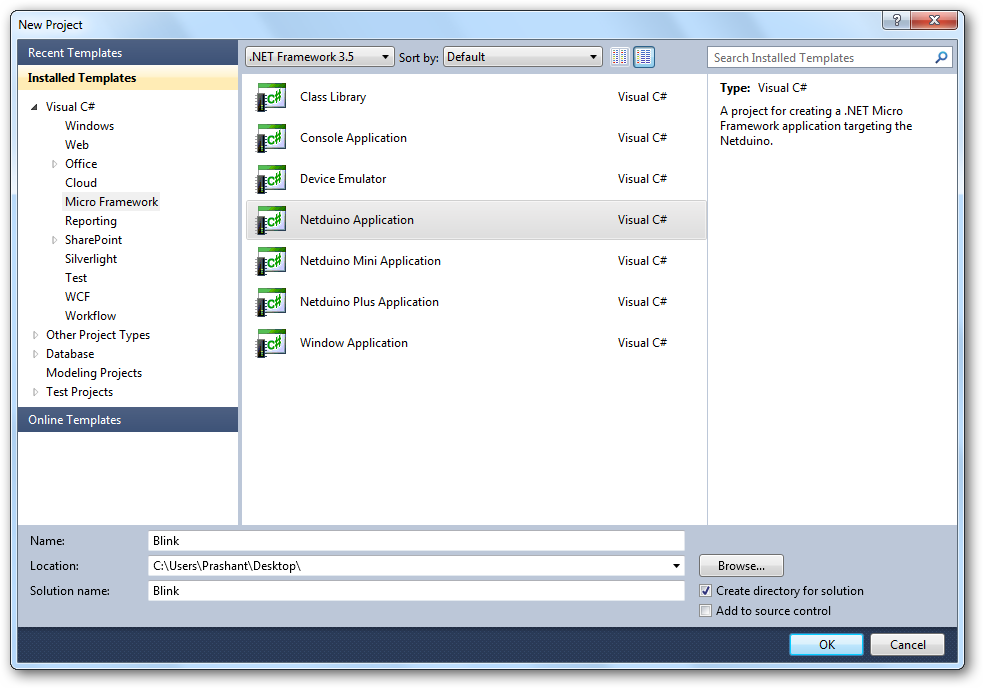
I have named the project Blink because we are going to blink the LED on board. As you can see there are two LEDs on the board. The one near the micro-USB indicates power (white) and the one near the onboard button is user LED (blue).
We are going to blink the user LED and for this I am going to use the code from the getting started guide form Netduino (nothing fancy here from my side) I am just re-using the code. below is the code you have to put inside you main method:
OutputPort led = new OutputPort(Pins.ONBOARD_LED, false);
while (true)
{
        led.Write(true); // turn on the LED
        Thread.Sleep(250); // sleep for 250ms
        led.Write(false); // turn off the LED
        Thread.Sleep(250); // sleep for 250ms
}
Now before you hit F5 go to project properties and under .NET Micro Framework change the Transport mode from Emulator to USB. As soon as you change the Transport mode you will notice the Device has been changed from Microsoft Emulator to Netduino_Netduino. Now press F5 and the application will get deployed to your Netduino board.
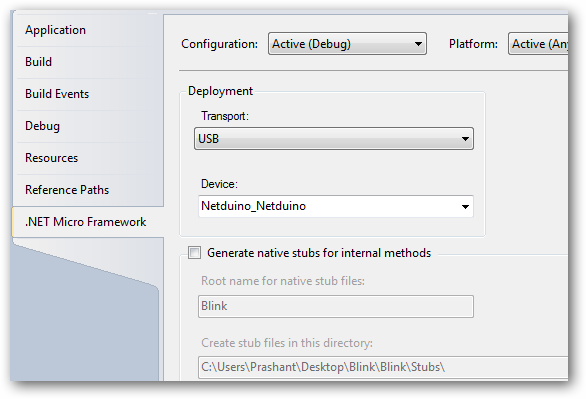
This is just a simple thing to do with a small but powerful development board. There are people around the globe building some amazing things with Netdunio and Arduino shields. In my next post I will show you how to erase Netduino memory for other application to deploy.
Below are some of the resources that I think you may find useful: