
© 2026 Pashant Khandelwal

© 2026 Pashant Khandelwal
![]()
Finally, I got to know the way to show Google Analytics stats on my blog space. To know more about using Google Analytics API read their official article on using the API.
I have built a widget with the help of Analytics API to show the Google Analytics stats on my blog. The widget shows three stats at the moment (I don’t want to make the widget look complex). Below is a screenshot for the widget in action on my blog:

The above widget shows the stats since I have started blogging. As you can see my blog is not as popular as yours or as popular comparative with other MSFT guys and other popular bloggers. As usual before you can use the widget you need to do some settings for the widget.
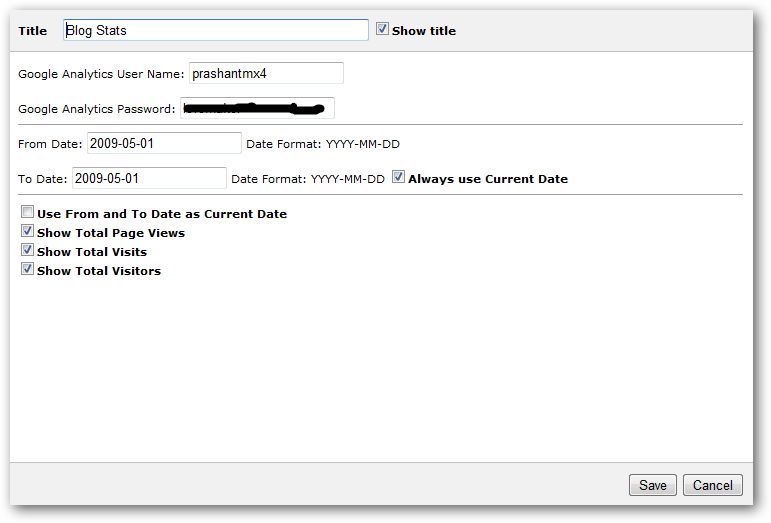
You should be aware by now that this widgets uses Google Analytics API, and I hope you all have Analytics account. The Username and Password will be the same as your Analytics account (and without @xyz.com). From Date and To Date specifies the date range which then populate the stats from Analytics service for the specified date range. I have provided an option that allows you to always use the To Date as the current date, you can do that by checkingAlways use Current Date (checking this will override To Date value). If you wish to show the stats ONLY for the current day then check Use From and To Date as Current Date (change the widget title from what you have to Today's Hit or whatever you wish!). I have settings as shown in the screenshot above for my blog and I am showing all my stats since I have started blogging.Last three options will allow you to toggle between the three statistics options you want to show on the widget or not.
Download: BlogAnalytics - Widget.zip (107.28 kb)
I have now been using BlogEngine for 2 years now and I was kinda fed up with the standard theme I have been since starting which I have modified a bit to look more prettier. I am not saying it’s bad but it’s too much now, I should do a makeover of my blog. Now the BlogEngine community is not as big and vast as that of the most popular blogging engine Wordpress and therefore it is hard to get beautiful themes for BlogEngine.
This time I made my mind and sat down to create a new theme for my blog from scratch (LOL!!) but with the help of some good looking Wordpress theme. So I began my search and what I got is the one I have been looking for in the past when I started blogging. I found a Wordpress theme which resembles Windows Live default blue skin. It looks good to me so I download and start changing the looks for my blog. I don’t know if I have messed up, but I like it and so my blog is up with a new Windows Live theme. There are few other customizations that I have done with the theme that works for my blog like after every post you see a Google Ads (let me know if they are annoying, which I feel they are not), logos of the sites having a reference of my blog and some other internal stuff (simple HTML and server-side work). This is the case with me, for you there are no hiccups, just copy and paste the Windows Live theme folder inside Themes folder and you are done.
This theme is based on the standard theme template for BlogEngine. If you have any suggestions to make the theme look more beautiful in some way or the other (as I am not a designer) please do share with me and all of us in the community.
Download: WindowsLive.zip (70.33 kb)
UPDATE: There is a slight change in the style.css file. The image above is broken when a blog is viewed in a large display.
it is now been fixed. Please download the latest style sheet from the link below.
![]()
If you have long URLs and other and want to create short URLs then Bit.ly API can help. I wrote a wrapper class which can let me create short URLs in jiffy. I was working on Bit.ly API to create my short URLs with a click of a button (that’s for my personal use). Therefore, I ended up with a ‘short’ class to create short URLs using Bit.ly API. What you need is a login and an apikey, which you can have one for yourself by signing up for a free account. You can find your apikey here after login. The class gives you two ways to make short URL, one with XML and the other with plain TEXT. I haven’t write anything for JSON as it was not required at all to me in any ways. I am using plain TEXT for this example. You can read Bit.ly API official documentation for more information.
The below class can be used to create short URLs using Bit.ly API, reverse the short URLs and get the original URL. Also if you are not aware you can have a QR code of your short URL. Read more about QR Code here. If you are using Bit.ly or Goo.gl to shorten your URLs then you can have the QR code image by adding .qrcode in the end of the short URL (See in the code example below)
using System;
using System.Collections.Generic;
using System.Linq;
using System.Text;
using System.Xml;
using System.Net;
using System.IO;

namespace Bitly.API
{

    public class BitlyData
    {
        #region Properties

        public static string APIKEY { get; set; }
        public static string LoginName { get; set; }

        public static string StatusCode { get; set; }
        public static string StatusDesc { get; set; }
        public static string ShortURL { get; set; }
        public static string LongURL { get; set; }
        public static string HashCode { get; set; }
        public static string GlobalCode { get; set; }
        public static string NewHash { get; set; }

        #endregion
    }

    public class Bitly
    {

        #region Bit.Ly Variables

        private static string URL = "http://api.bit.ly/v3/shorten?login=";

        private static string BitResponse = "";

        #endregion

        #region Enums

        public enum Format
        {
            XML,
            JSON,
            TXT
        }

        #endregion

        #region Sample Response
        //        <?xml version="1.0" encoding="utf-8"?>
        //<response>
        //    <status_code>200</status_code>
        //    <status_txt>OK</status_txt>
        //    <data>
        //        <url>http://bit.ly/ekYLee</url>
        //        <hash>ekYLee</hash>
        //        <global_hash>gBH72m</global_hash>
        //        <long_url>http://midnightprogrammer.net/post/Windows-7-Development-Working-With-Task-Dialog-Class.aspx</long_url>
        //        <new_hash>1</new_hash>
        //    </data>
        //</response>

        #endregion

        public static string ShortURL(string LongURL, Format ReqFormat = Format.TXT)
        {
            string sURL = string.Empty;
            string BitLyURL = URL + BitlyData.LoginName + "&apikey=" + BitlyData.APIKEY + "&longUrl=" + LongURL + "&format=";

            if (ReqFormat == Format.JSON)
            {
                throw new NotImplementedException("This method is not implemented yet!");
            }

            if (ReqFormat == Format.XML)
            {
                BitResponse = new WebClient().DownloadString(BitLyURL + "xml");
                string Response = BitResponse;

                XmlDocument doc = new XmlDocument();
                doc.LoadXml(Response);
                XmlNodeList XlistResponse = doc.GetElementsByTagName("response");

                foreach (XmlNode XResnode in XlistResponse)
                {
                    XmlElement ResElm = (XmlElement)XResnode;

                    BitlyData.StatusCode = ResElm.GetElementsByTagName("status_code")[0].InnerText;

                    if (BitlyData.StatusCode != "200")
                    {
                        BitlyData.StatusDesc = ResElm.GetElementsByTagName("status_txt")[0].InnerText;
                        return BitlyData.StatusDesc;
                    }
                }

                if (BitlyData.StatusCode == "200")
                {

                    XmlNodeList XlistData = doc.GetElementsByTagName("data");

                    foreach (XmlNode XDatanode in XlistData)
                    {
                        XmlElement DataElm = (XmlElement)XDatanode;

                        BitlyData.ShortURL = DataElm.GetElementsByTagName("url")[0].InnerText;
                        BitlyData.LongURL = DataElm.GetElementsByTagName("long_url")[0].InnerText;
                        BitlyData.HashCode = DataElm.GetElementsByTagName("hash")[0].InnerText;
                        BitlyData.GlobalCode = DataElm.GetElementsByTagName("global_hash")[0].InnerText;
                        BitlyData.NewHash = DataElm.GetElementsByTagName("new_hash")[0].InnerText;
                    }
                }
            }

            if (ReqFormat == Format.TXT)
            {
                if (ReqFormat == Format.TXT)
                {
                    BitResponse = new WebClient().DownloadString(BitLyURL + "txt");
                    string Response = BitResponse;

                    BitlyData.ShortURL = Response;
                }
            }

            return sURL = BitlyData.ShortURL;
        }

        public static string ReverseShortURL(string ShortURL)
        {
            HttpWebRequest Webrequest = (HttpWebRequest)HttpWebRequest.Create(ShortURL);
            HttpWebResponse Webresponse = (HttpWebResponse)Webrequest.GetResponse();
            Uri uri = Webresponse.ResponseUri;
            return uri.AbsoluteUri;
        }

        public static string GetQRCodeURL(string ShortURL)
        {
            string QRCodeURL = string.Empty;
            QRCodeURL = ShortURL + ".qrcode";
            return QRCodeURL;
        }
    }
}
In the above class you can see that the second parameter is accepting TXT by default. So, if you call the method with or without the second parameter it will still work with the default parameter TXT. The enumeration called Format contains all the possible format of all the formats which is accepted by Bit.ly API. The second parameter in the class above should be removed if you plan to use the above code with the lower versions of .NET i.e. 3.x/2.0.
Sample Usage .NET 3.x / 2.0
Bitly.API.BitlyData.LoginName = "LOGIN NAME GOES HERE";
Bitly.API.BitlyData.APIKEY = "API KEY GOES HERE";
Console.WriteLine("Short URL: "+Bitly.API.Bitly.ShortURL("http://midnightprogrammer.net/post/9-Promises-Should-Be-Taken-Before-Choosing-IT-Profession.aspx", Bitly.API.Bitly.Format.TXT));
Console.WriteLine("Reverse URL: "+Bitly.API.Bitly.ReverseShortURL("http://bit.ly/eZ1kdb"));
Console.WriteLine("QRCode Image URL " + Bitly.API.Bitly.GetQRCodeURL("http://bit.ly/eZ1kdb"));
Sample usage .NET 4.0
Bitly.API.BitlyData.LoginName = "LOGIN NAME GOES HERE";
Bitly.API.BitlyData.APIKEY = "API KEY GOES HERE";
Console.WriteLine("Short URL: "+Bitly.API.Bitly.ShortURL("http://midnightprogrammer.net/post/9-Promises-Should-Be-Taken-Before-Choosing-IT-Profession.aspx", Bitly.API.Bitly.Format.TXT));
Console.WriteLine("Reverse URL: "+Bitly.API.Bitly.ReverseShortURL("http://bit.ly/eZ1kdb"));
Console.WriteLine("QRCode Image URL " + Bitly.API.Bitly.GetQRCodeURL("http://bit.ly/eZ1kdb"));
I have tested my code with Console Application, but you can test it with web or Windows form application. Note that the default parameters are only accepted if you are working with .NET 4.0 and not by the lower versions of .NET. If you wish to use the second parameter in .NET 4 then also it will work, but not using it with lower version will give you error.
A Few months back I wrote a post on how to use jQuery plugin Uploadify to upload single/multiple files without postback in ASP.NET. The program works similarly to simple file upload sites in its ease of use. Now a few days back I was working on a demo project which is on MVC 3 Razor and I use the same plugin without any problems. But the files that are being uploaded are uploaded to the root folder instead of the folder I specified to upload the files. After a lot of head scratching, I was unable to find the actual problem as why the file was not being uploaded to the folder of my choice. The answer was hidden in the normal file upload code that I saw in a forum posted by a user. So I gave it a try and it WORKED!! I was about to blog about the usage of uploadify plugin, but before that one of my blog reader asked me a question about uploading the files in Razor, though it was a bit different but this way it is pretty.
Using the uploadify plugin in MVC 3 is the same as used with web forms, the only difference is that on the server-side we are going to use Controller and not a ASP.NET handler. Client side script is the same and there are only changes in script and folder parameter. Set the multi parameter to true if you wish to upload multiple files.
The script tag specifies the method in the Home Controller which handles the file upload. The Upload method in the Home Controller:
public string Upload(HttpPostedFileBase fileData)
{
      var fileName = this.Server.MapPath("~/uploads/" + System.IO.Path.GetFileName(fileData.FileName));
      fileData.SaveAs(fileName);
      return "ok";
}
Now you can use the uploadify plugin with MVC 3 Razor and upload files in a more effective and efficient way and that too with no postback.
Download: FileUploader.zip (572.92 kb)
Building applications with ASP.NET MVC 3 and that too with RAZOR is easy. I believe most of the programmers out there found MVC 3 with RAZOR view engine found it easy. The best things I found in the new RAZOR view engine is the code is pretty much tidy no traditional code behinds and moreover you can work with the server-side code with the start of the @ symbol.
What is a Helper Class?
I am not going to copy and paste the definition from somewhere but I want to write my own thoughts on the helper class. Maybe this is not the best definition but this is how I would like to describe the Helper Class.
A class that minimize the effort incurred in the design, implementation of functionality on your application is called a helper class.
One of the best things that Microsoft incorporated in the framework is the use of the helper classes. Although this is not a new concept, previously also all the programmers are working on their own to create helper classes for the work they are doing to minimize the effort and time spend in writing the same lines of code again and again. Microsoft Web Helpers provides some of the best helper classes that can be used in almost every web application.
How to get Microsoft Web Helpers
To use Microsoft Web Helpers in your project use the below NuGet command:

If you are using Web Matrix then you can start using the helper class right away, but if you have created the application from Visual Studio then you still need the Web Matrix reference in you project. You can add the Web Matrix reference from C:\Program Files\Microsoft ASP.NET\ASP.NET Web Pages\v1.0\Assemblies. Once installed, you can now use it for majority of the complex tasks with ease and in less time. Some of the major use of this helper class is listed below:
Gravatar: To show the gravatar on your web page use the Gravatar class Gethtml() and pass e-mail address as a parameter. If the e-mail id provided, has no Gravatar then the default Garavatar image will be displayed. To get the Gravatar with default Gravatar image:
@Gravatar.GetHtml("prashant@midnightrogrammer.net")
![]()
You can also have your own default image to replace the default Gravatar image. To show your own default image use the defaultImage: attribute
@Gravatar.GetHtml("prashant@midnightrogrammer.net", defaultImage: "http://midnightprogrammer.net/pics/default.gif")
![]()
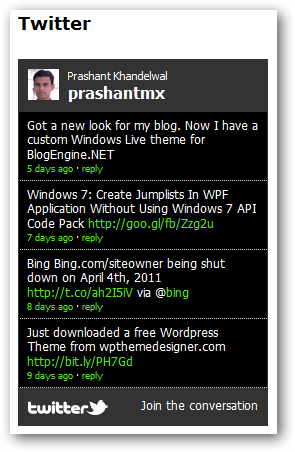
Twitter: Twitter helper class can be used to show your tweets using the Profile method. This will display the same widget that you can get for youself from the Twitter website. Moreover you can also change the apperance of the widget. To display your tweets you can use your twitter profile name as a parameter in the Profile method.
@Twitter.Profile("prashantmx")
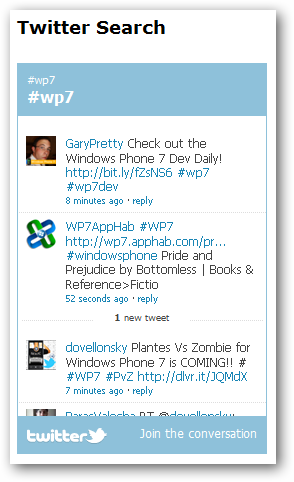
You can also search Twitter and display all the reactions. If I have to search about Windows Phone 7 then I will use the keyword #WP7.
@Twitter.Search("#wp7")
For Twitter follow button:
@TwitterGoodies.FollowButton("prashantmx")

Tweet Button: The tweet button will help you to tweet your website or blog content. But this time we will use the TwitterGoodies class TweetButton.
@TwitterGoodies.TweetButton(TwitterGoodies.DataCount.Horizontal, "This is RAZOR Tweet", "http://midnightprogrammer.net", TwitterGoodies.Languages.English,"prashantmx")
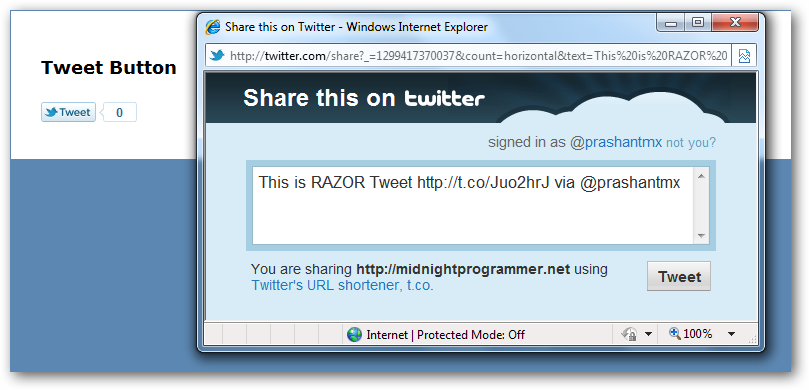
You can set the align of tweet counts either vertically or horizontally or none. I have set it to horizontal.
Google/Yahoo Analytics: Insert tracking code in your website directly.
@Analytics.GetGoogleHtml("UA-9087")
Same can be done for Yahoo. Just use GetYahooHtml instead of GetGoogleHtml.
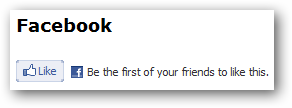
Facebook: Facebook integration is now much easier. To get the like button use:
@Facebook.LikeButton("http://midnightprogrammer.net")
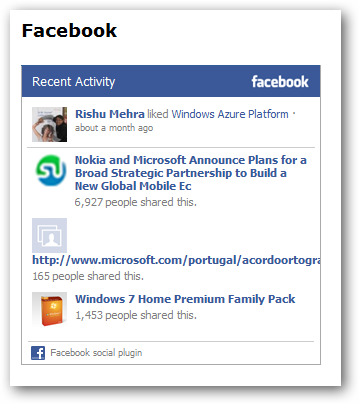
To show the latest activity feed use the ActivityFeed method. I am going to see the latest activity from Microsoft.
@Facebook.ActivityFeed("http://www.microsoft.com")
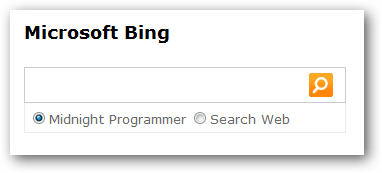
Microsoft Bing Search: If you want to have a search then the best option is to use Microsoft Bing (Because It’s Not Google). There are two Bing search boxes that you can use, but the most popular is the Bing Advanced Search Box. Below are the two ways to use the Bing Search box.
Normal Search Box:
@{
    Bing.SiteTitle = "Midnight Programmer";
    Bing.SiteUrl = "http://midnightprogrammer.net";
}

@Bing.SearchBox()
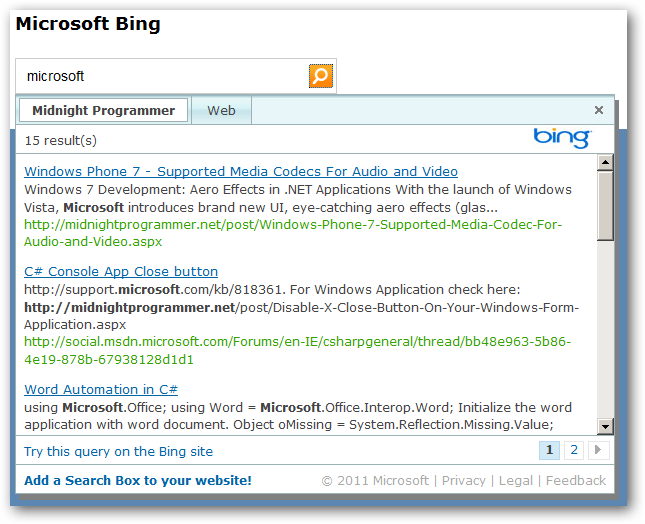
Advanced Search Box:
The same code will be used to show the advanced search box, just use the AdvancedSearchBox method instead of SearchBox as done previously.
@{
    Bing.SiteTitle = "Midnight Programmer";
    Bing.SiteUrl = "http://midnightprogrammer.net";
}

@Bing.AdvancedSearchBox()
The main advantage of using the advanced search box for Bing is that it will let you search the whole website/blog without taking you to the Bing site and display the search content in the small container with two tabs showing the search result from the website/blog and the other one from the web.
Note: Bing team at Microsoft announced that they will be shutting down siteowner service on April 4th. This will prevent you to use the AdvancedSearchBox feature of Bing on your website/blog or web applications. Here is the quote from Bing’s official blog:
As of April 4th, 2011 we will discontinue support for the bing.com/siteowner functionality. If you continue to leverage the feature after this date (April 4th, 2011), users who attempt to query in the search box will be redirected to a 404 page. This means that you will need to move to the Bing API in order to continue to receive web or site search results from us. We have decided to take this step for two reasons. First, the tool has not been getting a lot of use and while we have some very loyal customers on it, we believe we can provide you better alternatives in the future as we free up resources. Second, the functionality available through bing.com/siteowner can be replicated with the Bing search API and so it feels a bit redundant. As has become customary, we will give you a window to migrate off and ask us any questions you may have about this change. We will also provide reminders as we get closer to April 4th. Thank you so much for your support.
So this is it. These are some of the helper classes in action that I have described in this post. There are lot of others and I hope that there would be other helper classes would be added in the later releases of Microsoft helper classes for web. You can read more here on web helpers from the below official Mirosoft resources.
Download: DBMatrix.zip (1.13 mb)