
© 2026 Pashant Khandelwal

© 2026 Pashant Khandelwal
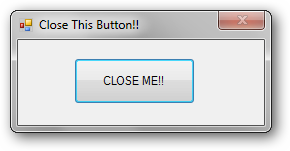
Recently, someone on MSDN forums asked this question on how to disable the “X” a.k.a. close button in his windows form application so the user is forced to close the application from the cancel button on the form and not from the close button. He wanted this for his application which requires registration first before a user can start using his application.
I don’t know the answer so I bing arond a bit and find a solution posted by someone though I don’t have the name but it worked like a charm….!!
We need some interoperability to do this, therefore get the namespace System.Runtime.InteropServices Code:
private const int MF_BYPOSITION = 0x400;
[DllImport("User32")]
private static extern int RemoveMenu(IntPtr hMenu, int nPosition, int wFlags);
[DllImport("User32")]
private static extern IntPtr GetSystemMenu(IntPtr hWnd, bool bRevert);
[DllImport("User32")]
private static extern int GetMenuItemCount(IntPtr hWnd);
Below code goes to the load event of your form:
IntPtr hMenu = GetSystemMenu(this.Handle, false);
int menuItemCount = GetMenuItemCount(hMenu);
RemoveMenu(hMenu, menuItemCount - 1, MF_BYPOSITION);
Time to press ‘F5’….and the close button is now disabled on the form.
Download: CloseButton.zip (43.08 kb)
Crystal reports is one of the most widely used reporting component in Visual Studio. But this time it goes missing from the final release of Visual Studio 2010. Crystal Reports for Visual Studio 2010 is now available for download to all the Visual Studio 2010 users and is for free of cost as always.
Download Links:
Download Crystal Reports for Visual Studio 2010
Getting Started with Crystal Reports for Visual Studio 2010
Tutorials for Crystal Reports for Visual Studio 2010
Related Areas
I was just surfing the net in search for some fundoo tutorial on WPF and by chance (I don’t meant to visit that site), I get this class which I feel is pretty helpful. A simple wrapper class to conver time. the class allows you to convert:
This can be pretty usefull. The class is as follows:
using System;

public static class TimeSpanUtil
{
    #region To days
    public static double ConvertMillisecondsToDays(double milliseconds)
    {
        return TimeSpan.FromMilliseconds(milliseconds).TotalDays;
    }

    public static double ConvertSecondsToDays(double seconds)
    {
        return TimeSpan.FromSeconds(seconds).TotalDays;
    }

    public static double ConvertMinutesToDays(double minutes)
    {
        return TimeSpan.FromMinutes(minutes).TotalDays;
    }

    public static double ConvertHoursToDays(double hours)
    {
        return TimeSpan.FromHours(hours).TotalDays;
    }
    #endregion

    #region To hours
    public static double ConvertMillisecondsToHours(double milliseconds)
    {
        return TimeSpan.FromMilliseconds(milliseconds).TotalHours;
    }

    public static double ConvertSecondsToHours(double seconds)
    {
        return TimeSpan.FromSeconds(seconds).TotalHours;
    }

    public static double ConvertMinutesToHours(double minutes)
    {
        return TimeSpan.FromMinutes(minutes).TotalHours;
    }

    public static double ConvertDaysToHours(double days)
    {
        return TimeSpan.FromHours(days).TotalHours;
    }
    #endregion

    #region To minutes
    public static double ConvertMillisecondsToMinutes(double milliseconds)
    {
        return TimeSpan.FromMilliseconds(milliseconds).TotalMinutes;
    }

    public static double ConvertSecondsToMinutes(double seconds)
    {
        return TimeSpan.FromSeconds(seconds).TotalMinutes;
    }

    public static double ConvertHoursToMinutes(double hours)
    {
        return TimeSpan.FromHours(hours).TotalMinutes;
    }

    public static double ConvertDaysToMinutes(double days)
    {
        return TimeSpan.FromDays(days).TotalMinutes;
    }
    #endregion

    #region To seconds
    public static double ConvertMillisecondsToSeconds(double milliseconds)
    {
        return TimeSpan.FromMilliseconds(milliseconds).TotalSeconds;
    }

    public static double ConvertMinutesToSeconds(double minutes)
    {
        return TimeSpan.FromMinutes(minutes).TotalSeconds;
    }

    public static double ConvertHoursToSeconds(double hours)
    {
        return TimeSpan.FromHours(hours).TotalSeconds;
    }

    public static double ConvertDaysToSeconds(double days)
    {
        return TimeSpan.FromDays(days).TotalSeconds;
    }
    #endregion

    #region To milliseconds
    public static double ConvertSecondsToMilliseconds(double seconds)
    {
        return TimeSpan.FromSeconds(seconds).TotalMilliseconds;
    }

    public static double ConvertMinutesToMilliseconds(double minutes)
    {
        return TimeSpan.FromMinutes(minutes).TotalMilliseconds;
    }

    public static double ConvertHoursToMilliseconds(double hours)
    {
        return TimeSpan.FromHours(hours).TotalMilliseconds;
    }

    public static double ConvertDaysToMilliseconds(double days)
    {
        return TimeSpan.FromDays(days).TotalMilliseconds;
    }
    #endregion
}
Last month I have blogged on how you can integrate OpenID login support in your ASP.NET aplication. Some of the reader requested me that it would be better if I could show how you can implement membership and roles with OpenID authentication. It doesn’t seems easy in the first place, because you will require a bit more informaton from the user like his name and e-mail address. So, what I am trying to show you here is how you can gather information of the user who has logged in with OpenID and then you can use that information to set roles and membership for your website. I am just extending the old sample project from my previous post to show you how you can get some of the basic information of the user including their e-mail address.
I assume you have downloaded the complete solution from my previous post with OpenID login support, download here if you haven’t yet. There is nothing new to be added in the application, instead we just need to change some properties of the OpenID control we have used. Click the control and press F4 to get the properties up. Set the properties to Request to make sure that whenever a user sign-in with OpenID the API also makes a request to the service provider to get the information of the user signing in. I have request some of the basic information of the user by making them Request. It all depends on the author of the code what information he wants to see/require when the user gets logged in.
Now as you have set the properties, it’s time to make a request to the provider and get the infromation. You need to do something special to get the details, sign-in as normally you would have done, but notice while re-directing the page URL will be something like this (only for a while):
.............&openid.sreg.required=&openid.sreg.optional=nickname%2Cfullname%2Cdob%2Cgender%2Ccountry
Notice the last few options in the query string is requesting the parameters we have “Requested”. But you should also know that the values will be null if the user has not filled up his Persona (Personal Details). If you try to fetch the details of the user, you will get a null value. So, it’s pretty necessary that the user who has logged in using the OpenID should have his personal details filled up at the provider’s end. This is how my personal details look like at OpenID (website) login.
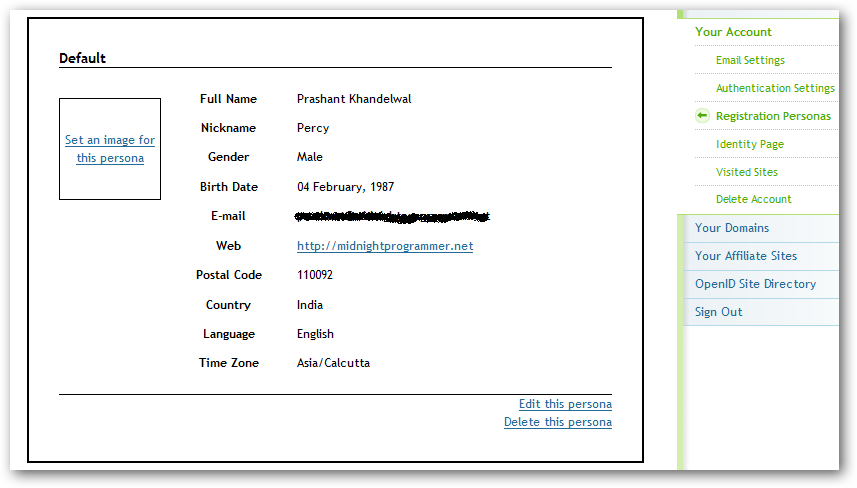
Personas are actually the information of the user which will be delivered to the site or application where the user has logged in using OpenID. You can add/modify/delete a personas. Once you have the persona of the logged in user you can:
I’ve already demonstrate in the above steps on how to set the OpenID user control to request the user details or personas.
What else I need to do
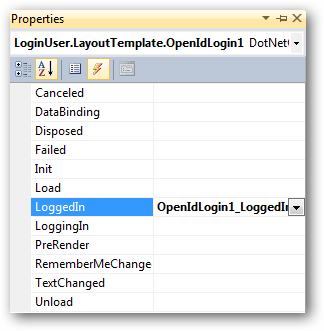
In Visual Studio, select the OpenID control and press F4 to get the properties. Under method section double-click the LoggedIn method (The method name describes itself).
In this method, read the response and set it to the session variable. Give a name to the sesison variable.
protected void OpenIdLogin1_LoggedIn(object sender, DotNetOpenAuth.OpenId.RelyingParty.OpenIdEventArgs e)
{
        Session["OpenID"] = e.Response;
}
When the user is successfully authenticated by the provider, user is re-directed to the default home page. Therefore, we need to handle the response on the home page. Add these two namespaces on the page code-behind.
using DotNetOpenAuth.OpenId.RelyingParty;
using DotNetOpenAuth.OpenId.Extensions.SimpleRegistration;
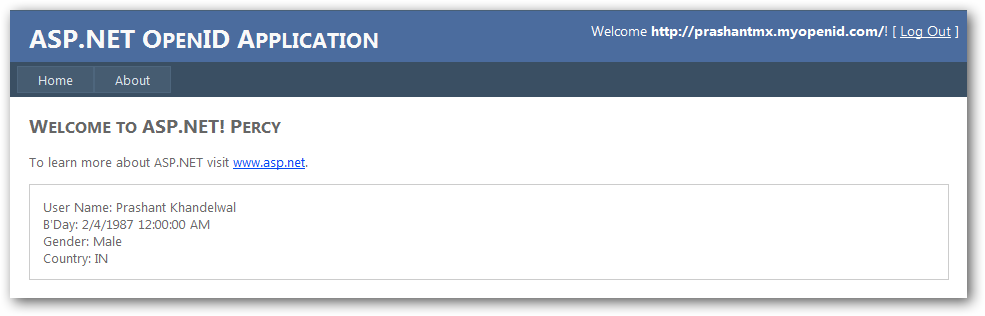
I am using the page load method so as to get the details and display it front of the user, you can also set the same details to fill up a registration form. To read the response from the session variable use the IAuthenticationResponse to read store the session value and then read it with GetResponse<ClaimResponse> method. Below is the complete code for your default.aspx page or the page you want the user to be re-directed. I have store the values in the public variables as I want to show the user details on the default page.
using System;
using System.Collections.Generic;
using System.Linq;
using System.Web;
using System.Web.UI;
using System.Web.UI.WebControls;
using DotNetOpenAuth.OpenId.RelyingParty;
using DotNetOpenAuth.OpenId.Extensions.SimpleRegistration;
namespace DOTNETOAUTH
{
    public partial class _Default : System.Web.UI.Page
    {
        IAuthenticationResponse OResponse;
        public string UserName = string.Empty;
        public string Gender = "No Gender Specified";
        public string Country = string.Empty;
        public string Nick = string.Empty;
        public string Bday = string.Empty;

        protected void Page_Load(object sender, EventArgs e)
        {
            try
            {
                OResponse = (IAuthenticationResponse)Session["OpenID"];
                var details = OResponse.GetExtension<ClaimsResponse>();
                UserName = details.FullName;
                //email = details.Email;
                Gender = details.Gender.ToString();
                Country = details.Country;
                Nick = details.Nickname;
                Bday = details.BirthDate.ToString();
            }
            catch { }
        }
    }
}
If any of the above values are not present in the user persona , it will result in an error, so make sure you have handle the exceptions properly. This is it, once you have the details you can use to store the details in the database, set roles and membership to the user logins. I have skip the part to set user roles and membership, once we have the user information we can use that information to set roles or just save the information in the database.
Download: DOTNETOAUTH - UserData.zip (552.20 kb)
I have found many web developers seeking for help to upload a file in AJAX style, I am not a web developer but among the list of people who used to search the web for some control, way or a workaround to do this. I found a .NET control to do this, but like all good controls….it wasn’t free. But the control worth it.
But now we have an excellent open source plugin called Uploadify. I have been using it for sometime and thought I should now blog and spread a word about it. To implement in your ASP.NET project is simple. Download the latest version of Uploadify from its official site here.
Take a look at the downloaded files. Actually, I need NOT to explain it again to you because the download itself has a PDF file which makes it really simple to understand the working and usage of the plugin. If you need to take a look how this plug-in works, then the best place to look at the demo page at the uploadify page here.
I also compiled a small apllication with ASP.NET to see it in action with ASP.NET
NOTE: The code below I have uploaded is not written by me, I have just compiled a bunch of files under one hood to get it working.
Download: JqueryUploadify.zip (229.05 kb)