
© 2026 Pashant Khandelwal

© 2026 Pashant Khandelwal
Ever since the .NET stack went open source last year, there is a huge excitement among the developers about the .NET stuff and developing apps using .NET which are no longer limited to Windows platform. I tried to install ASP.NET VNext on Ubuntu VM in which I terribly failed in the first go. Why? because the tutorial I used was quite old and I messed up the installation of pre-requisites. But I get everything working in the second try. So here are the steps and commands that will get you started with ASP.NET VNext on Ubuntu.
I am setting up a fresh VM for development on Ubuntu 14.04.2 LTS
First thing is to install Mono. For folks who are new to Linux environment, Mono is a community driven project which allows developers to build and run .NET application on Linux platforms. Here is the set of commands that I have to execute to install Mono.
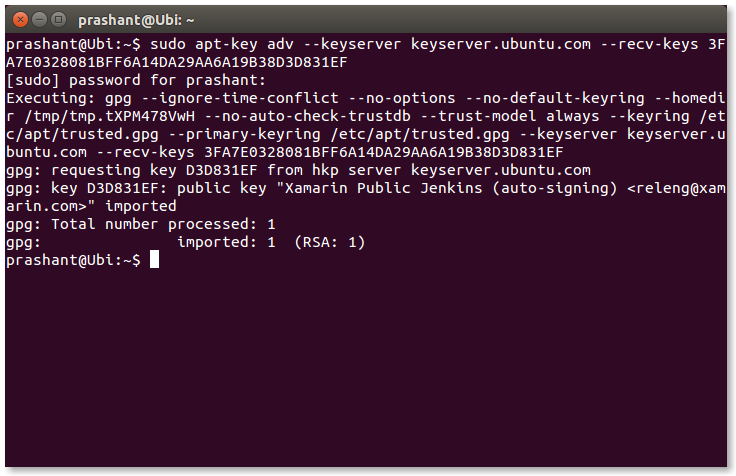
sudo apt-key adv --keyserver keyserver.ubuntu.com --recv-keys 3FA7E0328081BFF6A14DA29AA6A19B38D3D831EF
echo "deb http://download.mono-project.com/repo/debian wheezy main" | sudo tee /etc/apt/sources.list.d/mono-xamarin.list
sudo apt-get update
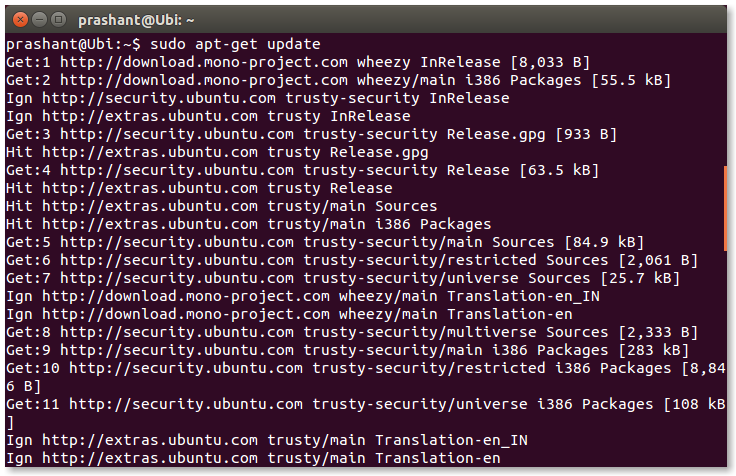
Install the latest version of Mono available.
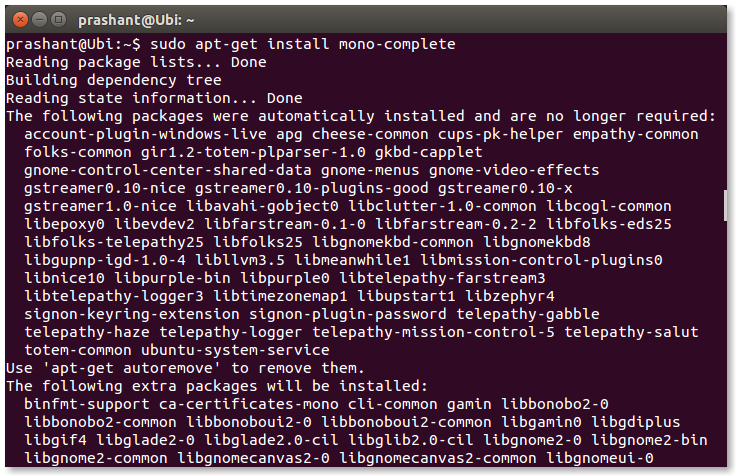
sudo apt-get install mono-complete
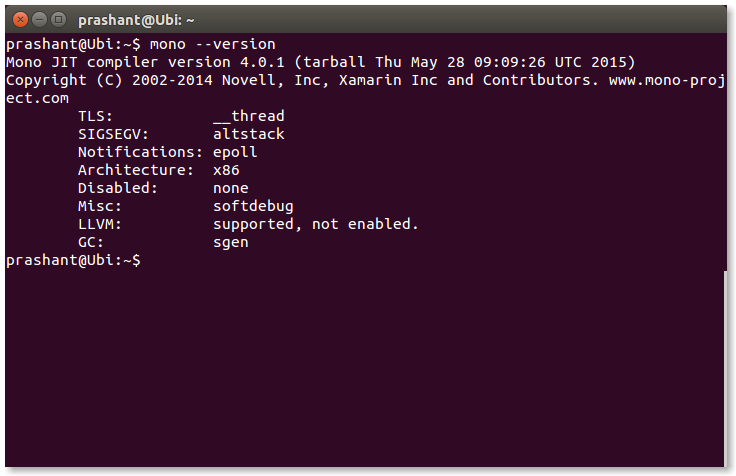
To check if Mono is successfully installed or to determine the version of Mono on you machine run the below command in the terminal.
mono --version
As stated on Github:
Libuv is a multi-platform asynchronous IO library that is used by the KestrelHttpServer that we will use to host our web applications.
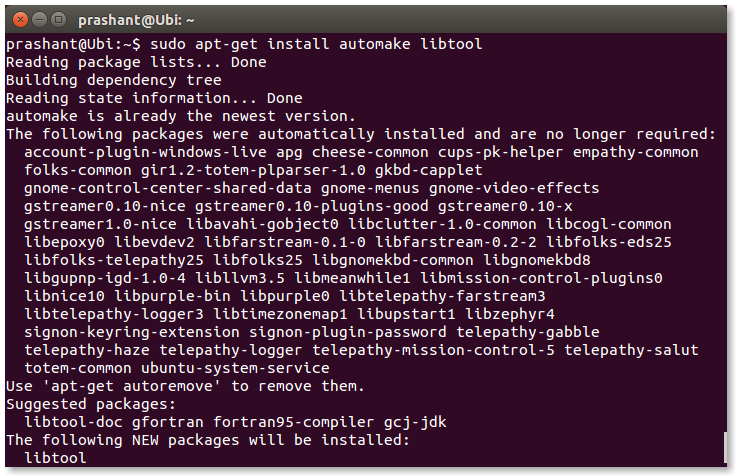
Running the below command will install LibUV along with the dependencies require to build it.
sudo apt-get install automake libtool
Getting the source and building and installing it.
curl -sSL https://github.com/libuv/libuv/archive/v1.9.0.tar.gz | sudo tar zxfv - -C /usr/local/src
cd /usr/local/src/libuv-1.9.0
sudo sh autogen.sh
sudo ./configure
sudo make
sudo make install
sudo rm -rf /usr/local/src/libuv-1.9.0 && cd ~/
sudo ldconfig
Here is a note at Githb repo that explains what the above set of commands are doing.
NOTE: make install puts libuv.so.1 in /usr/local/lib, in the above commands ldconfig is used to update ld.so.cache so that dlopen (see man dlopen) can load it. If you are getting libuv some other way or not running make install then you need to ensure that dlopen is capable of loading libuv.so.1
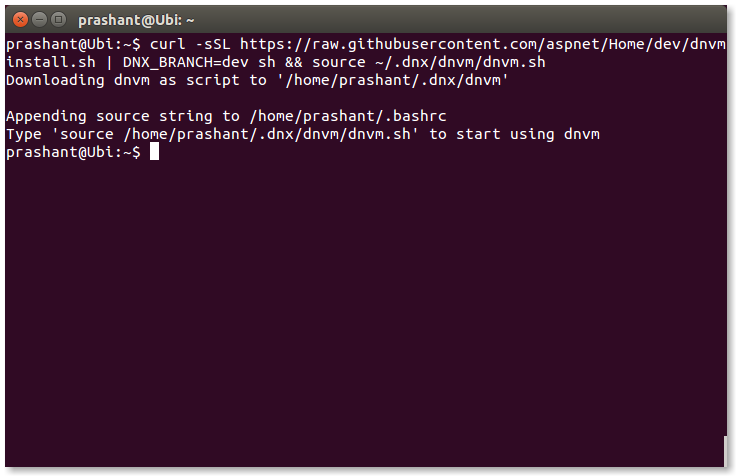
DNVM is a command line tool which allows you to get new build of the DNX (.NET Execution Environment) and allows you to switch between them. To get DNVM running fire the below command in the terminal.
curl -sSL https://raw.githubusercontent.com/aspnet/Home/dev/dnvminstall.sh | DNX_BRANCH=dev sh && source ~/.dnx/dnvm/dnvm.sh
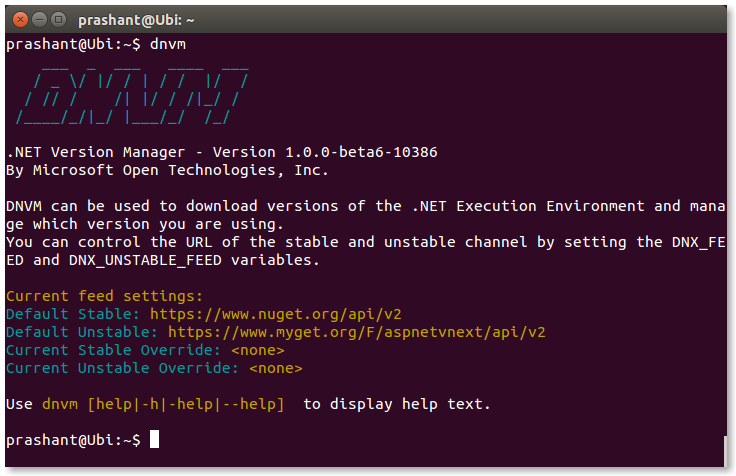
To check if the DNVM is successfully installed on your machine, type DNVM in the terminal. The output should be something like this:
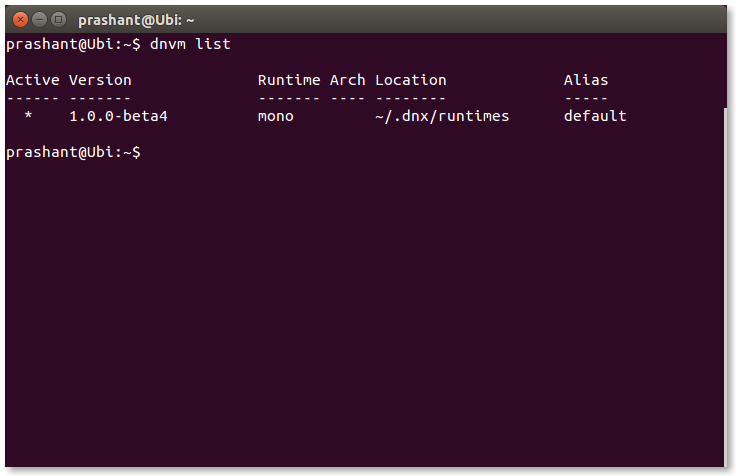
At any point of time if you want to list out the installed DNX runtimes, run the below command
dnvm list
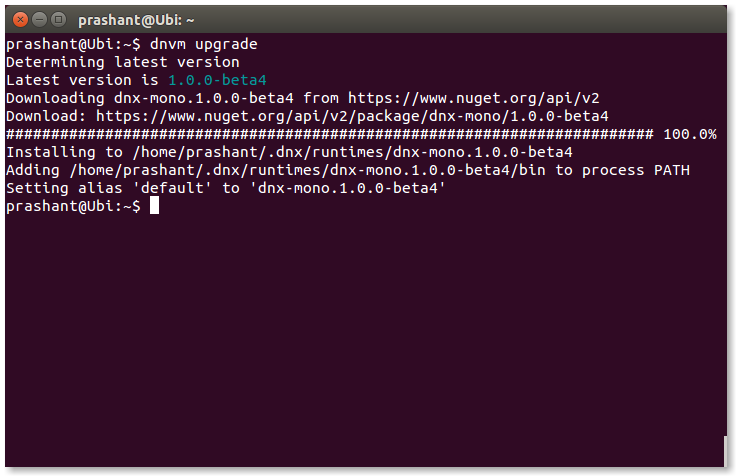
The next step after this, is to upgrade the DNVM so you can use the dnx and dnu commands. Run the following command in the terminal.
dnvm upgrade
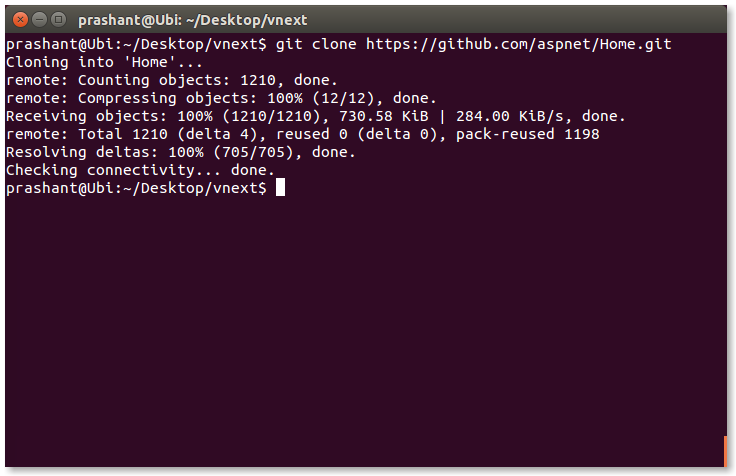
Once this is done, we are all set to run ASP.NET VNext application on Ubuntu box. Clone the aspnet/Home repository from Github. If you don’t have Git installed then install it with this simple command.
sudo apt-get install git
For simplicity, I have created a new directory on Ubuntu desktop named vnext. You can name the directory as you wish. Navigate to this directory in the terminal and clone the aspnet/Home repository.
git clone https://github.com/aspnet/Home.git
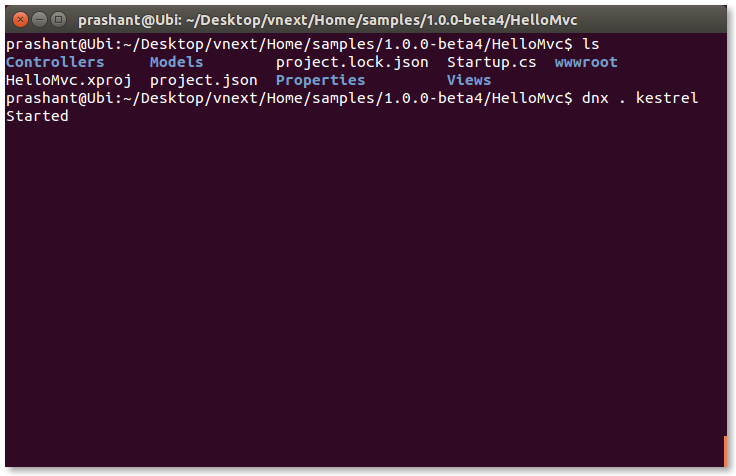
After cloning of repository is done, navigate to the 1.0.0-beta4 directory.
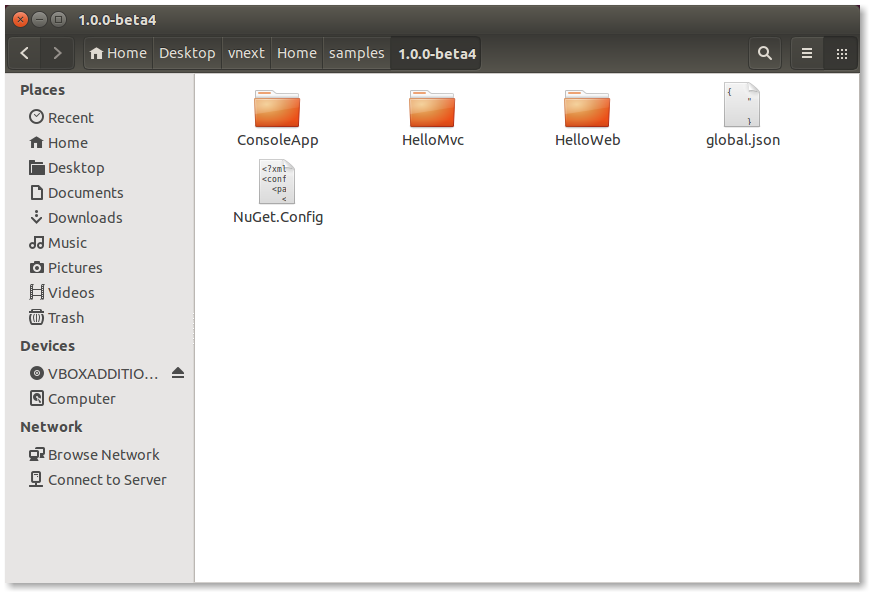
You can see three sample applications that you can test. For this tutorial I am going to checkout HelloMvc application. Get inside the HelloMvc directory and then, run the command
dnu restore
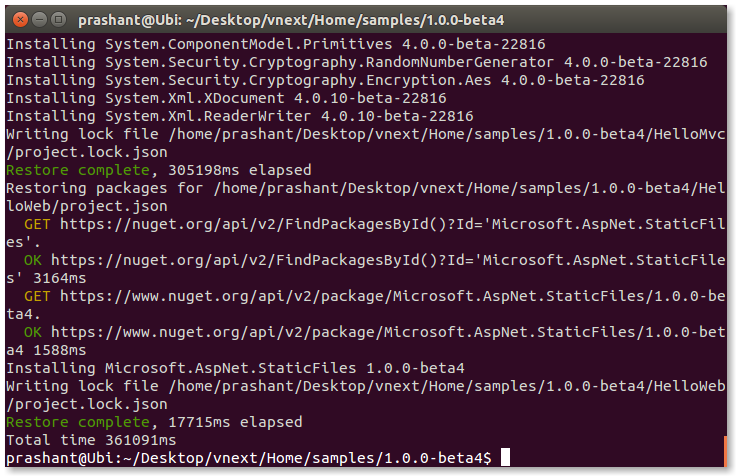
This will take some time to execute. I didn’t face this problem but there is a chance that someone will. When you run this command, the project.json.lock file gets created and the restore of the package will start. In the end when the restore is finalizing, it may say permission is denied. To resolve this error you can change the permission of the folder by running the following command.
sudo chmod -R 755 HelloMvc
You should always change permission to 755 for directories and 644 for files.
After the execution is completed, you can start the server by running the command.
dnx . kestrel
This command will work for both web and mvc application. If you plan to test out the console application then you can run the following command.
dnx . run
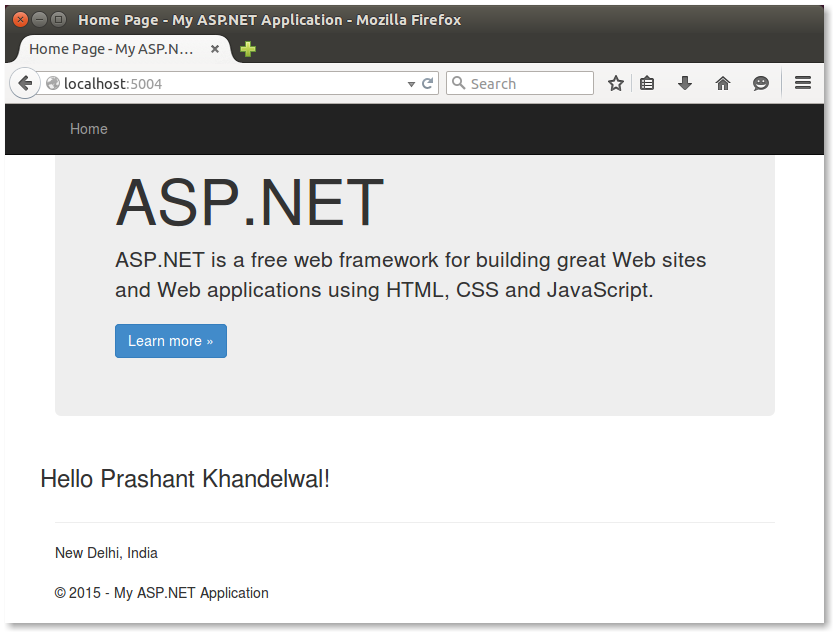
The server runs at port 5004. Fire up the browser and type in http://localhost:5004/
Hope this is helpful for the first time users of Linux.
I am involving myself in reading book these days rather than reading blogs. Here are 2 free e-books, one from Microsoft Press with a valuable insights on Cloud, Fundamental of Azure and the other from Telerik, The Developer's Guide To The New .NET. I encourage you to read both the books, but if you are not about cloud then you should read the book from Telerik.
Microsoft Press - Fundamentals of Azure (Download)
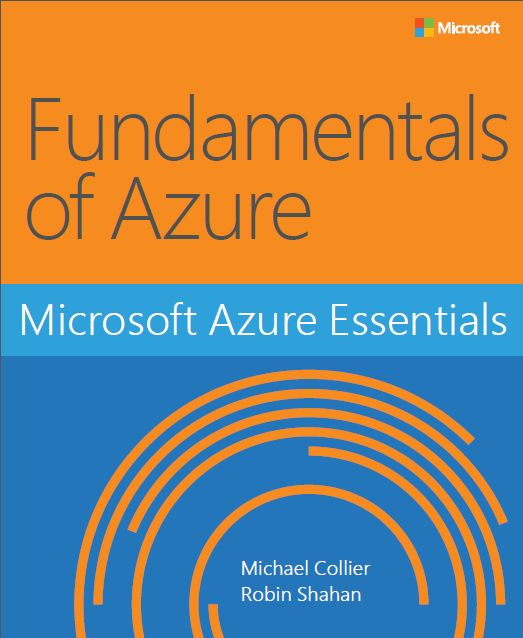
The “Microsoft Azure Essentials” series helps you advance your technical skills with Microsoft Azure. “Microsoft Azure Essentials: Fundamentals of Azure” introduces developers and IT professionals to the wide range of capabilities in Azure. The authors—both Microsoft MVPs in Azure—present conceptual and how-to content for seven key areas and describe management tools and business cases.
Telerik - The Developer’s Guide To The New .NET (Download)
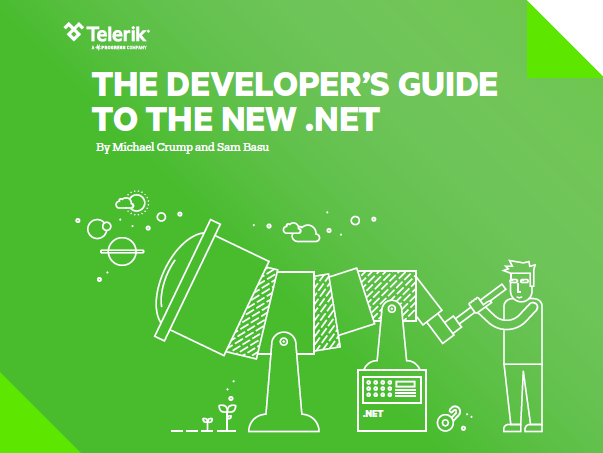
From Telerik
This ebook is no fluff–just a developer-to-developer breakdown of what’s in store for .NET in 2015. Included are code snippets and step-by-step tutorials on handy new features and techniques.
Download for free, and learn more about:
It is fun working with Generics, but sometimes it just won’t work as I intended it to work. While working on a personal project, I was trying to write the code as generic as possible so I can re-use the functions or extension methods in my other projects as well. But it is not always the case, things will not always work as you want it to be. Here is the case of what I was trying to do.
I am working extensively on JSON in this project, so I thought of creating an extension method for the classes I want to serialize to JSON and save it to the file system. Creating the extension method was not a problem, but it turned out to my surprise that I just can’t use the extension method on type T. If I would have paid attention to the detail here before writing the function, I would have noticed the problem. Before I tell you what I did here, here is the extension method which will serialize class to JSON string.
public static string ToJSON<T>(this T Entity) where T : class
{
    return JsonConvert.SerializeObject(Entity);
}
As I want only classes to be serialize, I have a constraint in place that assure me that this extension method should be used when the T is of type Class. I agree with the fact the creating an extension method just for a simple work is an over kill but I am just lazy about writing this line again and again. The application I am working on can support multiple databases and for that I am using Dependency Injection (DI). I wrote this function keeping in mind that I just have to pass the model name i.e. class object and this function will then save the JSON string from the serialized class to the file system.
public bool Save<T>(T Entity, string Path) where T : class
{
    bool IsSaved = false;
    try
    {
        if (!Path.IsNullOrEmpty())
        {
            File.AppendAllText(Path, Entity.ToJSON());
            IsSaved = true;
        }
        return IsSaved;
    }
    catch (Exception x)
    {
        throw x;
    }
}
The above code will not compile. This is because, there is no way for the compiler to know the type of Entity object we are passing. The constraints has nothing to do with it. It is just the compiler who has to know what kind of type it is dealing with. In this case we have a type T which is not resolved at compile time and hence the ToJSON() extension method I am using above, is an assumption from my part that Entity is a class, is not going to work. The important point here is that T is going to resolve at runtime and before that if we try to use the extension method (meant only for class) on type T, the intellisense will never show the ToJSON() extension method in the list.
Now to overcome this problem, we have to make some changes to the above code in order to have the information which the compiler can use and allow us to make use of the ToJSON()extension method. As there is a constraint in place for this function which will only allow us to pass class object as a first parameter, but the case is still the same. The Save function will never know what is the actual type of the Entity. Therefore we can use the Entity object and get the name of the Class like so.
string className = Entity.GetType().Name;
This gives us the name of the class and now we can use it to get the actual type of T and convert it to that type (which will be class). Once we have a class we can then use our ToJSON() extension method. Here is the updated code.
public bool Save<T>(T Entity, string Path) where T : class
{
    bool IsSaved = false;
    try
    {
        if (!Path.IsNullOrEmpty())
        {
            if (Entity.GetType().Name == "Board")
                File.AppendAllText(Path, Convert.ChangeType(Entity, typeof(Board)).ToJSON());
            else if (Entity.GetType().Name == "Story")
                File.AppendAllText(Path, Convert.ChangeType(Entity, typeof(Story)).ToJSON());

            IsSaved = true;
        }
        return IsSaved;
    }
    catch (Exception x)
    {
        throw x;
    }
}
This code will compile and saves the JSON string to the specified path on execution. Notice the Convert.ChangeType function. It’s simple function which you can use to convert one type to your desired type. The only drawback here will be that you have to come here and update the function whenever you have a type of class added in the project which you want to serialize to JSON. The code is still pretty sleek according to me for the type of task I am trying to accomplish.
The type T is very useful, but sometimes it may not solve all your problem.
This is open-source at its best. Running background task to work in context with ASP.NET was and is still a big deal for few developers. I user QueueUserWorkItem to schedule emails when a new comment is added on my blog. This makes sure that the UI is responsive and the user can close or navigate to other post. I have been working on enterprise applications for many years now and most of the long running tasks are running in the background i.e. windows services.
HangFire is not limited to ASP.NET applications, you can even use it in your console applications.
HangFire is an open-source project which allows us to run recurring tasks within the ASP.NET application. No need of scheduling tasks and windows services. Everything will be within the ASP.NET application. When a new comment is added on my blog, an email is sent to my inbox as a notification to moderate it. In a normal scenario it will take a bit more than a normal time to add a comment because an email is also being sent to my inbox. To overcome this problem, I queued the mail process in the background like so:
bool commentSave = _db.AddComment(comment);
if (commentSave)
{
    System.Threading.ThreadPool.QueueUserWorkItem(s=> BlogEmail.SendEmail(comment));
    return Json(new { message = "Thanks for your comment. The comment is now awaiting moderation" });
}
else
    return Json(new { message = "There is an error while saving comment. Please try again later" });
As soon as a comment is added, user will be prompted that comment is added in the DB but the process of sending the email is scheduled in the background. But this approach has a drawback. What if the email sending is failed? As the admin of my blog, will I be able to see the status of the process? HangFire resolves all these questions and it comes with an awesome HangFire monitor which displays the status of all the background tasks in real-time. I will discuss about the HangFire monitor later in this post, but first let’s get started with HangFire.
HangFire is available on NuGet. Firing the below command will automatically add the references in your project and takes care of all the configuration.
Install-Package HangFire
Attempting to resolve dependency 'HangFire.SqlServer (= 0.9.1)'.
Attempting to resolve dependency 'HangFire.Core (= 0.9.1)'.
Attempting to resolve dependency 'Common.Logging (= 2.1.2)'.
Attempting to resolve dependency 'Newtonsoft.Json (= 5.0.0)'.
Attempting to resolve dependency 'ncrontab (= 1.0.0)'.
Attempting to resolve dependency 'Dapper (= 1.13)'.
Attempting to resolve dependency 'HangFire.Web (= 0.9.1)'.
Attempting to resolve dependency 'CronExpressionDescriptor (= 1.10.1)'.
Attempting to resolve dependency 'WebActivatorEx (= 2.0.1)'.
Attempting to resolve dependency 'Microsoft.Web.Infrastructure (= 1.0.0.0)'.
Installing 'Common.Logging 2.1.2'.
Successfully installed 'Common.Logging 2.1.2'.
Installing 'ncrontab 1.0.0'.
Successfully installed 'ncrontab 1.0.0'.
Installing 'HangFire.Core 0.9.1'.
Successfully installed 'HangFire.Core 0.9.1'.
Installing 'Dapper 1.13'.
Successfully installed 'Dapper 1.13'.
Installing 'HangFire.SqlServer 0.9.1'.
Successfully installed 'HangFire.SqlServer 0.9.1'.
Installing 'CronExpressionDescriptor 1.10.1'.
Successfully installed 'CronExpressionDescriptor 1.10.1'.
Installing 'WebActivatorEx 2.0.1'.
Successfully installed 'WebActivatorEx 2.0.1'.
Installing 'HangFire.Web 0.9.1'.
Successfully installed 'HangFire.Web 0.9.1'.
Installing 'HangFire 0.9.1'.
Successfully installed 'HangFire 0.9.1'.
Adding 'Common.Logging 2.1.2' to HangfireDemo.
Successfully added 'Common.Logging 2.1.2' to HangfireDemo.
Adding 'ncrontab 1.0.0' to HangfireDemo.
Successfully added 'ncrontab 1.0.0' to HangfireDemo.
Adding 'HangFire.Core 0.9.1' to HangfireDemo.
Successfully added 'HangFire.Core 0.9.1' to HangfireDemo.
Adding 'Dapper 1.13' to HangfireDemo.
Successfully added 'Dapper 1.13' to HangfireDemo.
Adding 'HangFire.SqlServer 0.9.1' to HangfireDemo.
Successfully added 'HangFire.SqlServer 0.9.1' to HangfireDemo.
Adding 'CronExpressionDescriptor 1.10.1' to HangfireDemo.
Successfully added 'CronExpressionDescriptor 1.10.1' to HangfireDemo.
Adding 'WebActivatorEx 2.0.1' to HangfireDemo.
Successfully added 'WebActivatorEx 2.0.1' to HangfireDemo.
Adding 'HangFire.Web 0.9.1' to HangfireDemo.
Successfully added 'HangFire.Web 0.9.1' to HangfireDemo.
Adding 'HangFire 0.9.1' to HangfireDemo.
Successfully added 'HangFire 0.9.1' to HangfireDemo.
I am using HangFire with ASP.NET MVC application. Here are the few things that you need to configure before you dive in. When installing HangFire via NuGet, it adds HangFireConfig.cs under App_Start folder. HangFire supports Redis, SQL Server, SQL Azure or MSMQ. I am using SQL Server in this demo. The reason we require this storage because it is being used by the HangFire monitor to display the real-time data of the jobs. To configure HangFire to use SQL Server, open HangFireConfig.cs file and change the connection string as per your SQL Server installation.
JobStorage.Current = new SqlServerStorage(
    @"Server=GHOST\SERVER; Database=Jobs;user id=sa; password=pass#w0rd1;");
When the application first starts, all required database objects are created.
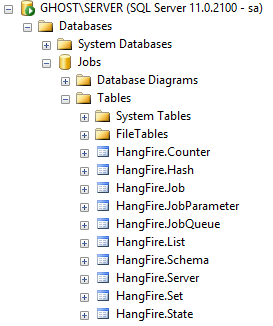
You can find the scripts inside the downloaded package HangFire.SqlServer.0.9.1\Tools\install.sql. The jobs and monitor will be using this database to show me the real-time status of the jobs running in the background. To view the HangFire monitor, simply navigate to http://<sitename>/hangfire.axd. As it is a handler, you can see it in your web.config file. Let’s see it in action:
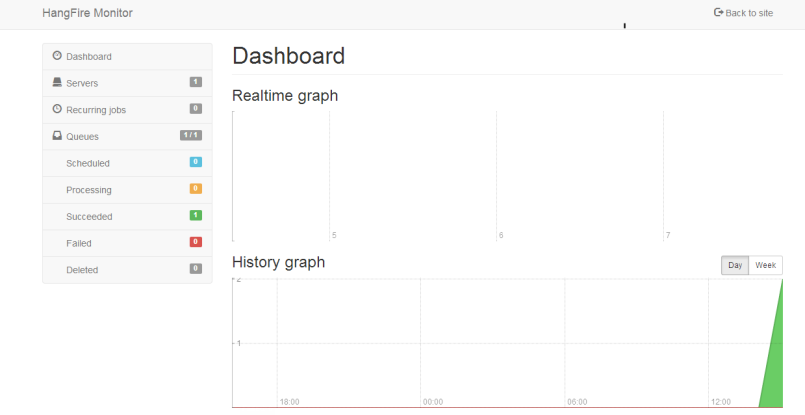
The navigation pane on the right, lets you see the jobs and their status. It let’s you even see the queues which are currently running.
Scheduling jobs using HangFire is easier then I thought it would be. Talking about the same example from my blog which sends email in my inbox when a new comment is added. If I want to schedule the mail send process as a background job I can do it easily using the BackgroundJob class.
bool commentSave = _db.AddComment(comment);
if (commentSave)
{
    BackgroundJob.Enqueue(() => BlogEmail.SendEmail(comment));
    return Json(new { message = "Thanks for your comment. The comment is now awaiting moderation" });
}
else
    return Json(new { message = "There is an error while saving comment. Please try again later" });
As I require it to run only once I just have queue it using the BackgroundJob.Enqueue() method. I can also delay the execution of the job using the Schedule method of the BackgroundJob class.
bool commentSave = _db.AddComment(comment);
if (commentSave)
{
    BackgroundJob.Schedule(() => BlogEmail.SendEmail(comment), TimeSpan.FromMinutes(60));
    return Json(new { message = "Thanks for your comment. The comment is now awaiting moderation" });
}
else
    return Json(new { message = "There is an error while saving comment. Please try again later" });
What if the email sending is failed? The SendMail method throws an exception that the mail sending is failed. HangFire will handle this by default and it will retry automatically 3 more times after a consecutive delay after each retry. But if I want to retry it more than 3 times then I can make use of the AutomaticRetry attribute and pass the number of retries I want, something like this:
[AutomaticRetry(Attempts = 5)]
public bool SendEmail(Comment comment)
{
    //Email code
}
Let’s say if I do have another method that I want to run every minute (it’s an overkill for my blog) then I will make use of RecurringJob class.
RecurringJob.AddOrUpdate(() => Storage.PunchIt(), Cron.Minutely);
Cron enum allows me to schedule a job daily, weekly, monthly, yearly, hourly and minutely. Now as my job is schedule in the background, time to take a look at HangFire monitor.
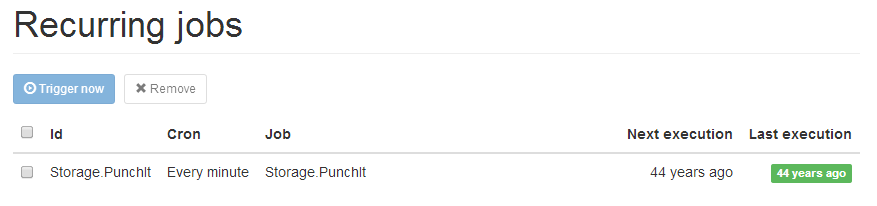
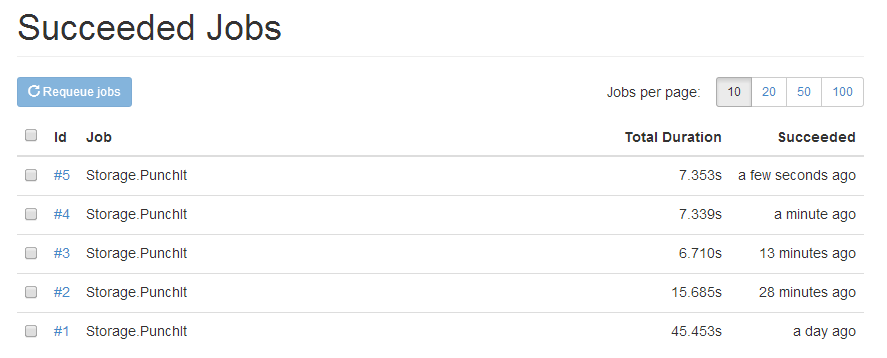
I have no idea why my Recurring Jobs screen is showing Next and Last execution time as 44 years ago. But you can see the Succeeded Jobs with a minute interval (#5 and #4). HangFire uses persistent storage and therefore you can trigger the job at your will or remove it when you feel like it. That means you configure the job in the code and manage it from the HangFire monitor.
I just showed you how easy it can be scheduling jobs using HangFire. But there are more advanced topics which you should be looking into for more complex implementation. HangFire supports logging, dependency injection using Ninject, multiple queue processing and more.
Building real-time applications with SignalR is easy. But building real-time applications with JavaScript will be a problem if you are not aware of Firebase. I first heard of it when I was learning AngularJS. The official AngularJS site has the example where you can add, edit and delete the detials in real-time. This example uses Firebase as the storage and updates the UI in real time.
The data is stored in JSON format and accessing it using jQuery makes it very easy. Firebase API is pretty powerful and lets you get started in minutes. To get started with Firebase, you have to first create a new account with Firebase. It’s a paid service but for now you can opt for a developer account. As soon as your account is created you will be redirected to your dashboard where you can create a new application or use the one which is there by default from Firebase. Take the note of the URL ending with firebaseIO.com, we will be needing it later on at the time of implementing.
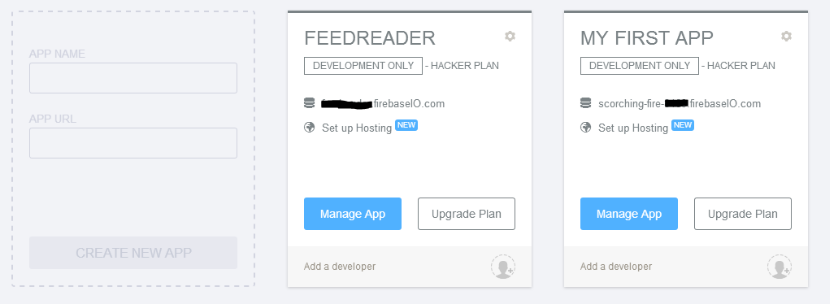
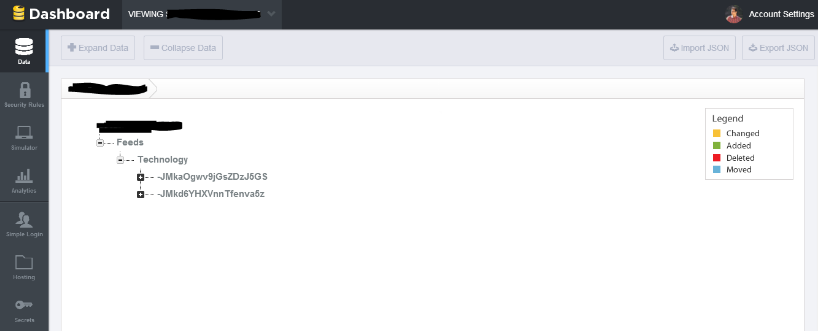
Clicking on Manage App button will take you to the details page of the application. Where you can view/edit/import/export the data in the JSON format, authentication from Facebook, Twitter, Google etc, simulate read/write operation and more. You can see the sample data in JSON format I have been testing in the below screenshot. If you already have a JSON file, you can directly import it from the dashboard using the Import JSON feature.
For this example I am using jQuery and AngularJS. If you wish you can just stick to jQuery. Create a new HTML page and add Firebase JS references in the head section. I am using AngularJS so I am going to add AngularJS reference as well.
<script src="http://ajax.aspnetcdn.com/ajax/jQuery/jquery-1.7.2.min.js" type="text/javascript"></script>
<script src="//ajax.googleapis.com/ajax/libs/angularjs/1.2.15/angular.min.js"></script>
<script src="https://cdn.firebase.com/js/client/1.0.11/firebase.js"></script>
<script src="https://cdn.firebase.com/libs/angularfire/0.7.1/angularfire.min.js"></script>
You get the first three references but the last reference is the AngularFire which is a quick way to work with Firebase applications with AngularJS. This is AngularJS code with firebase dependency.
var feedApp = angular.module('feedDataApp', ['firebase']);

feedApp.controller('feedListController', function ($scope, $firebase) {
    var fbURL = new Firebase("https://scorching-fire-0000.firebaseio.com/Feeds/");
    $scope.feedsList = $firebase(fbURL);

    $scope.save = function () {
        $scope.feedsList.$add({
            Name: $scope.feedsList.Name,
            Url: $scope.feedsList.Url,
            Description: $scope.feedsList.Description

        });
        $(":text").val('');
    }
});
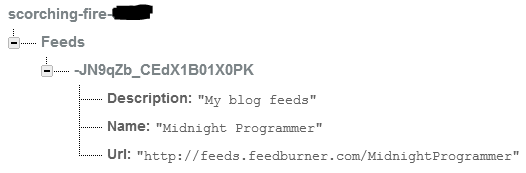
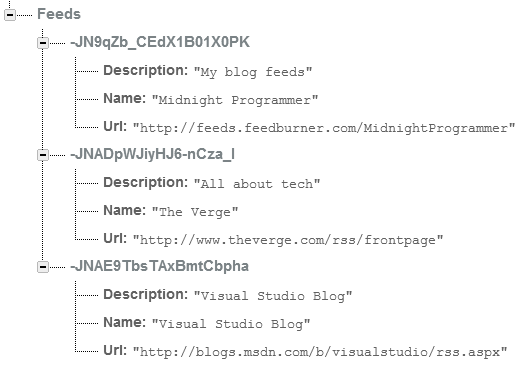
I am not getting into the basics of AngularJS, but I will explain few things in the above code. The first line in the above code has the dependency named firebase, in simple AngularJS apps we could have skip the dependecies. Then I have the controller named feeListController, which is accompanied by a very own $scope and new param which is $firebase. Inside the controller I have a variable fbURL which holds my Firebase URL. If you see here, you willl notice that I have appended the URL with Feeds. This is because I want my data to be saved inside the Feeds section in the Firebase storage. The $scope.feedsList will hold the collection of all my entries I have in my storage. I have the save function which will save the details to my storage. Inside the Firebase’s $add function, I have passed Name, Url and Description. You can pass as many params as you want. the best thing is that you don’t even have to set the storage schema. As soon as you click the save button, a new entry is created in the storage. This is my storage looks like.
If you don’t want to save it under the Feeds section then in the above JS file you just have to remove the Feeds from the above URL. The UI for this demo is simple, just listing down the saved JSON data in a readable form using AngularJS.
<div ng-controller="feedListController">
    <table class="table">
        <tr>
            <td>
                Name
            </td>
            <td>
                Url
            </td>
            <td>
                Description
            </td>
        </tr>
        <tr ng-repeat=" feeds in feedsList">
            <td>{{feeds.Name}}</td>
            <td>{{feeds.Url}}</td>
            <td>{{feeds.Description}}</td>
        </tr>
        <tr>
            <td>
                <input type="text" ng-model="feedsList.Name" /><br />
            </td>
            <td>
                <input type="text" ng-model="feedsList.Url" /><br />
            </td>
            <td>
                <input type="text" ng-model="feedsList.Description" /><br />
            </td>
            <td>
                <button type="submit" ng-click="save()">Add Feed</button>
            </td>
        </tr>
    </table>
</div>
Using a simple design I have displayed the details using AngularJS.

The best part is the as soon as I add a new feed details, it will get updated in the UI in real-time. Open the same page on a different browser and add a new entry. You will notice that the data is updated in real-time.

Firebase is not limited for web, it is available for iOS/OS x, Java/Android, Node.js, Ember etc. Building mobile applications using Firebase as a real-time storage will be an amazing thing to do. This is not a very good example for Firebase with AngularJS but this will get you started with Firebase and let you test a part of your application using this awesome real-time storage.
I would recommend you to look at this web application build completely on Firebase and AngularJS.